TX / TXH / TXB 180S - 400L (Rev. 4/23/07)TX / TXH / TXB 180S - 400L (Rev. 4/23/07)
22-1022-10
(14-16 N(14-16 N⋅⋅m).m).
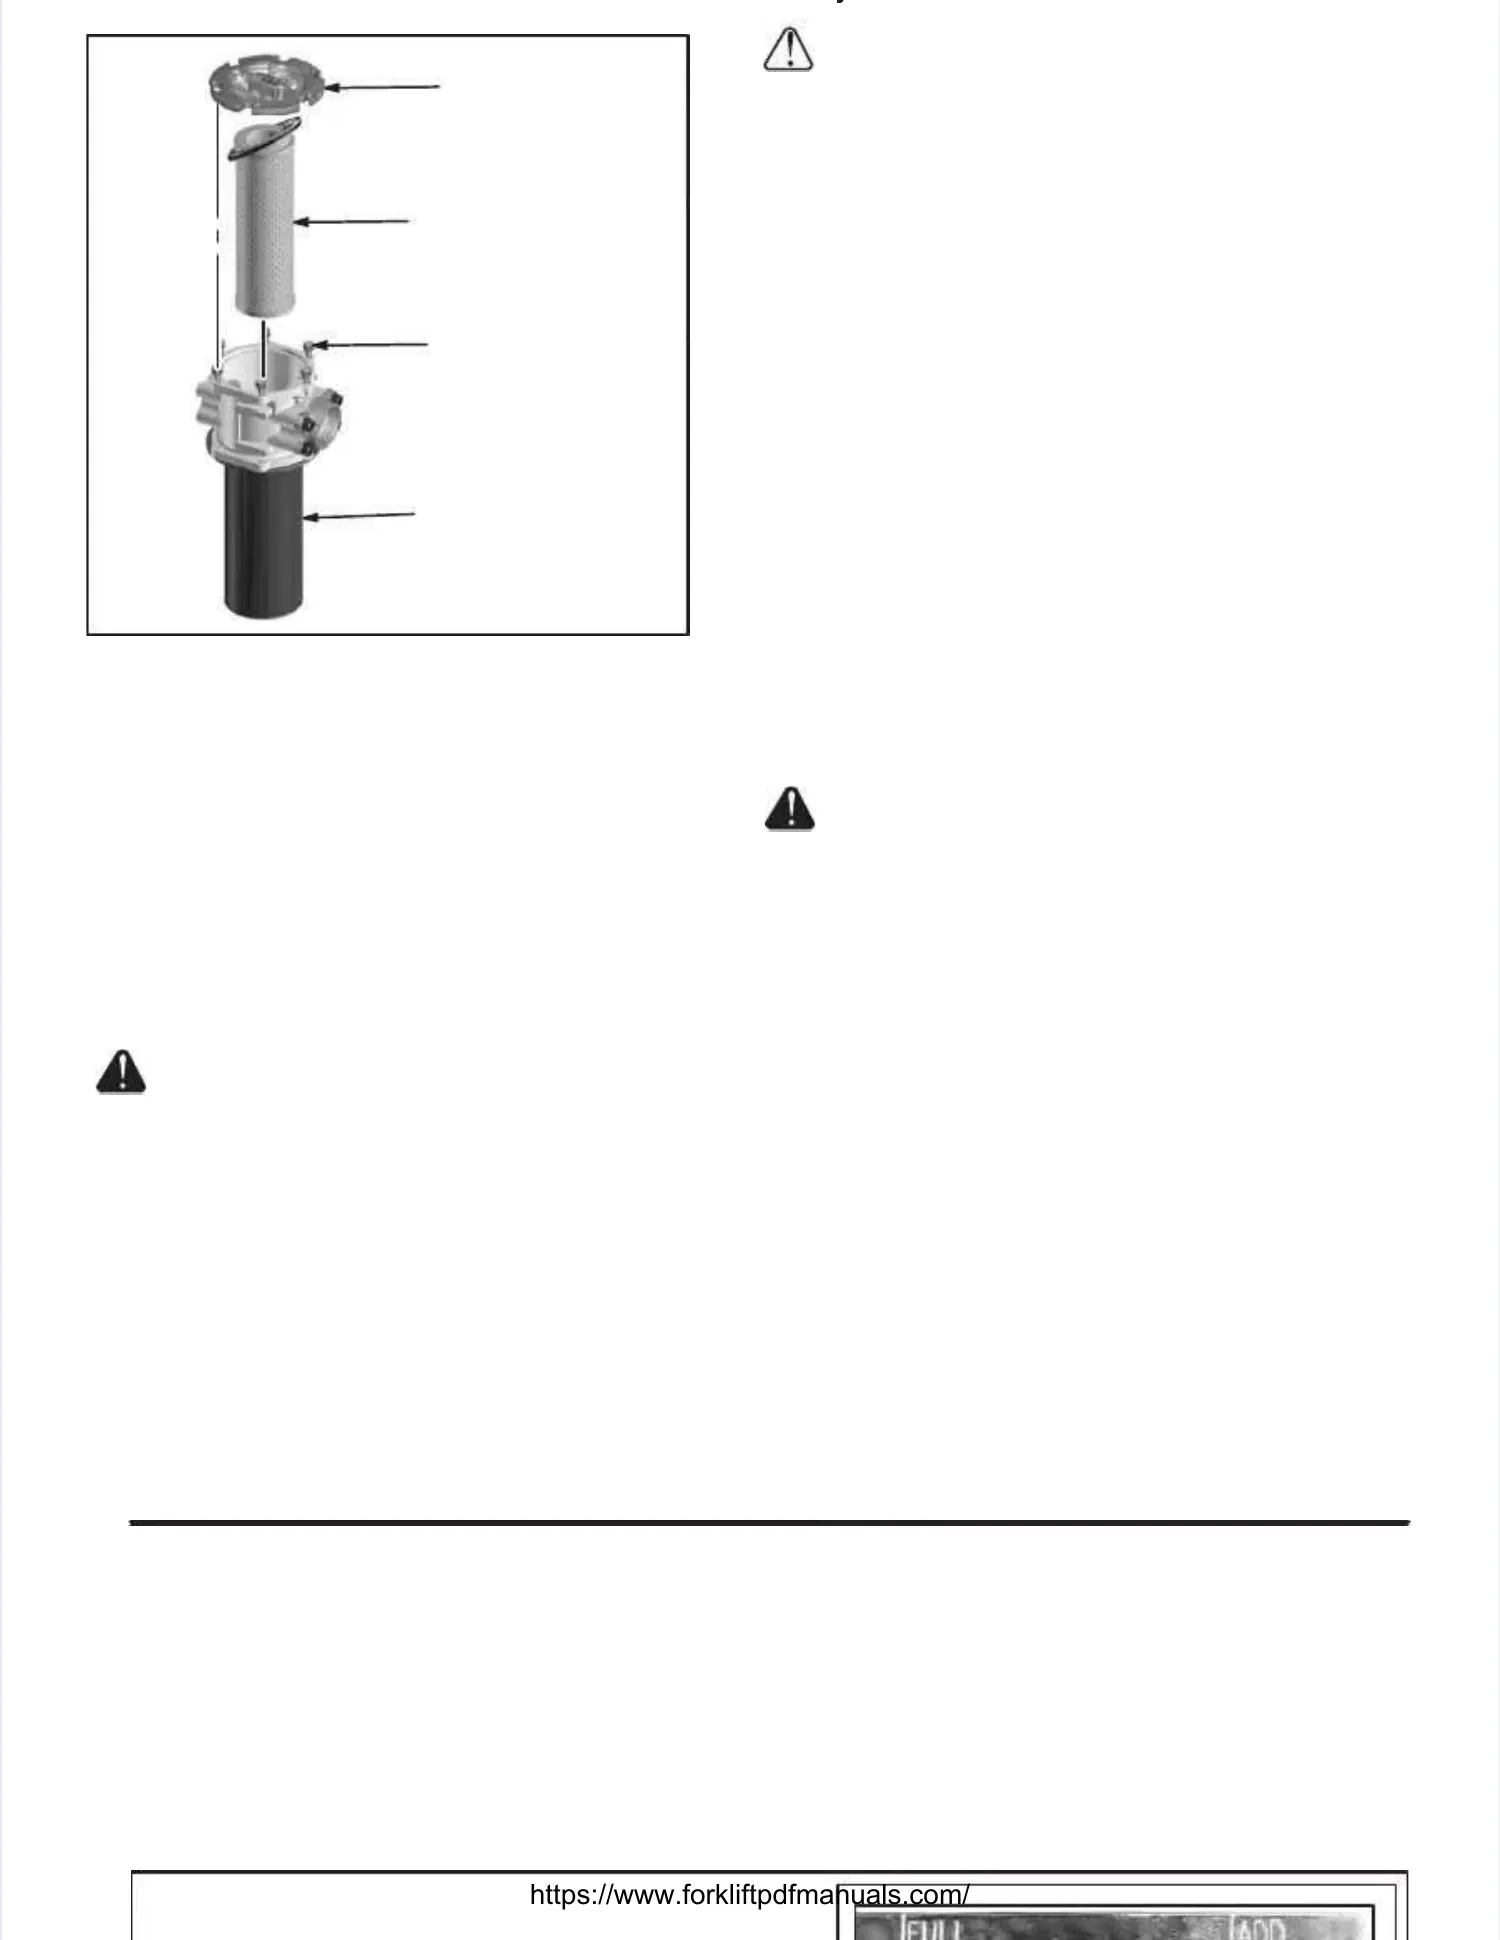
FILTERFILTER
HEAD / BOWLHEAD / BOWL
ASSEMBLASSEMBLYY
BOLTBOLT
RETURNRETURN
FILTERFILTER
COVERCOVER
Illustration 22-15. Illustration 22-15. Hydraulic Hydraulic Return Return FilterFilter
Changing The Hydraulic FluidChanging The Hydraulic Fluid (Illustration(Illustration
22-16)22-16).. The hydraulic The hydraulic fluid should fluid should be changedbe changed
periodically (refer to theperiodically (refer to the Preventive MaintenancePreventive Maintenance
chart in thechart in the AppendicesAppendicesfor hydraulic fluid changefor hydraulic fluid change
interval). interval). The hydraulic The hydraulic fluid must fluid must also bealso be
changed in the event of a catastrophic failure of achanged in the event of a catastrophic failure of a
hydraulic hydraulic component. component. Refer Refer to theto the Fuel andFuel and
Lubricant SpecificationsLubricant Specificationschart in thechart in the Appen-Appen-
dicesdicesfor the proper type of fluid to be used andfor the proper type of fluid to be used and
perform the following procedures to change theperform the following procedures to change the
hydraulic fluid:hydraulic fluid:
Death or serious injury couldDeath or serious injury could
result from result from a runaway truck. a runaway truck. Park the truck Park the truck onon
a hard, level surface, apply the parking brake,a hard, level surface, apply the parking brake,
block the wheels in both directions to preventblock the wheels in both directions to prevent
movement of the truck and Lock-Out & movement of the truck and Lock-Out & TTag Outag Out
yy
Plug all hoses when they arePlug all hoses when they are
disconnected to prevent foreign matter fromdisconnected to prevent foreign matter from
entering the hydraulic system.entering the hydraulic system.
1.1. Park tPark the trhe truck on a hauck on a hard, lerd, level svel surfurfaceace, blo, blockck
the wheels in both directions, apply the park-the wheels in both directions, apply the park-
ing brake and Lock Out & Tag Out the truck.ing brake and Lock Out & Tag Out the truck.
2.2. ProvidProvide a sue a suitablitable conte containerainer, re, remove move the the draindrain
plug and drain the hydraulic fluid.plug and drain the hydraulic fluid.
3.3. RemRemove tove the ache accescess cap fs cap from trom the hyhe hydradrauliulicc
tank.tank.
4.4. RemRemove ove the the brebreathather er filfilterter..
5.5. RemRemove tove the rehe returturn fin filtelter (rr (refeefer tor to HydraulicHydraulic
Return Filter ReplacementReturn Filter Replacementfor removal pro-for removal pro-
cedures).cedures).
6.6. RemRemove thove the sucte suction stion strairainerners from ts from the hydhe hydraurau--
lic tank and lic tank and clean in solvent. clean in solvent. Dry with comDry with com--
pressed air.pressed air.
7.7. AftAfter aler all the fl the fluiluid has bd has been dreen drainained fred from thom thee
tank, remove the access cover(s) andtank, remove the access cover(s) and
O-ring(s).O-ring(s).
8.8. Steam Steam clean clean the the interiinterior oor of thf the hyde hydraulic raulic tank.tank.
Do Not clean the interior ofDo Not clean the interior of
the hydraulic tank with a flammable solvent;the hydraulic tank with a flammable solvent;
this can create a serious fire hazard.this can create a serious fire hazard.
9.9. InsInstaltall nl new ew retreturn urn filfilterter..
10.10. Re-insRe-install suction straintall suction strainers.ers.
11.11. Re-install accesRe-install access cover(s) s cover(s) and O-ring(s).and O-ring(s).
Inspect O-ring(s) and replace if necessary.Inspect O-ring(s) and replace if necessary.
12.12. Re-insRe-install the draitall the drain plug.n plug.
13.13. Install new Install new breather filterbreather filter..
14.14. Slowly fill tank Slowly fill tank with hydraulic fluid with hydraulic fluid from the fillerfrom the filler
filter port (see Illustration 22-16) while inspect-filter port (see Illustration 22-16) while inspect-
ing for leaks (pay particular attention to theing for leaks (pay particular attention to the
access covers). access covers). If a leak If a leak is detected, is detected, repairrepair
before adding before adding additional hydraulic additional hydraulic fluid. fluid. IfIf
there are no leaks detected, fill the hydraulicthere are no leaks detected, fill the hydraulic
tank to the FULL mark on the fluid level dip-tank to the FULL mark on the fluid level dip-
stick (see Illustration 22-16).stick (see Illustration 22-16).
15.15. Inspect hydraulic Inspect hydraulic tank fittings tank fittings and hoses forand hoses for
leaks. leaks. Tighten Tighten connections / bolts connections / bolts as required.as required.
Hydraulic Hose Assemblies and Fittings.Hydraulic Hose Assemblies and Fittings. AllAll
hydraulic hose assemblies should be checkedhydraulic hose assemblies should be checked
daily for chafdaily for chaffing or fing or cracking. cracking. Check daily Check daily toto
ensure that there are no loose fittings on theensure that there are no loose fittings on the
hydraulic connections.hydraulic connections.
 Loading...