ENGLISH
15
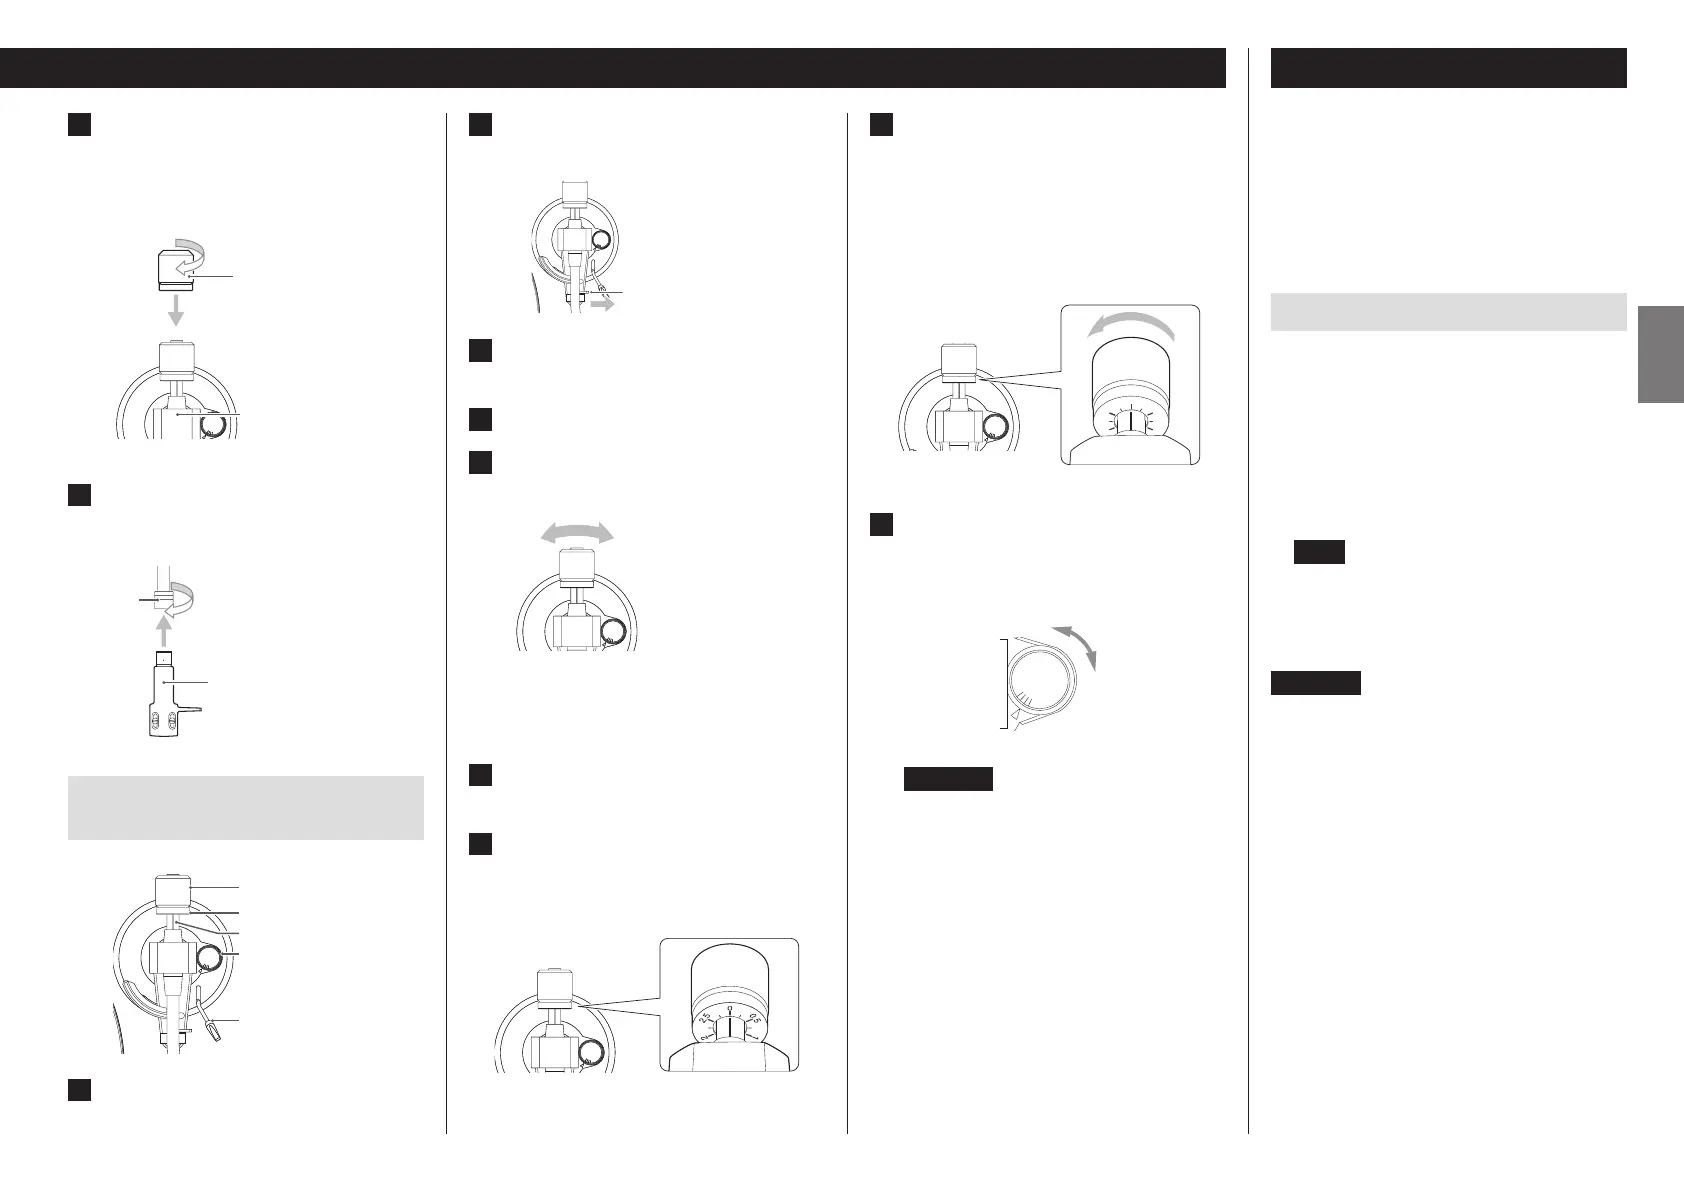
7 Install the counterweight.
Place the counterweight over the end of the tone arm,
and press it gently as you turn it right to attach it.
o When the counterweight can be moved toward the
bearing, installation is complete.
A
N
T
I
–
S
K
A
T
I
N
G
3
0
A
N
T
I
–
S
K
A
T
I
N
G
3
0
Counterweight
Bearing
8 Install the headshell.
Insert the headshell on the end of the tone arm and turn
the nut to secure it in place.
Headshell
Nut
Balancing the tone arm and adjusting
the tracking force
A
N
T
I
–
S
K
A
T
I
N
G
3
0
A
N
T
I
–
S
K
A
T
I
N
G
3
0
Anti-skating dial
Arm lifter lever
Counterweight
Tracking force adjustment ring
Center line
1 Set the anti-skating dial to zero.
2 Move the tone arm clasp to the right to
release the tone arm.
Clasp
A
N
T
I
–
S
K
A
T
I
N
G
3
0
A
N
T
I
–
S
K
A
T
I
N
G
3
0
3 Raise the arm lifter lever and shift the
tone arm to the left slightly.
4 Lower the arm lifter lever.
5 Turn the counterweight and adjust so
that the tone arm is level.
A
N
T
I
–
S
K
A
T
I
N
G
3
0
A
N
T
I
–
S
K
A
T
I
N
G
3
0
o Remove the protective cap from the cartridge stylus
before adjusting.
o Be careful not to let the cartridge stylus touch the
unit.
6 Return the tone arm to its original posi-
tion, and use the clasp to lock it.
7 Turn the tracking force adjustment ring
so that the center line aligns with 0 on
the scale.
A
N
T
I
–
S
K
A
T
I
N
G
3
0
A
N
T
I
–
S
K
A
T
I
N
G
3
0
o Only turn the ring. Be careful not to let the counter-
weight turn.
8 Turn the counterweight so that the
tracking force adjustment ring scale
matches the tracking force specied for
the cartridge.
o The tracking force of the included cartridge is 2.0 g.
So, turn it to 2.0 on the counterweight scale when
using the included cartridge.
A
N
T
I
–
S
K
A
T
I
N
G
3
0
A
N
T
I
–
S
K
A
T
I
N
G
3
0
0
2.5
2
1.5
1
0.5
o Turn it right from 0 in the direction of 0.5 and 1.0.
9 Adjust the anti-skating dial.
Start with it set at 2.0 and adjust it during record playback
(page18) to the position where the left and right volumes
are balanced.
A
N
T
I
–
S
K
A
T
I
N
G
3
0
ATTENTION
Depending on the condition of a record, the left-right
volume balance could become uneven and skipping
could occur.
In such cases, try making the following adjustments.
If the sound jumps backward (stylus skips backward)
Slightly lower the anti-skating dial setting.
If the sound jumps forward (stylus skips forward)
Slightly increase the anti-skating dial setting.
Notes about record styluses
o If the stylus becomes bent (damaged), it will no longer
be able to accurately trace the groove. Since a bent stylus
could also damage records and cause malfunction, handle
styluses carefully.
o Always use a commercially-available stylus cleaner to clean
a stylus. Use of anything other than a stylus cleaner could
damage the stylus.
Replacing the stylus
If the tip of the stylus becomes worn, not only will it worsen
the sound quality, it could also damage records. After about
300 hours of playback time, replace the stylus with one that
we specify.
Please use an Audio-Technica AT-VMN95E replacement stylus.
o An Audio-Technica AT-VM95E VM Type cartridge is installed
in this unit.
(The body of the replacement stylus for the installed cartridge
is green.)
NOTE
VM type cartridges have the same characteristics as MM
type cartridges.
o Follow the replacement instructions in the manual of the
replacement stylus.
ATTENTION
o Since loud noises could suddenly occur, put the unit into
standby before changing the stylus.
o Be careful not to hurt your hand or the equipment.
o Be careful not to allow small children to accidentally swallow
styluses.
o Be aware that bent styluses, for example, that result from
insufficient customer caution or an outside cause are not
covered by the warranty.
 Loading...