4
TX-200, 5009, 09/22
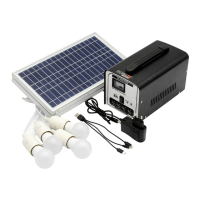
Product overview
Voltage Indicator of battery
Solar panel input
DC input 14.8V / 1A
Output LED 12V / 1A total
First use
Charge the battery with the AC charging cable by plugging it into the power station (5)
and a 110V-230V 50-60Hz AC outlet until the indicator LED (4) turns solid green. This
may take approximately 6-9 hours.
LED indicator light
The indicator LED (4) of the device shows the charging status of the device according:
Green slow flashing light
Slow flashing orange light
LED light bulb system
Plug the cable of the three LED light bulbs into the LED bulb output (6) at the device
to power them. Each light bulb can be turned on and off separately with the switch at
the power cord of the bulb.
WARNING: Never plug the LED bulb into an E27 socket with more than 12V.
The LED bulb may become very hot. It may cause an electronic shock and/or a
house fire.
USB output
To charge devices via the USB output (2), plug your USB charging cable into the USB
port and connect the device to be charged to the USB charging cable.
SOLARSYSTEM
LOADCHARGE
BATTER
Y VOLTAGE
POWER
USB 5 V OUTPUT
L1
D C12VOUTPUT
L2 L3 L4
CHARGE
AC TO DC 14V CONVERTER
2
3
4
5
6
7