par
by
450.699.2424–1877.377.4494450.699.8484info@technoform.cawww.technoform.ca
TSSK38202003‐08
Thisproducthasbeendesigned withsomeadjustability forminor alignmentproblems;however,ifthe
wallsandfloorsurfacearenotsolid,plumbandsquare,itmayresultinapoorinstallation.
Thisproductshouldnotbeinstalledinareaswherethetemperaturemaydropbelowfreezing(32ºFor
0ºC).
Useshippingcardboardtoprotecttheproductwhileinstalling.
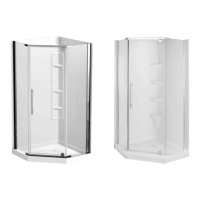
Showerbase:Innewconstruction,prepareshoweralcoveusingdimensionsshowninfigure2.Thealcove
shouldbeframedin2"X3"lumberand coveredwith 1/2"drywall. It must bebuiltplumbandsquare to
insureproperfitoftheshower.Ifyouareinstallingoveraconcrete floor, clear away concrete around the
existingdrainpipetoaccommodatethedrainbody(Fig.3).
Showerwall:Allowpanelstoreachroomtemperaturefor30minutes before installing. In case of a
windowopeningorforanadjustmentrequiringacut,werecommendthatyoucutthepanelswiththe
helpofautilityknife.Planaheadtheperforationsrequiredfortheplumbing.Werecommendthatyou
useaholesawtoproceed.Thewallsshouldbecoveredwith1/2"drywallorwater‐resistantdrywall.The
wallsmustbedryandfreeofdirt,waxandsoap,oranyotherresidue.Wallpapermustberemoved.Do
notinstallpanelsoverexistingceramictileorplywood.
ÉTAPESÀSUIVRE–BASEDEDOUCHE|STEPSTOFOLLOW–SHOWERBASE
1. Installezlabasededouchedansl'alcôveetassurez‐vousqu'ellesoitdeniveau.Tracezunelignerepère
pourladécoupeduplacoplâtre.Retirezlabasededouchedel'alcôve.
2. Découpezleplacoplâtresurunelongueurde38"X41/2"lelongdelabasededouche,dechaquecôté,
selonvotrelignerepère.
3. Installez le drain dans la basede douche (Fig.3). Si unscellant additionnel est requis,un calfeutrant
d'acryliqueouuncordondeplombier(mastic)devraitêtreutilisé.
4. Coupezletuyaududrainà13/4''àpartirdudessousduplancher(ouà21/2''àpartirdudessusdu
plancher)(Fig.3).Repositionnezlabasededouchedanssonalcôvepar‐dessusledrain.
5. Percezdestrousdanslabridedecarrelage(3dechaquecôté)àl'aided'unemècheàfraiser,puisvissez
danslesmontantsmurauxàl'aidedevisno.8X11/4(Fig.1+4).
6. Terminezl'installationdudrainselonlesinstructionsdumanufacturier.
1. Placetheshowerbaseintothealcoveandmakesurethatitislevelled.Traceapencillineforthecutting
ofthedrywall.Removetheshowerbase.
2. Cutadrywallsectionof38"X41/2"alongtheshowerbase,oneachside,asperyourpencilline.
3. Installthedrainontheshowerbase(Fig.3).Ifadditionalsealantisrequired,acryliccaulkorplumbers
puttyshouldbeused.
4. Cutthedrainpipeat13/4''fromunderneaththefloor(orat21/2''fromabovethefloor)(Fig.3).Placethe
showerbaseintothealcoveoverthedrainpipe.
5. Drillcountersinkholesthroughthetilingflange(3screwsoneachside),thensecurewithno.8X1¼screwson
thestuds(Fig.1+4).
6. Finishthedraininstallationasperthemanufacturer'sinstructions.
 Loading...