Do you have a question about the Teka IR 631 and is the answer not in the manual?
Important safety guidelines for using the appliance.
Instructions for hob placement and ventilation.
Procedures for electrical connection and safety requirements.
Overview of the hob's technical specifications and class.
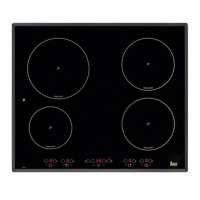
Guide to operating the hob's touch control panel and elements.
Explanation of the 'Power' function for increased heat output.
Addresses issues like lack of heating and buzzing sounds.
Solutions for control panel not turning on or random bleeping.
Explains fan noise and power reduction due to overheating.
Addresses hotplates powering off unexpectedly or timed hotplates failing.
This document provides comprehensive instructions for the installation, use, and maintenance of Teka induction hobs, including models IR 631, IT 631, IR 641, IT 641, IRC 631, IR 630, IT 630, and IR 831. It emphasizes safety, proper installation, and effective operation to ensure the appliance's longevity and optimal performance.
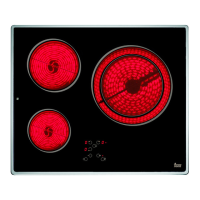
Teka induction hobs are modern cooking appliances designed for efficient and precise cooking. They utilize induction technology, which heats cookware directly through electromagnetic fields, offering faster heating times and improved energy efficiency compared to traditional electric or gas hobs. The hobs feature multiple cooking zones, each with adjustable power levels, and some models include a "Power" function for an extra boost of heat. A key feature of induction hobs is their ability to detect cookware, ensuring that a cooking zone only activates when a suitable pot or pan is placed on it. This not only enhances safety but also prevents energy waste.
The control panel is touch-sensitive, allowing users to easily select cooking zones, adjust power levels, and access various functions with a simple touch of a finger. An acoustic signal confirms each action. The hobs also incorporate a residual heat indicator (H) to warn users when a cooking zone is still hot after use, minimizing the risk of burns.
Beyond basic cooking, these hobs offer advanced functionalities such as a timer, which can be used as a countdown chronometer or to automatically turn off a cooking zone after a set period. This feature is particularly useful for recipes requiring precise cooking times or for users who need to multitask in the kitchen. Additionally, some models include a "Fondue" function, designed for delicate tasks like melting butter, cheese, or chocolate at a very low power level.
Safety is a paramount aspect of the design. The hobs are equipped with an overheating safety feature that automatically adjusts power levels if the glass or electronics become too hot, protecting the system from damage. A locking sensor is also available to prevent accidental operation or manipulation by children.
To begin using the hob, the user must first touch the on/off sensor for at least one second. The touch control will activate, and indicators will light up. If any cooking areas are hot, an "H" will alternate with "0" on the indicator. Within 10 seconds of activation, a power level must be selected for a cooking zone, or the touch control will automatically switch off.
Selecting a power level is done using the "+" and "-" sensors. Touching the "+" sensor will set the plate to level 1, and subsequent touches will increase the power up to the maximum "P" level. The "-" sensor reduces the power. For quick maximum power, touching the "-" sensor once when the plate is at "0" will activate level 9 directly. Holding down the "+" or "-" sensors will rapidly adjust the power level.
The "Power" function, available on some models, provides an "extra" power boost beyond the nominal level, up to 3,200 W on larger plates. To activate it, set a plate to power level 9, then press the "+" sensor, and a "P" symbol will appear. This function lasts for a maximum of 10 minutes before automatically reverting to level 9. It's important to note that due to independent power generators, the "Power" function cannot be activated simultaneously on two plates on the same side of the hob. If activated on one plate, the other plate on the same side will have its power limited.
The "Fondue" function, for very low power cooking, is accessed by activating a plate at power level 1, then pressing the "-" sensor until a "U" symbol is displayed.
The timer function allows users to set a countdown for individual plates or as a general chronometer. To set a countdown timer for a plate, activate the plate, then touch the clock sensors ("-" or "+") to display "00." Within 5 seconds, touch the "+" or "-" sensor of the desired plate to time it. The clock digits will blink, indicating the countdown has started. Once the time elapses, the plate will power off, and a series of beeps will sound.
The locking sensor (8) blocks all touch control sensors except the on/off sensor, preventing unintended operations. The on/off sensor (1) can still be used to turn off the hob even when locked.
Proper cleaning and care are essential for maintaining the glass ceramic hob's appearance and functionality. The hob should be cleaned after each use, once it has cooled down to a lukewarm or cool temperature. This prevents dirt buildup and makes cleaning easier.
For light, non-sticky soiling, a damp cloth with a soft detergent or warm, soapy water is sufficient. For heavy dirt and grease, a specialized glass ceramic cleaning agent (e.g., Vitroclen) should be used, following the manufacturer's instructions. Sticky stains that have been burned in can be removed with a scraper featuring a razor blade. Rainbow coloring, often caused by grease on pan bases, can be removed with a nickel scourer and water or a special glass ceramic cleaner.
Crucially, any plastic objects, sugar, or food with high sugar content that melts onto the hob should be removed immediately while hot using a scraper to prevent damage to the glass surface.
The manual explicitly warns against using aggressive cleaning products, abrasive materials, or steam-based appliances, as these can scratch or damage the hob's surface. It also advises against placing metal objects like knives, forks, spoons, or lids on the hob's surface when not in use, as they can become very hot.
When using a scraper, extreme caution is advised due to the sharp blade. Users should ensure the blade is in perfect condition and replace it if any signs of wear appear. After use, the scraper should be folded away and covered. Only the blade should come into contact with the glass ceramic surface to avoid scratching.
The document also addresses potential issues and troubleshooting. For instance, if the induction zones are not heating up, it suggests checking if the pan is suitable (ferromagnetic base, correct size) by testing with a magnet. If a buzzing sound is heard, it's often due to light or multi-part pans and is not a fault; lowering the power or using a heavier, single-part pan can mitigate this. If the control panel is blocked after a power outage, it advises against powerful halogen lights shining on the sensor area, as this can interfere with calibration.
The manual emphasizes that the glass ceramic is not covered by warranty if damaged by violent blows or improper use. For any internal work or cable changes, only TEKA's technical staff should perform the service.
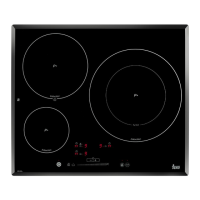
| Hob type | Zone induction hob |
|---|---|
| Product color | Black |
| Appliance placement | Built-in |
| Cooking zone 1 type | Large |
| Cooking zone 2 type | Simmer |
| Cooking zone 3 type | Extra large |
| Cooking zone 1 power | 3200 W |
| Cooking zone 1 shape | Round |
| Cooking zone 2 power | 1800 W |
| Cooking zone 3 power | 3700 W |
| Cooking zone 1 diameter | 210 mm |
| Cooking zone 1 position | Left rear |
| Cooking zone 2 diameter | 145 mm |
| Cooking zone 2 position | Left front |
| Cooking zone 3 diameter | 190 \\ 300 mm |
| Cooking zone 3 position | Right |
| Number of cooking zones | 3 zone(s) |
| Cooking zone 2 power source | Electric |
| Number of gas cooking zones | 0 zone(s) |
| Timer type | Digital |
| Control type | Touch |
| Residual heat indicator | Yes |
| AC input voltage | 230 V |
| AC input frequency | 50 - 60 Hz |
| Depth | 510 mm |
|---|---|
| Width | 600 mm |
| Height | 50 mm |