EasyManua.ls Logo

Teka LP8 840 VR03 - User Manual

Teka LP8 840 VR03
28 pages
Print Icon
To Next Page IconTo Next Page
Loading...
12 place settings
LP8 840 VR03
Question and Answer IconNeed help?

Do you have a question about the Teka LP8 840 VR03 and is the answer not in the manual?

Overview

This document is a user manual for the Teka LP8 840 VR03 dishwasher, a 12-place setting appliance designed for household use. It provides comprehensive instructions on operation, installation, maintenance, and troubleshooting.

Function Description

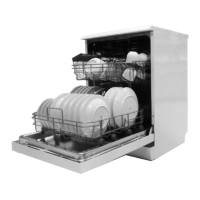
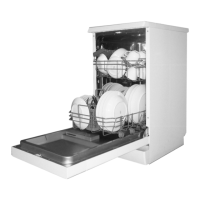
The Teka LP8 840 VR03 is an automatic dishwasher designed to clean dishes and utensils efficiently. It features multiple wash cycles, a water softener system, and a detergent dispenser. The appliance aims to remove dirt, crush food particles, and ensure thorough rinsing and spot-free drying. It is intended for indoor, household use and similar applications such as staff kitchen areas, farm houses, hotels, motels, and bed and breakfast environments.

Important Technical Specifications

  • Model: LP8 840 VR03
  • Place Settings: 12
  • Energy Efficiency Class: A++ (highest efficiency)
  • Annual Energy Consumption: 258 kWh (based on 280 standard cleaning cycles with cold water fill)
  • Energy Consumption of Standard Cleaning Cycle: 0.91 kWh
  • Power Consumption (Off-mode): 0.45 W
  • Power Consumption (Left-on Mode): 0.49 W
  • Annual Water Consumption: 3080 litres (based on 280 standard cleaning cycles)
  • Drying Efficiency Class: A (highest efficiency)
  • Standard Cleaning Cycle: ECO 45°C
  • Program Duration (Standard Cleaning Cycle): 190 minutes
  • Noise Level: 49dB(A) re 1 pW
  • Mounting: Free standing, can be built-in
  • Dimensions:
    • Height: 84.5 cm
    • Width: 59.8 cm
    • Depth (with door closed): 600 mm
    • Depth (with connectors): 60 cm
  • Power Consumption: 1760-2100 W
  • Rated Voltage / Frequency: AC220-240 V/ 50 Hz
  • Water Pressure (Flow Pressure): 0.04-1.0 MPa (0.4-10 bar)
  • Water Softener: Yes, adjustable based on water hardness.
  • Hose Connections: New hose sets for water mains connection; old hose sets should not be reused.
  • Drain Hose: Minimum diameter 40mm, top of hose must be less than 1000mm from the floor.

Usage Features

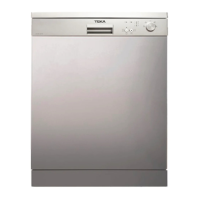
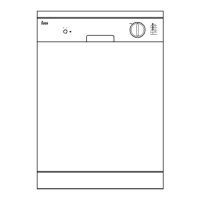
Control Panel: The control panel includes an On/Off button, Delay button, Display screen (showing remaining time, running state, delay time, error codes), Program indicators, Rinse Aid indicator, Add Salt indicator, Half load indicator, Program button, Half load function button, and Program step indicators (Pre-wash, Main-wash, Rinse, Drying, Program end).

Water Softener System: The dishwasher is equipped with a water softener to remove minerals and salts from hard water, preventing deposits on dishes. The water softener must be manually set according to the local water hardness. Salt consumption is adjustable, with settings from H1 (0 gram/cycle) to H6 (60 gram/cycle) for varying water hardness levels. The salt container is located beneath the lower basket and should be filled with dishwasher-specific salt. A salt warning light on the control panel indicates when refilling is needed.

Rinse Aid Dispenser: The rinse aid is released during the final rinse to prevent water droplets, spots, and streaks, and to improve drying. The dispenser is located inside the door next to the detergent dispenser. It has six or four settings, with "4" being the recommended factory setting. The rinse aid level can be estimated by an optical indicator, which changes from dark (full) to lighter (empty). Only branded dishwasher rinse aid should be used.

Detergent Dispenser: The dishwasher uses specific detergents for automatic dishwashers. The dispenser should be refilled before each wash cycle. For normal loads, one tablespoon of detergent is generally sufficient, with more needed for heavily soiled items. Detergent tablets can be used, but long programs are recommended to ensure complete dissolution. The dispenser has compartments for main wash and pre-wash detergents.

Loading the Dishwasher Baskets:

  • Upper Basket: Designed for delicate and lighter dishware like glasses, coffee/tea cups, saucers, small bowls, and shallow pans. Items should be positioned to avoid movement by spray water. The height of the upper basket is adjustable to accommodate larger utensils in either basket. Long bladed knives should be placed horizontally.
  • Lower Basket: Intended for large and difficult-to-clean items such as pots, pans, lids, serving dishes, and bowls. These should be placed top down, and deep pots should be slanted for water drainage. The lower basket features folding spikes for better stacking of pots and pans.
  • Cutlery Basket: Cutlery should be placed with handles at the bottom, except for knives and other potentially dangerous utensils, which should be placed handles-up. Spoons should be loaded separately into appropriate slots. Items should not nest together.
  • General Loading Guidelines: Items like cups, glasses, and pots/pans should face downwards. Curved items should be loaded aslant for water run-off. All utensils must be stacked securely and not tip over. Spray arms must be able to rotate freely. Overloading the dishwasher should be avoided for good results and energy efficiency. Very small items should not be washed in the basket as they may fall out.

Washing Programmes: The manual provides a "Wash Cycle Table" with various programs:

  • Intensive: For heaviest soiled crockery, pots, pans, and dishes with dried-on soiling. (Pre-wash 50°C, Wash 60°C, Rinse, Rinse, Rinse 70°C, Drying)
  • Normal: For normally soiled loads like pots, plates, glasses, and lightly soiled pans. (Pre-wash 45°C, Wash 55°C, Rinse, Rinse 65°C, Drying)
  • ECO (EN 50242): Standard program for normally soiled tableware, most efficient in terms of combined energy and water consumption. (Pre-wash, Wash 45°C, Rinse 65°C, Drying)
  • Glass: For lightly soiled crockery and glass. (Pre-wash, Wash 40°C, Rinse, Rinse 60°C, Drying)
  • 90 min: For normally soiled loads needing a quick wash. (Wash 65°C, Rinse, Rinse 65°C, Drying)
  • Rapid: A shorter wash for lightly soiled loads that do not need drying. (Wash 45°C, Rinse 50°C, Rinse 55°C)

Starting a Wash Programme:

  1. Load dishes into the baskets.
  2. Add detergent.
  3. Plug in the appliance and ensure water supply is on.
  4. Close the door and press the Power button.
  5. Select the desired program using the Program button. The dishwasher will start after about 10 seconds.

Changing a Programme: A running cycle can only be modified if it has been running for a short time. If detergent has already been released, the dispenser must be refilled. To change, open the door, press the program button for more than 3 seconds to enter standby, then select a new program.

Adding Forgotten Dishes: Dishes can be added before the detergent cup opens. Open the door slightly to stop washing, wait for spray arms to stop, then open completely, add dishes, and close the door. The dishwasher will resume after 10 seconds.

End of Wash Cycle: The dishwasher buzzer will sound 8 times. Turn off the appliance, shut off water supply, and open the door. Wait about 15 minutes before unloading to allow dishes to cool and dry better. Unload the lower basket first to prevent water from dripping onto it from the upper basket.

Maintenance Features

Filtering System: The filter system consists of a coarse filter, a flat (main) filter, and a microfilter (fine filter). These filters prevent food remnants from entering the pump and should be cleaned regularly. The coarse filter traps larger items, while the fine filter holds soil and food residues. To clean, remove the filter device by pulling the cup handle upwards, turn the filter anti-clockwise, and lift the assembly. Clean with a brush under running water. The dishwasher must never be used without filters.

Caring for the Dishwasher:

  • Control Panel: Clean with a lightly dampened cloth and dry thoroughly.
  • Exterior: Use appliance polish wax. Avoid sharp objects, scouring pads, or harsh cleaners.
  • Door: Clean the edge with a soft, warm, damp cloth. Do not use spray cleaners, abrasive agents, or paper towels to avoid damage to the door lock, electrical components, or stainless steel surface.
  • After Every Wash: Turn off water supply, leave door slightly open to prevent moisture and odors.
  • Removing the Plug: Always unplug before cleaning or maintenance.
  • No Solvents or Abrasive Cleaning: Use warm soapy water for exterior and rubber parts. For interior spots/stains, use a cloth dampened with water and vinegar or a specific dishwasher cleaning product.
  • Long Periods of Non-Use: Run an empty wash cycle, unplug, turn off water supply, and leave the door slightly open to prolong seal life and prevent odors.
  • Seals: Clean periodically with a damp sponge to prevent food trapping and odors.

Cleaning the Spray Arms: Spray arms should be cleaned regularly to prevent clogging by hard water chemicals. To remove the upper spray arm, hold the nut and rotate clockwise. To remove the lower spray arm, pull it upwards. Wash arms in soapy, warm water and clean jets with a soft brush.

Protect Against Freezing: During winter, if the dishwasher is not used, take frost protection measures:

  1. Cut off electrical power.
  2. Turn off water supply and disconnect the inlet pipe from the water valve.
  3. Drain water from the inlet pipe and water valve (use a pan).
  4. Reconnect the inlet pipe.
  5. Remove the filter at the bottom of the tub and use a sponge to soak up water in the sump. If the dishwasher cannot work due to ice, contact professional service persons.

Troubleshooting Tips: The manual includes a comprehensive troubleshooting section with common problems, possible causes, and recommended solutions, such as checking fuses, water pressure, door closure, drain hose, filters, detergent type, rinse aid levels, loading, and spray arm obstructions.

Error Codes: The dishwasher displays error codes to warn of malfunctions:

  • E1: Longer inlet time (Possible causes: Faucet not opened, restricted water intake, low water pressure).
  • E4: Overflow (Possible causes: Some element of dishwasher leaks). In case of overflow, turn off the main water supply and remove water from the base pan before restarting.

This manual emphasizes safety precautions, including proper earthing, careful loading of sharp items, and using only specified detergents and rinse aids. It also highlights the importance of regular maintenance for optimal performance and longevity of the appliance.

Teka LP8 840 VR03 Specifications

General IconGeneral
BrandTeka
ModelLP8 840 VR03
CategoryDishwasher
LanguageEnglish

Related product manuals