First steps 7
2
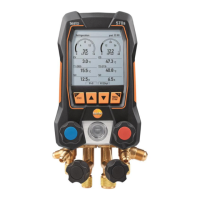
Setting parameters:
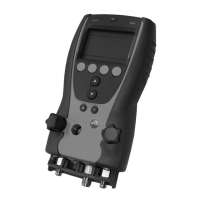
Button functions
· : Alter parameter.
· : Change to next parameter.
· OK : Store settings and leave configuration menu.
· esc : Leave configuration menu (without storing).
Settable parameters
· P=0: Set pressure sensors to zero
· bar, kPa, MPa, psi: Set pressure unit.
·
Pabs, Prel or psi
a
, psi
g
(depending on pressure unit selected): Switch between display of absolute and
relative pressure.
· °C, °F : Set temperature.
· AutoOff off, on : Automatic switch-off (20min after the last time a button was pressed) switch on/off.
· 24hr, am/pm : Switch between 24h and 12h time display.
·
88:88 : Set time (hours, minutes).
· day, month, year : Set date (day, month, year).
Example “Set pressure unit”
1 Press function button or several times, until bar, kPa, MPa or psi flashes.
2 Press or several times, until the desired pressure unit appears.
3 Press function button or several times to switch to the next parameter
3 Press function button OK to store the settings and leave the configuration
menu.
²
Switching iinstrument ooff:
i Press .
²
Operating vvalve kknobs:
The function of the valve knobs is independent of the valve position. For
easier operation, unlocking the knobs is recommended. For transport,
stowing the valve knobs is recommended.
i Unlock valve knobs: Press unlocking button.
i Stow valve knobs: Press valve knobs into the housing.
The refrigeration system analyzer acts like a conventional two-way manifold
with respect to the refrigerant path: The passage is opened by opening the
valves. The connected pressure is measured measured independently of
whether the valves are open or closed.
i Open valve: Turn the valve knob anti-clockwise.
i Close valve: Turn the valve knob clockwise.
Warning!
Tighten valve positioner only hand-tight. Do not use tools to tighten
the valve positioner, as the thread may be damaged thereby!
enfresitptsvnl????