8
EN
VII. OPERATION.
1. Switch on the electric water heater
Before initial start of the appliance, please make sure that the water heater has
been correctly connected to the electrical network and that it is lled up with
water. Switching on the water heater is done through the device incorporated
in the installation, which is described in sub-item 3.3 of section V, or by
inserting the plug into an electrical socket (for models with cord with a plug).
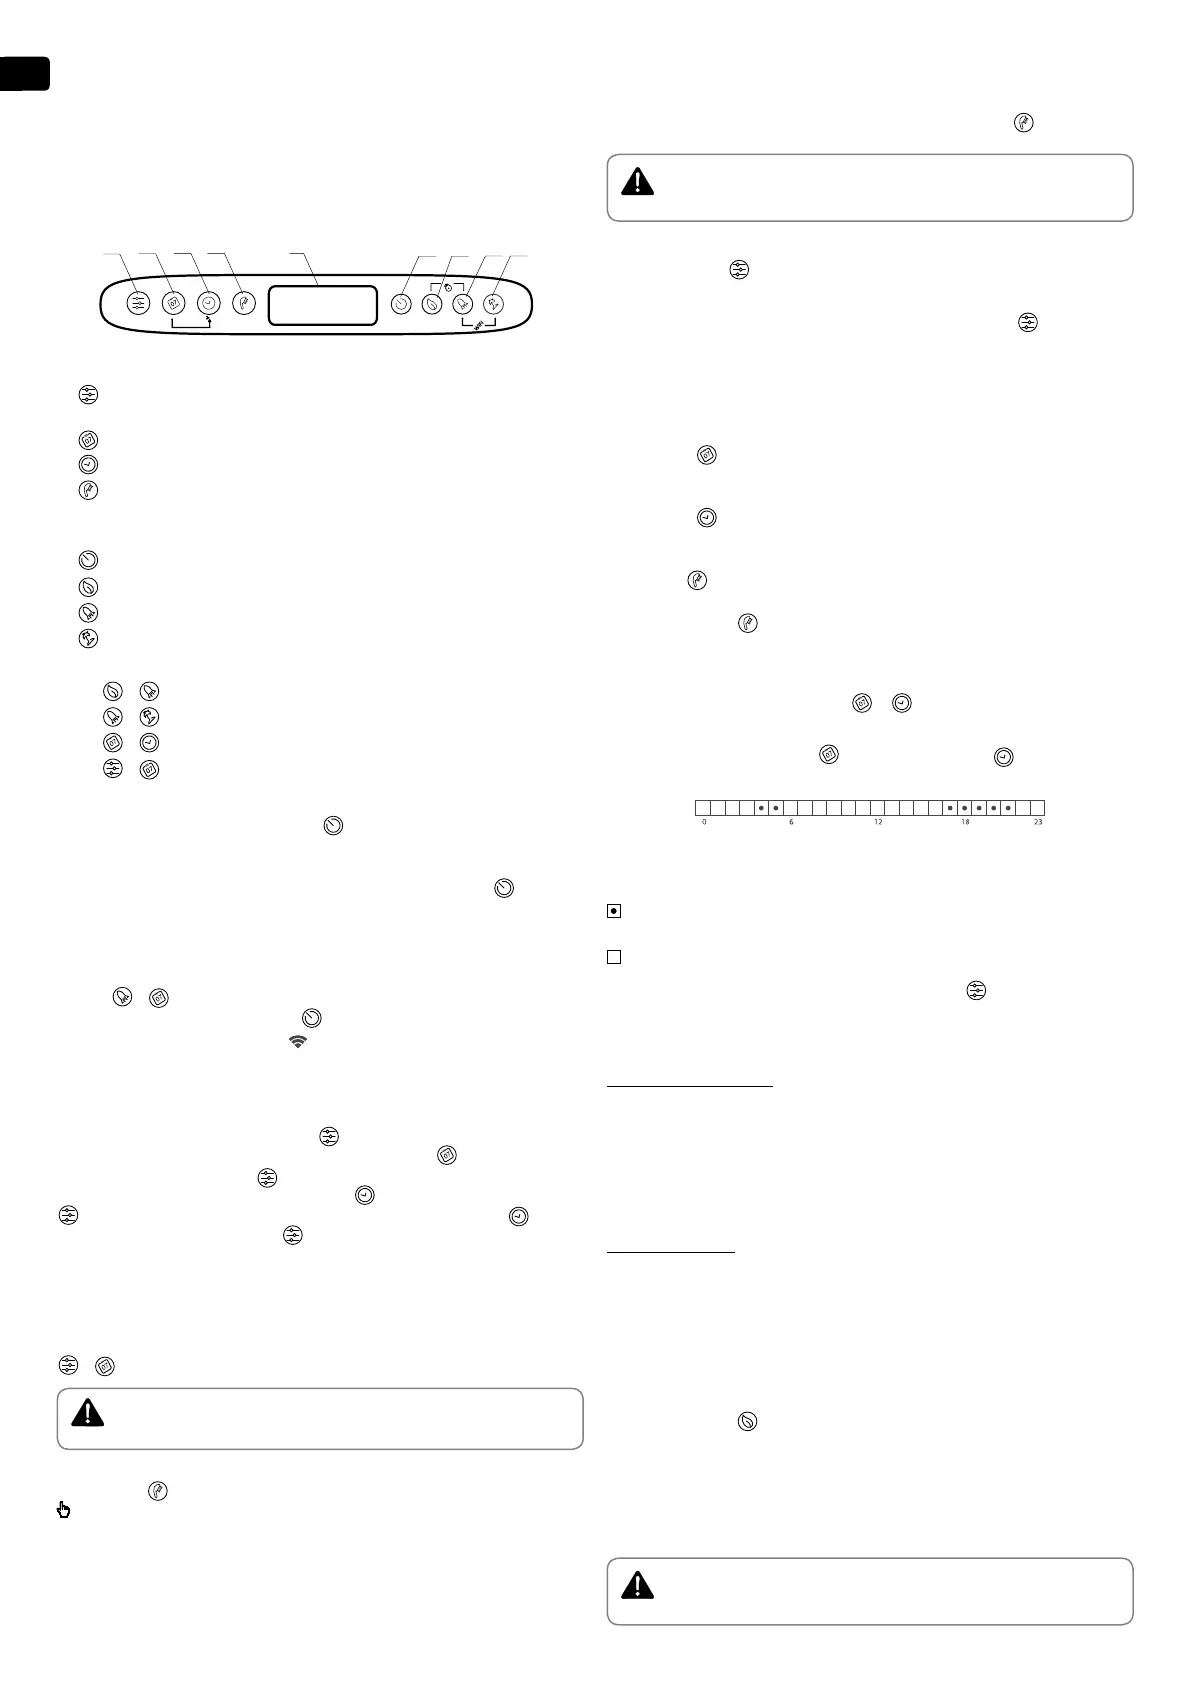
2. Description of the control panel of the appliance
Button and element designation:
1 -
Program selection button and activation of programming functions in
the "Weekly Programmer" regime
2 -
Button for selection of the day of the week.
3 -
Time / period selection button in dierent modes
4 -
"Handset" button to select number of showers and activate the “Manual
control” mode.
5 - LCD display.
6 -
Device on / o button - Standby mode.
7 -
ECO SMART, ECO NIGHT or ECO COMFORT mode selection button
8 -
"BOOST" function selection button
9 -
On / O button for Vacation Mode
Possible combinations:
7 + 8 -
+ "locking" of the panel
8 + 9 -
+ Turning the Wi-Fi Module On or O (Stand By Mode)
2 + 3 -
+ Copy the status of the current cell
1 + 2 -
+ Vertical to horizontal orientation of the display
3. Switching on the electronic operation of the appliance
Switching on is done by pressing button
. By doing so the display will show
the mode which is to be used and, depending on the type of mode, the symbols
described for each mode below.
Switching o the electronic operation is done by pressing button
.
4. Setting up and operation of the appliance
•
Switching on and o the Wi-Fi module (for models with Wi-Fi).
Switching on and o the Wi-Fi module is done by simultaneously pressing the
buttons
+
for minimum 10 seconds in stand-by mode, i.e. when the
appliance is switched o from button . When the Wi-Fi module is on, the
display shows the following symbol .
•
Setting the time and day of the week
In order for the programme modes to work properly you must set the current
time and day of the week. Setting up is done in stand-by mode, i.e. when the
appliance is not switched on. Hold the
button. The day of the week starts
blinking in the weekday selection eld. Using the button select the current
day of the week. Press button to conrm the selection. The rst two digits
of the timer start blinking. Using the button set the time and conrm with
. The second group of digits starts blinking. Again, using button set the
minutes and conrm with button .
•
Vertical to horizontal orientation of the display
In order for the program modes to work correctly when installing the appliance
horizontally, it is obligatory to select a "horizontal" mode of operation
(horizontal orientation of the display). To switch between horizontal and
vertical symbols and vice versa, you need to press and hold the two buttons
+ for 5 seconds when the water heater is a standby mode.
WARNING: Your TESY electric water heater is of the highest energy class. The
class of the appliance in ECO mode is guaranteed only When the display
orientation is correct
.
•
"Manual control" mode
Using button you can select the "Manual control" operating mode. The symbol
and the countdown timer are shown on the display if the appliance is in a warm-
up or clock mode, if the appliance is ready for use.
When you turn on the manual mode, the screen shows the last saved preset
number of showers. The maximum number of showers that can be selected
depends on the model and is shown in table 1.3.
•
"nti-freezing" function
The Аnti-freezing function is active with the following modes: Manual control
and Weekly Programmer.
To turn the Аnti-freezing mode on, you need to press button
until to display
the
symbol
appears.
WARNING: The electrical power supply of the device should be switched on. The
safety valve and the pipe connecting it to the device must be secured against
freezing
ter.
•
"Weekly programmer" mode
By pressing button , you can select one of the three built-in weekly program
modes - P1, P2 or P3.
To set up the program you have selected, press and hold button
to start
setting it.
The device enters programming mode for the selected program. The program
indicator (P1, P2 or P3) ashes on the display.
Step 1 - Choose a day of the week
Using button
select the day of the week for which you will change the program.
Step 2 - Select the desired time
Using button
select the desired time.
Step 3 – Select the desired amount of hot water
With button
select the number of showers to indicate the required amount
of hot water for the desired time. You can choose *, 1, 2, ... number of showers by
pressing the button .
"*" means that the anti-freeze mode is selected, which is displayed with the symbol
.
By using the combination of buttons
+
you may copy settings (number of
showers) from the current hour to the next hour.
To do this, press and hold button
and by pressing button move to the next
hour (neighbouring cell), copying the selected number of showers.
A cell is provided in the hour chart for each hour of the day. The numbers
below are guiding you.
Indication key:
- When the time cell is full there is a requirement for hot water at that time
and the water will be heated depending on the number of showers selected.
- if the time cell is empty, the device has no task set for that time
The changes made are conrmed by pressing button
, once and the
appliance will exit the setup mode.
In case the buttons are not manipulated for a long time, the changes are
automatically saved (even if they have not been conrmed).
Program modes - P1 и P2
For programs P1 and P2, you can select which day of the week, at what time
what amount of hot water you need. The appliance calculates when to turn on
in order to provide the required amount at the set time.
Example:
If you have set that you need to have hot water for 3 people on Wednesday at
18:00, the appliance will maintain that amount for a certain period of time and will
then shut down.
Program mode - P3
For P3 programs, you can select the day of the week, the duration of operation
of the appliance and the amount of hot water it needs to provide. The
appliance switches on and tries to reach the set number of showers.
If you have set that on Wednesday at 18:00 you need to have hot water for 3
showers, the appliance will start heating the water at this time until it reaches
the 3 showers set.
•
ECO SMART, ECO NIGHT and ECO COMFORT mode
By pressing button
you can choose between three modes:
EC0 - ECO SMART,
EC1 - ECO NIGHT (SMART algorithm with night-time heating priority),
EC2 - ECO COMFORT ((the lowest limit provides 2 showers, the upper limit
generates economy).
The selected mode is displayed on the screen.
Attention! Your TESY electric water heater is of the highest energy class. The
class of the appliance is guaranteed only when it operates in ECO mode “Eco
Smart” due to the signicant energy savings that are generated.
 Loading...