UKUK
Dear Customer,
Congratulations on
choosing your new highly
e cient, easy to maintain,
Tetra Aquarium Filter.
The Tetra IN plus Internal Filter
not only mechanically and
biologically lters the water but
also creates a natural water ow
enriching the aquarium water with
oxygen. Furthermore the Tetra IN
plus is quickly and easily adjusted
to perfectly suit the requirements
of your aquarium. Please read
the instructions carefully, before
installing your new Tetra IN plus.
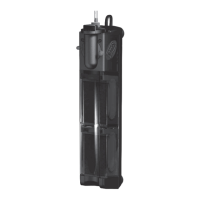
Tetra IN plus Internal Filter
A. Suction Cups
B. Mounting unit
C. Air intake tube
D. Adjustable venturi air intake
E.
Multidirectional water di user
F. Motor casing
G. Flow rate adjuster
H. Double lter cartridge
I. Split lter media
J. Double ow inlet
K. Split foam carrier
Instructions
Preparation for use (see g. 1)
Before installing the lter, attach
the enclosed suction cups to
the back of the mounting unit.
Attach the air intake tube to the
adjustable venturi air intake.
Installation and operation ( g. 2)
Using the suction cups, attach the
lter at your chosen position to
the inside of the aquarium glass,
making sure that the top of the
water di user is placed maximum
1 cm or less below the surface of
the water so that the inlet end of
the air intake tube is well above
the water surface.
To start the lter simply plug it in!
Adjustment of water ow ( g. 3)
Depending on stocking levels and
the size o f yo ur a quarium it m ay b e
necessary to adjust the water ow
through your Tetra IN plus.
To increase the water ow,
turn the adjuster Clockwise. To
decrease the water ow, to turn
the adjuster counterclockwise.
Adjustment of air ow ( g. 4)
The larger the aquarium and the
number of sh the greater the need
for oxygen in the water. Using the
adjustable venturi air intake the
concentration of oxygen can be
set to your requirements.
To increase the air ow, turn the
adjuster towards the back of the
lter. To decrease the ow, turn
the adjuster towards the front of
the lter.
Adjustment of ow
direction ( g. 5)
The multidirectional water
di user produces a water ow
that corresponds to those found
in the natural environment of
your sh. To adjust the direction,
simply rotate the nozzle through a
maximum angle of 180° to suit your
requirements.
Care and Maintenance
IMPORTANT! Always disconnect
the lter from the e le ctrical supp ly
before removing it from the water
or carrying out any maintenance
upon it!
Cleaning and replacing the foam
lter media ( gs. 6 & 7)
During use the foam lter media
will eventually become clogged
with debris which may reduce
both the air supply through the
venturi air intake and the water
ow through the lter. Regular
cleaning and/or replacement of
the lter foam on a regular basis is
necessary to ensure that the lter
remains working e ciently.
1. Cleaning the foam lter media
Remove the lter cartridge
from the mounting unit. It is not
necessar y to remove the mo unting
unit from the aquarium during
normal maintenance ( g. 6).
Remove the lter cover and with it
the foam lter media ( g. 7). One
of the two foam lter media should
then be rinsed in water from the
aquarium.
Foam lter media should never
be cleaned using untreated tap
water as the chlorine present will
kill useful lter bacteria growing
on its surface!
2. Replacing the foam lter media
The foam lter media can be
cleaned 2 to 3 times and reused
before it requires replacement.
Replacement lters are available
from your local retailer.
When placing the foam lter media
into the cartridge it is important to
ensure that the foam is centered
on the foam holder (see g. 7)
In models that contain two
double lter cartridges, only
the lower cartridge should be
changed at any one time as
per the following instructions;
(I) Remove the lower foam lter
media and discard.
(II) Remove the upper double
Tetra GmbH
D-49304 Melle, Germany
www.tetra.net
2 Years Guarantee
Tetra guarantees that your Tetra IN
plus will be repaired or replaced-
free of charge for two year from the
date of purchase if it fails to work
because of faulty material or work-
manship.
This guarantee does not cover nor-
mal wear and tear, nor any deterio-
ration su ered through overloading,
improper use, negligence or ac-
cident. Similarly any modi cations
made by the purchaser to the appli-
ance will cause the guarantee to be
null and void.
Please keep your receipt as proof of
purchase. The guarantee does not
cover improper use, normal wear
and tear or any modi cation made to
the appliance. In case of complaints
please contact your local retailer or
address to Tetra (UK) Ltd., P.O. Box
271, Southampton, S018 3ZX.
SAFETY FIRST!
Always isolate the unit from the
mains electricity before carrying
out any maintenance. The control
unit of this lter cannot be replaced.
If this is damaged the lter
must no longer be used. This
Tetra lN Internal Filter is only
designed for use in tempera-
tures which do not exceed 35°C.
T he sup ply co rd cann ot be re placed.
If the cord is damaged the entire
appliance must no longer be used.
This appliance is not intended for
use by persons (including children)
with reduced physical, sensory or
mental capabilities, or lack of ex-
perience and knowledge, unless
they have been given supervision
or instruction concerning use of the
appliance by a person responsible
for their safety. Children should be
supervised to ensure that they do
not play with the appliance.
For further information on sh keep-
ing please contact: The Tetra (UK)
Ltd., P.O. Box 271, Southampton,
S018 3ZX.
www.tetra.net
Technical Data
Model
Flow rate in
Litres/hour
Aquarium size
In litres
Number of double
Filter cartridges
IN 300 plus
150 – 300 10 – 40 1
IN 400 plus
200 – 400 30 – 60 1
IN 600 plus
300 – 600 50 – 100 2
IN 800 plus
400 – 800 80 – 150 1
IN 1000 plus
500 – 1000 120 – 200 2
lter cartridge and remove the
foam lter media. Place this into
the lower lter cartridge and
reinsert into the mounting unit.
(III) The new foam lter media
should then be placed into
the empty upper double lter
cartridge, reinserted into the
mounting unit and the lter
restarted.
Replacing only one foam lter
media at any one time ensures that
at least 50% of bacterial activity
in the lter is preserved ensuring
fast and e cient bacterial
maturation of the new foam lter
media.
Cleaning the impeller
unit ( g. 8)
The impeller unit should
be cleaned each time the
foam lter media is cleaned or
replaced. Due to the Tetra Internal
Filter’s innovative design this can
be done quickly and easily as the
lter mounting unit remains in the
aquarium.
T he imp eller unit is easily remove d
from its housing as shown in
gure 8.
Do not use abrasive or caustic
cleaning agents when cleaning
the impeller unit.
If e ciency is impaired, clean
the lter.
6
7
 Loading...