EasyManua.ls Logo

Teuco 122W User Manual

Teuco 122W
10 pages
To Next Page IconTo Next Page
Page #1 background imageLoading...
Page #1 background image
2200
720
100
80
1000
850
650
1010
820
380
810
2200
380
720
100
820
80
650
1010
1000
810
850
1800
1800
C - Hot water connection for
1
/2
"
tap fittings
F - Cold water connection for tap fittings
1
/2
"
O - Connection for drainage pipe recessed in floor 1
1
/2
"
CA - Electrical connection for sauna IPX4
(box with cable press PG 13.5)
N.B. Installation must take place once floors and
walls are completed.
The room in which the sauna is to be installed
should be at least
230 cm for the model that can be
inspected at this height).
O
Siphon
Net
Weight
Kg.
123 155 2,24 6
0.5 ÷ 5
bar
1/2"
Delivery
Weight
Kg.
Delivery
Volume
m
3
ART.122W - 122R
Vertical
Jets
3
Back
jets
2
Foot
jets
9 ÷ 16
Capacity
l/min
2 ÷ 5
bar
Pressure
Min. Max
Pressure
Min. Max
Supply
1
1/2"
Drain
Conn.
HYDRAULIC CHARACTERISTICS
ELECTRICAL
CHARACTERISTICS
(1)
Multifunctions
Sauna
18
(1) - Before connecting the appliance, make sure that the voltage indicated on the rating plate is the same as that of the electric mains.
The information and characteristics shown do not bind Teuco Guzzini Spa who reserves the right to make any modifications it retains necessary without any prior warning or notice of replacement.
Measurements in mm.
The electrical installation must comply with the safety regulations for bathroom installation, as
described in the enclosed user’s manual.
Left-side Model
Right-side Model
Central
Showerh.
1
2MEX18
2NEX18
Art.
1,9 ÷ 2,3
Kw
Min. Max
Sauna and Multifunctions
PRE-INSTALLATION CARD ART. 122W - 122R
(mm 1010 x 810)
GB
Question and Answer IconNeed help?

Do you have a question about the Teuco 122W and is the answer not in the manual?
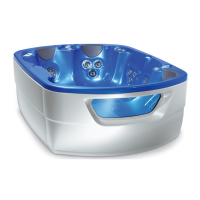
Teuco 122W Specifications

General IconGeneral
Model122W
CategoryHot Tub
Seating Capacity2
MaterialAcrylic
CabinetYes
Shell ColorWhite
Cabinet ColorGrey

Summary

ASSEMBLING THE CABIN

FIXING THE UNIT TO THE WALL

Instructions for securing the shower unit to the wall using appropriate fixings and measurements.

POSITIONING THE SHOWER BASE

Guidance on placing and leveling the shower base, including drain connection preparation.

ASSEMBLING THE BACK PANELS

Steps for attaching the back panels to the shower base and tracks with silicone and screws.

INSTALLING THE SIDE PANEL

Procedure for sliding and fastening the side panel into the bottom track and connecting it to the back panel.

INSTALLING THE TOP TRACK

Details on fitting the top track onto the supports and securing it to the back panels.

APPLYING SILICONE

Instructions for applying neutral silicone sealant to prevent water leaks between the back panel and bathtub.

MOUNTING THE DOOR

Process for assembling door handles, tracks, and attaching the door to the cabin structure.

MOUNTING THE TWO-CLIMATE SAUNA DOME UNTO THE SHOWER CABIN

Specific steps for installing the sauna dome, including seals and alignment with the top track.

USING THE SHOWER FOR THE FIRST TIME

Guidance on initial operation, including removing tags, running cycles, and checking for leaks.

FITTING THE INSPECTION DOOR

Steps for closing the shower cabin, aligning magnetic seals, and adjusting the door assembly.

FIXING THE SHOWER TO THE WALL

Procedure for final wall mounting of the cabin, including bracket installation and fastening.

CONNECTIONS FOR VARIOUS MODELS

EQUIPOTENTIAL EARTHING CONNECTION

Instructions for connecting metal parts of the cabin with a yellow wire for equipotential bonding.

Related product manuals