2726
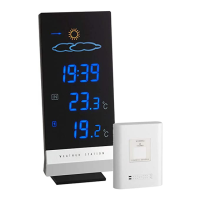
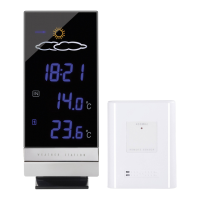
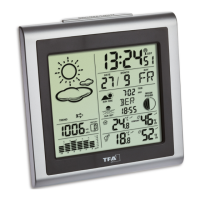
LARGO – Wireless weather station
• Within concrete walls (reinforced with steel) such as basements, the received signal is naturally
weakened. In extreme cases, please place the unit close to a window to improve reception.
• During night-time, the atmospheric interference is usually less severe and reception is possible in
most cases. A single daily reception is adequate to keep the accuracy deviation under 1 second.
7. Operation
• Press and hold the + or – button in setting mode for fast mode.
• The device will automatically quit the setting mode if no button is pressed for 15 seconds.
7.1 Manual settings
• Press and hold the MODE button for 3 seconds. 24 Hr (default) appears on the display. Press
the + or – button in the setting mode to choose the 12 HR or 24 HR system. Press the MODE
button to make the settings in the following sequence: the temperature unit (default: °C), the
atmospheric pressure unit (default: hpa), the time zone (default: 00), the hours, the minutes, the
year, the month, the day and the language of the day of the week (default: GE). Press + or – but-
ton to adjust the settings.
• Confirm the setting with the MODE button.
• The manually set time is overwritten once the DCF time signal is successfully received.
7.1.1 12/24-hour display setting
• You can choose between the 12 - or 24 hour system in setting mode.
• In the 12-HR system AM (before noon) or PM (after noon) appears on the display.
7.1.2 Temperature unit setting
• You can change between °C (Celsius) or °F (Fahrenheit) as temperature unit in setting mode.
7.1.3 Atmospheric pressure unit setting
• You can change between hpa or inHg as atmospheric pressure unit in setting mode
7.1.4 Time zone setting for DCF time
• You can make the time zone correction (+2/-2) in setting mode.
LARGO – Wireless weather station
• The time zone correction is needed for countries where the DCF signal can be received but the
time zone is different from the DCF time (e.g. +1=one hour plus).
7.1.5 Day-of-the week language
• You can set the day-of-the week language in setting mode : German (GE), English (EN), Italian
(IT), French (FR) and Spanish (SP)
8. Backlight
• Press the SNOOZE/LIGHT button to activate the backlight for 5 seconds.
9. Alarm function
9.1 Alarm time setting
• Press the MODE button in normal mode, to enter the alarm mode 1.
• A1 and 0:00 (default) or the last adjusted alarm time appear on the display.
• Press and hold the MODE button.
• The hour digits flash.
• Press the + or – button to adjust the hours.
• Confirm the setting with the MODE button and set the minutes in the same way.
• Press the MODE button again.
• The display shows the current time.
• Press the MODE button twice in normal mode, to enter the alarm mode 2.
• Set the alarm time for the second alarm (A2) in the same way as the first alarm time.
• To activate/deactivate the respective alarm function, press the + button.
• The respective alarm symbol appears/disappears.
• When the adjusted alarm time is reached, the alarm rings.
• The alarm symbol flashes.
• If the alarm is not stopped manually, the alarm tone automatically turns off after two minutes
and will be reactivated at the same set time in the following day.
• Press any button (except SNOOZE/LIGHT) and the alarm will stop.
• Press the SNOOZE/LIGHT button to activate the snooze function.
• Once the snooze function is activated, Zz will be flashing on the display.
• The alarm will be interrupted for 5 minutes.
TFA_No. 35.1145_Anleitung_05_18 23.05.2018 10:30 Uhr Seite 14
 Loading...