1918
Radio-controlled alarm clock with thermometer
Radio-controlled alarm clock with thermometer
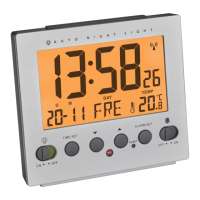
M: RESET button
N: AUTO-LIGHT slide
O: Battery compartment
6. Getting started
• Pull the protective foil off the display.
• Remove the battery insulation strip.
• The clock will scan the DCF frequency signal and the DCF symbol
flashes on the LCD. When the signal is received successfully after
3-5 minutes, the radio-controlled time and the DCF symbol
appear permanently.
•
The clock automatically receives every day at 2:00 and 3:00 in the
morning a radio signal. If the reception fails, the symbol disappears
and scanning stops and will be repeated at 4.00 am and 5.00 am.
• Manual initialization can be helpful. Press and hold WAVE but-
ton. If the reception fails (10 minutes), the symbol disappears
and scanning stops and will be repeated in the next hour.
• Press and hold WAVE button, to stop the initialization.
• In case the clock cannot detect the DCF-signal (for example due
to disturbances, transmitting distance, etc.), the time can be set
manually. The clock will then work as a normal quartz clock.
(see: Setting of the clock and calendar).
• The manually set time will be overwritten by the DCF time when
the signal is received successfully.
Important information on product safety!
• Do not place your product near extreme temperatures, vibra-
tions or shocks.
• Protect it from moisture.
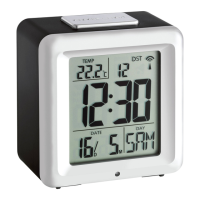
5. Elements
Front (Fig. 1)
A: Temperature display
B: Clock
C: Date with weekday
D: DCF symbol
E: Alarm symbol
F: Light sensor
G: SNOOZE/LIGHT button
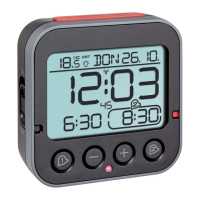
Back (Fig. 2)
H ALARM slide
I: MODE/SET button
J: ▲ / 12/24 button
K: ▼ / °C/°F button
L: WAVE button
TFA_No. 60.2503 Anleitung_04_13 12.04.2013 10:03 Uhr Seite 10