IS-68X000424-A 0715
Thermo Fisher Scientifi c
Eutech Instruments Pte Ltd
Blk 55, Ayer Rajah Crescent,
#04-16/24, Singapore 139949
Tel: (65) 6778-6876
eutech@thermofi sher.com
www.eutechinst.com
© 2015 Thermo Fisher Scientifi c Inc. All rights reserved. All trademarks are the property of Thermo Fisher Scientifi c and its subsidiaries.
Restoring Factory Calibration
1. With the meter off, press and hold s key.
2. Power on the meter using ON/OFF. Release s key when “
”
(User-Reset) appears in the display.
3. The display shows “
” for about 2 seconds and then shows
“
”.
4. Use s or t key to choose “
” or “ ”.
= To restore meter back to factory calibration values
= To retain last calibrated values
5. Press READ/ENTER key to confi rm. When “
” is selected, the
meter performs a reset, and will blink “
” to indicate that it is
reading in measurement mode.
Turbidity Measurement
Turbidity Measurement
Good techniques are important for accurate turbidity measurements.
For best results, use clean sample vials, properly position the vial in
the sample well, cover the vial with the light shield cover, use proper
handling of standards, use supplied cloth to keep vials clean and
scratch free, and perform meter calibration as needed.
Preparation of Sample Vial
1. Obtain a clean, dry sample vial.
2. Handle the sample vial only by the cap to avoid fi ngerprints on
the glass.
3. Rinse the vial with approximately 10 mL of the sample, capping
the vial with the black screw cap and gently inverting it several
times. Discard the used sample and repeat.
4. Fill the rinsed vial with the sample up to the mark indicated in the
vial. Cap the vial with the supplied black screw cap.
5. Wipe the vial with the soft, lint-free cloth supplied. Ensure that the
outside of the vial is dry, clean and free from smudges.
6. Apply a thin fi lm of silicone oil (supplied) on the sample vial (see
image below).
7. Wipe with a soft cloth to obtain an even distribution over the entire vial’s
surface. The purpose of oiling the vial is to fi ll small scratches and
to mask the imperfection in the glass. Do not apply large quantity
of oil as this may collect dirt and dust.
8. The sample vial is now ready to be inserted into the sample well
for measurement.
Place the light shield cover over the vial to keep stray light from
changing the calibration and sample measurement readings. In many
environments, the light shield is not required as the vial cap is able to
keep stray light from entering the sample well.
Indexing is not required due to the high quality of the glass vials.
Simply align the index mark (arrow) on the vial with the index mark
(arrow) on the meter.
Note: Do not shake the calibration standards as air entrapment
will introduce error. Do not allow the calibration standards to freeze
as this will cause permanent damage to the standards, making
them inaccurate.
Calibration Procedure
Preparing the Calibration Standard Vials
Ensure there are no scratches or marks on the glass vial. If there are
marks that could affect the turbidity measurement, select another vial.
Before using the standards for the fi rst time, rinse the inside of the
vial with a small amount of the same NTU standard that will be used
to fi ll that vial.
1. Gently pour about 5 mL from the 60 mL stock standard into the vial.
2. Cap and swirl the vial so the inside of the vial is fully rinsed with
the standard.
3. Pour the standard out of the vial and discard it.
4. Repeat steps 1 through 3.
5. Gently fi ll the vial using the 60 mL stock standard above the fi ll line
on the vial and cap the vial.
6. Repeat this rinse and fi lling procedure for the other three vials.
Note: The vial rinsing is critical for precision with the lower
NTU standards.
Use these calibration standard vials daily as a check, and
also periodically for calibration as needed. When the standard
reading of 20.0, 100, or 800 NTU drifts more than 10 % of the
standard’s NTU value, the solution should be replaced with another
aliquot from the plastic bottle following the steps listed above.
Note: 0.02 NTU standard read back value should be <0.1 NTU.
Calibration Sequence
Getting Started
This instrument operates on the nephelometric principle of turbidity
measurement and is designed to meet the criteria specifi ed in ISO
7027 and DIN 27027 standards.
Using a Phillips screwdriver, remove the screws from the battery cover
and install (4) AAA batteries (included). Tighten the screws to retain a
waterproof seal when completed.
Keypad Functions
Turbidity Calibration
The TN-100 was calibrated and tested prior to leaving the factory. The
TN-100 kit includes (4) primary standards (0.02, 20.0, 100
and 800 NTU) to verify the meter calibration or to recalibrate
the meter as needed. Before measuring samples for the fi rst
time, perform a meter calibration with the primary standards.
Four standard vials are included and labeled for each standard
level. 800 NTU (CAL 1), 100 NTU (CAL 2), 20.0 NTU (CAL 3),
0.02 NTU (CAL 4).
Instrument Operating Conditions
Operating Ambient Temp. 0 to 50 ºC
Operating Relative
Humidity
0 to 90 %, non-condensing
at 30 ºC
Storage Temp. -20 to +60 ºC (instrument only)
Storage Relative Humidity
0 to 90 %, non-condensing
at 30 ºC
Pollution Degree 2
Overvoltage Category II
Weight 200 g
Size (L x W x H) 15.5 x 6.8 x 4.6 cm
Battery Requirement 4 x AAA (LR03) 1.5 V batteries
Vibration Shipping/handling per ISTA #1A
Shock Drop test in packaging per ISTA #1A
Certifi cations/Compliance
FCC part 15 class A, TUV 3 in 1,
CE, RoHS
Operation Instructions
Operation Instructions
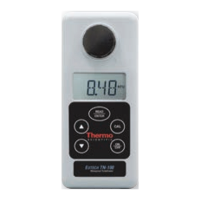
TN-100 Turbidimeter
Measurement Procedure
1. Turn meter off, and place on a fl at, level surface.
2. Place the sample vial inside the sample well and align the vial’s
index mark with the meter’s index mark.
3. Push the vial down until it is seated.
4. Place the light shield cover over the vial that is inserted into the
sample well.
5. Turn on the meter by pressing the ON/OFF key. After the power-up
sequence, the meter goes to measurement mode and the display
blinks “
”. The measured reading appears in the display.
* When meter is in “
” mode after calibration it is ready for
measurement. Press the READ/ENTER key. The display blinks
“
” until the measured reading appears.
Notes:
• NEVER pour liquid directly into the sample well of the instrument.
Always use a vial. The instrument will only accurately measure the
turbidity of a sample when vials sealed with the black caps are
used. The black cap serves as both seal and a primary light shield.
• NEVER attempt to clean the sample well. The optics may
be damaged.
• For battery conservation, the instrument automatically powers off
20 minutes after the last key pressed.
Measurement Sequence
Troubleshooting Guide
The TN-100 turbidimeter routinely performs self-diagnostics, and
will automatically generate messages to provide you with specifi c
diagnostic information.
Routine Maintenance and Care
The supplied carrying case is optimal for protecting the instrument.
If you do not plan on leaving the instrument in the supplied carrying
case, when not in use, ensure that the instrument has been turned off
and that a clean sample vial fi tted with a black cap has been placed in
the sample well. This will ensure that a minimal amount of dust and/or
debris will be able to settle on the optics of the instrument.
Proper measurement of the turbidity of a sample requires the use
of a vial that is free of marks, smudges, scratches and bacterial
growth. Sample vials must be handled with absolute care to
avoid contamination or damage, which might change the optical
characteristics of the glass. Scratches, fi ngerprints, and water droplets
on the sample vial or inside the sample well can cause stray light
interference leading to inaccurate readings.
Cleaning the vial is accomplished by washing the interior and exterior
of the vial in a detergent solution. Once cleaned, the vial should be
rinsed thoroughly 8 to 10 times with clean distilled water to eliminate
the possibility of detergent buildup and streaking.
Vials can also be acid washed periodically and coated with a special
silicone oil to fi ll small scratches and mask the imperfections in the
glass. Since the silicone oil required for this application should have
the same refractive characteristics as glass, it is recommended
that the oil be obtained from us. Care should be taken not to apply
excessive oil that could attract dirt or contaminate the sample well
of the meter. Once the oil has been applied to the vial, the excess
oil should be removed with a lint-free cloth. The result should be a
sample vial surface with a dry appearance, but with all imperfections
fi lled with oil.
Sample vials should always be handled from the top or by the cap
to avoid fi ngerprints or smudges. After a vial has been fi lled with
a sample and capped, the outside surface should be wiped with a
clean, lint-free absorbent cloth until it is dry. Cleaned and dried vials
should be stored with the black caps on. The vials can be stored in the
carrying case. During normal operation you may use any typical glass
cleaner along with a lint free cloth or tissue (Kimwipes
®
), to clean the
outside of the vials.
Condensation may appear on the vial when your sample is very cold
and the relative air humidity is high. When this happens, the turbidity
that you read may be higher than the actual turbidity due to the light
scattered by the condensate on the vial. To alleviate this problem,
coat the vial with an anti-fogging agent, or by running warm water
over the vial for a short period of time to warm the sample prior
to measurement.
Ordering Information
ECTN100IR
Waterproof TN-100 handheld turbidimeter
with set of 4 calibration standards (800, 100,
20.0 & 0.02 NTU), sample vials, lint-free cloth,
silicone oil, batteries, and hard carrying case
ECTN100NOSTDS
Waterproof TN-100 handheld turbidimeter,
sample vials, lint-free cloth, silicone oil,
batteries, and hard carrying case
TN100CALKIT
Calibration kit set – standard solutions (0.02,
20.0, 100, 800 NTU) 60 mL each and (4) vials
ECTN100CUVKT Pack of 3 sample vials
ECTN100CUVKIT4 Pack of 4 sample vials
ECSILICONEOIL Silicone oil (10 mL)
32X366401 Replacement light shield cover
67X357201 Replacement cloth
Powers on and shuts off the meter.
The meter automatically shuts off 20 minutes
after last key press.
Initiates the calibration mode.
Press during calibration mode to abort the
calibration and enter Standby “
” mode.
When in measurement mode, the READ/ENTER key
is used to perform a measurement.
Single Measurements: When the key is pressed
and released immediately (less than 0.3 seconds),
the display will blink “
” for 10 times and then
display the measured value.
Continuous Measurements: If the READ/ENTER
key is pressed and held, the instrument will perform
a continuous measurement during which the display
is updated every 2 seconds. This can be used for
indexing vials. (This function is not available in
calibration mode).
After the READ/ENTER key is released,
the instrument will automatically perform a
single measurement.
During calibration mode, these keys are used
to select the calibration point in an incremental/
decremental manner. Note: This meter uses an
auto incrementing feature, i.e. after the successful
calibration of one point it automatically selects the
next calibration point, or automatically exits the
calibration mode after the fourth calibration point.
See also “Restoring Factory Calibration”.
Sample Well
Index Mark
Liquid Crystal Display
Keypad
Sample Vial
Blinks
Press ENTER to accept
Press ENTER to accept
Press ENTER to accept
Press ENTER to accept
Blinks
Blinks Blinks
Blinks
Place the CAL 1
standard into the sample
well and press “CAL”
Place the CAL 4
standard into the
sample well
Place the CAL 2
standard into the
sample well
Place the CAL 3
standard into the
sample well
CAL 1
800 NTU
CAL 2
100 NTU
CAL 4
0.02 NTU
CAL 3
20.0 NTU
Ready To Measure
Power on meter or from
Standby mode, press and
release READ/ENTER
“
” blinks until stable,
then displays measured value
Place sample
vial into the
sample well
Sample
Unknown
NTU
Message Description Corrective Actions
Calibration Error. The meter is
unable to recognize the 800
NTU Calibration Standard.
Check or replace the
800 NTU calibration
standard.
Calibration Error. The meter is
unable to recognize the 100
NTU Calibration Standard.
Check or replace the
100 NTU calibration
standard.
Calibration Error. The meter is
unable to recognize the 20.0
NTU Calibration Standard.
Check or replace the
20.0 NTU calibration
standard.
Calibration Error. The meter is
unable to recognize the 0.02
NTU Calibration Standard.
Check or replace the
0.02 NTU calibration
standard.
General Calibration Error.
There is not suffi cient signal
to achieve the appropriate
resolution.
Perform recalibration
with all (4) standards.
Excessive stray light detected.
Ensure the vial is
properly seated in the
sample well. Use light
shield cover.
Lamp Failure. Return unit.
“Over Range”; value is above
maximum measurement range.
Dilute sample.
Low battery indication. The
batteries need to be replaced.
Replace batteries.
Applying a thin
fi lm of silicon to
the sample vial
Fill line
Insert vial containing
sample or calibration
standards before
powering on.
Alternatively, from
“
” mode,
press READ/ENTER.
“X.X” is
software
revision
number
Vial is currently
Reading in
measurement mode
Reading in (Nephelometric
Turbidity Units (NTU) is
displayed. “
” error
message will occur if a
vial is not present.
Calibration Standards Battery Indicator
Align index mark
on the vial with
the index mark on
the turbidimeter
Light Shield Cover
- for covering the vial
Intended Use, Maintenance & Precautions
This instrument is designed for turbidity measurement of water-based
solutions. For routine maintenance dust or wipe the display using a damp
cloth. If necessary, warm water or a mild water based detergent can be
used. Immediately remove any spilled substance from contact with the
meter using the proper cleaning procedure for the type of spill.
• Do not use this equipment in potentially explosive atmospheres.
• Ensure that no liquid enters the instrument.
• Do not use any aggressive cleaning chemicals (solvents or similar
agents).
• There are no user serviceable parts inside. Attempts to service internal
parts may void the warranty.
• WARNING: No modifi cation of this equipment is allowed.
Thermo Scientifi c
™
Eutech
™
TN-100 Waterproof Turbidimeter Operation Instructions
Thermo Scientifi c
™
Eutech
™
TN-100 Waterproof Turbidimeter Operation Instructions
www.esis.com.au
Ph 02 9481 7420
Fax 02 9481 7267
esis.enq@esis.com.au