Do you have a question about the Thermo Scientific Microm HM355S and is the answer not in the manual?
Provides contact information for Anatomical Pathology divisions.
A welcoming message to the user from Thermo Fisher Scientific.
Explains symbols and conventions used throughout the manual and on the instrument.
Details important safety information for personal protection during operation.
Outlines general safety precautions to prevent injury and equipment damage.
Defines the proper use of the microtome in biology, medicine, and industry.
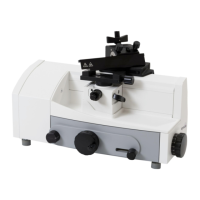
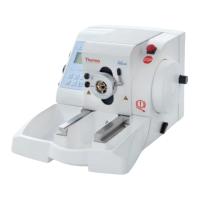
Provides a detailed overview of the Microm HM355S rotary microtome.
Lists the standard equipment and accessories included with the microtome.
Lists optional accessories available for the microtome with their catalog numbers.
Presents detailed technical specifications and parameters for the microtome.
Provides step-by-step instructions for unpacking and setting up the microtome.
Guides users through the initial setup procedures after unpacking the instrument.
Explains how to connect and use the optional foot pedal for operation.
Details the layout and functions of the microtome's operating panel and its controls.
Explains the functions of various keys and the information displayed on the panel.
Describes how to set the upper and lower limits of the cutting window.
Details the procedures for starting and stopping the motorized cutting drive.
Explains the operation of both mechanical and electronic hand wheel brakes for safety.
Describes the function and use of the emergency stop button and device.
Explains how to view section count, sum of thicknesses, and remaining travel.
Details the function of the section counter and how to reset it.
Describes the display of the sum of cut sections in microns.
Explains how the remaining travel distance for sectioning is displayed.
Guides on setting the desired section and trimming thicknesses using the control knob.
Explains how to perform trimming and obtain first cuts using the instrument.
Details how to use the fine feed for precise specimen adjustment.
Describes the cutting movements and the retraction function for specimen protection.
Explains how to use the motorized cutting drive and set cutting speed.
Details how to use the motorized coarse feed for specimen positioning.
Introduces the different operating modes available for sectioning.
Explains the two methods for selecting operating modes.
Describes how to select modes using the dedicated MODE button.
Explains how to select modes via the menu using knob [A].
Details the interval stroke operating mode.
Details the single stroke operating mode.
Details the multi stroke operating mode.
Details the continuous stroke operating mode.
Instructions for setting the instrument's time and date.
Describes how to select between NORMAL and LARGE display modes.
Explains how to enable or disable the retraction function.
Guides on how to change the display language of the instrument.
Details how to adjust and set the cutting speed of the microtome.
Explains how to reset all settings to their factory default values.
Describes the memory function for storing and recalling the "first-cut-position".
Explains how to perform manual sectioning in rocking mode.
Details how to lock and unlock the push-in hand wheel handle for safety.
Discusses the different adapters available for specimen clamping.
Describes the non-orienting adapter for specimen clamps.
Explains the orienting adapter for aligning specimens with the knife.
Provides instructions on how to change and fasten specimen clamps.
Explains how to readjust specimen clamps for optimal clamping strength.
General overview of specimen clamping methods.
Details the use of the universal cassette clamp.
Explains the adjustable universal cassette clamp and its features.
Describes the standard specimen clamp for rectangular and square blocks.
Explains inserts for round specimens and V-inserts for the standard clamp.
Details the use of the foil clamp for thin specimens.
Describes holders suitable for clamping small specimens.
Introduces the different types of knife and blade carriers.
Details the Disposable Blade Carrier "ER" for high and low profile blades.
Instructions for using high profile blades with the ER carrier.
Explains how to adjust the clearance angle for optimal sectioning.
Details the Disposable Blade Carrier "E" for various blades.
Instructions for moving the blade carrier on the console.
Describes knife guards for protection against injury.
Details the Knife Carrier "C" and its functions.
Instructions for moving the knife carrier on the console.
Explains knife guards for protection during adjustments.
Describes the clamping plates for C- and D-knives.
Explains how to readjust knife or blade carriers for proper clamping.
Describes the section waste tray and its features.
Introduces the large field magnifier and its magnification.
Provides instructions for mounting the large field magnifier.
Provides essential points for cutting usable sections.
Emphasizes the importance of a sharp and clean knife/blade.
Explains how to set the correct knife angle relative to the specimen block.
Offers guidance on preventing common errors during sectioning.
Lists common problems, their causes, and solutions for troubleshooting.
Provides daily cleaning and care procedures for the microtome.
General maintenance recommendations.
Recommends annual routine maintenance by a trained technician.
Information about available service contracts for the instrument.
Details procedures for replacing fuses.
Step-by-step guide to replacing the instrument's fuses.
Instructions for returning the instrument for repair or routine maintenance.
Steps to take when preparing the instrument for transport.
Specific measures for transporting the instrument outside buildings.
Guidance on proper disposal of the instrument at the end of its life.
Outlines warranty provisions and conditions that may invalidate the warranty.
Details the CE marking and compliance with relevant standards.
| Microtome Type | Rotary |
|---|---|
| Feed Mechanism | Motorized |
| Horizontal specimen feed | 28 mm |
| Vertical stroke | 70 mm |
| Frequency | 50/60 Hz |
| Blade Type | Disposable blade |
| Specimen orientation | 8° X/Y |
| Specimen Illumination | Optional |
| Specimen Clamp | Universal |
| Operating voltage | 100 – 240 V |
| Section Thickness Range | 0.5 to 100 µm |
| Trimming thickness range | 1 to 600 µm |
| Trimming thickness setting | 1 – 10 µm in 1 µm increments, 10 – 20 µm in 2 µm increments, 20 – 50 µm in 5 µm increments, 50 – 100 µm in 10 µm increments, 100 – 600 µm in 50 µm increments |