02
(Fig 1)
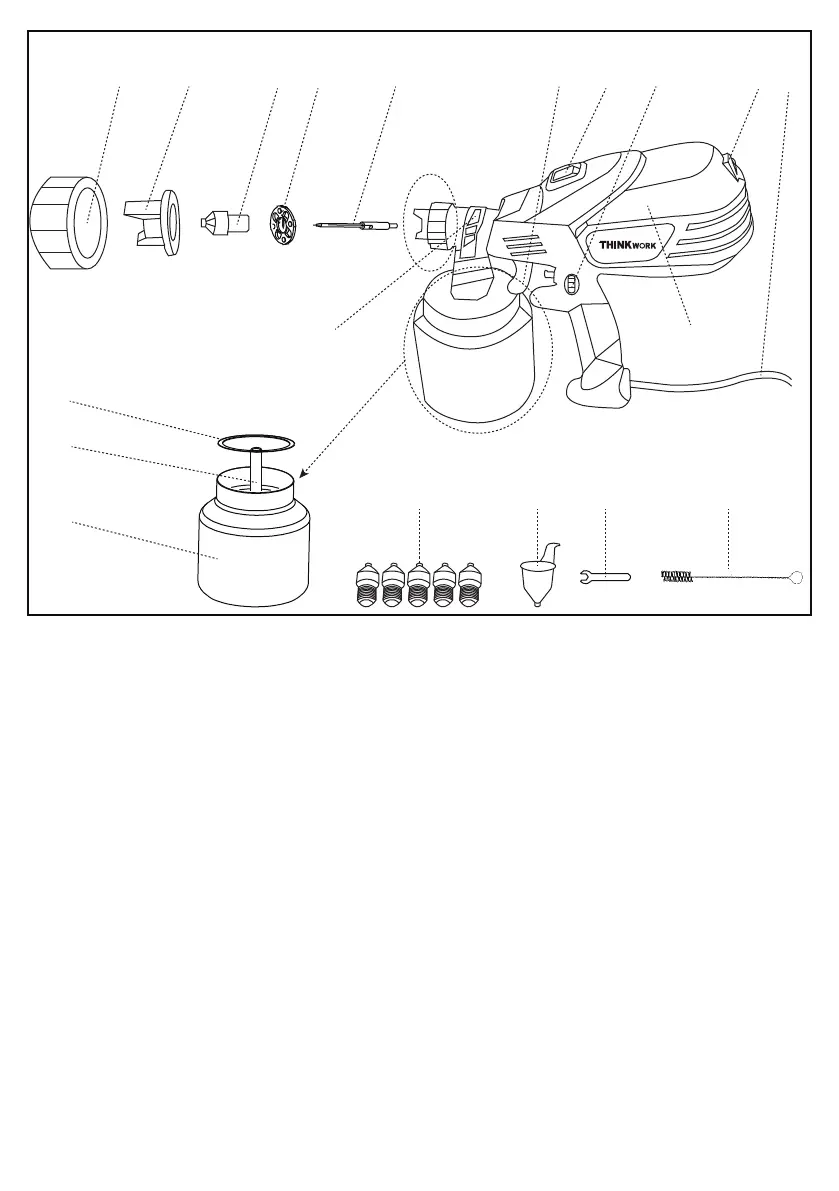
Sprayer Structure
► Part A:Spray gun unit:under its action, the sprayer transfers and atomizes the paint. This part is
relatively easy to block, please be sure to clean it after use. In addition, if the attachment is damaged or
accidentally lost, please contact us.
► Part B:Power unit:the motor can generate powerful airflow to drive paint flow and atomization.Please
note that electronic components should not be exposed to water and avoid storing in a humid environ-
ment.
●
1:Nut:it is used to fix the nozzle and air cup.
●
2:Air cup:it is used to adjust the direction of spraying: vertical, horizontal and circular.
●
3:Nozzle:different nozzles are used to spray different paints and do different projects.
●
4:Head seal:divide the air.
●
5:Spin tip:prevent and allow paint to enter the nozzle.
●
6:Trigger:control the spin tip to prevent and allow paint to enter the nozzle.
●
7:Body lock:lock and unlock Part A and Part B.
●
8:Flow control knob:used to adjust the flow rate of the paint.
●
9:Motor switch:turn the motor on and off.
●
10:Power cord:connect to a power outlet.
●
11:O-ring:avoid air leaks in the canister.
●
12:Paint channe:push the paint to the nozzle.
●
13:Canister:store paint.
●
14:Nozzles:gather the paint and prepare to start atomization.Size: 1.0mm, 1.5mm, 1.8mm, 2.0mm, 2.5mm.
Please note that one of the nozzles was already installed in the body.
●
15:Viscosity cup:used to measure the viscosity of paint. Under normal circumstances, the paint needs to be
mixed with a thinner to achieve a viscosity suitable for spraying. The thinner of water-based paint is water, and
the thinner of oil-based paint is banana oil, turpentine oil, gasoline, etc.
●
16:Nozzle spanner:used to replace the nozzle.
●
17:Cleaning Brush:used to clean the sprayer itself.
1 2 3 4
A
5
11
12
13
14 15 1716
7 8
B
9 106
 Loading...