5
• Charging begins automatically; the Charge LED
on the transmitter turns green as soon as the charging
contacts of the transmitter and headphones areconnected.
The device now switches automatically to standby mode.
• When charging is complete, the green Charge LED ()goes
out.
• Switch on the playback device (TV or audio component)
that your transmitter is connected to, and initially set the
volume to about 30–40% of the maximum volume to avoid
damaging your hearing during setup.
• Press and hold the for one second to
switch on the transmitter.The status LED ()begins
to light up blue. The status LED ()begins to ash
blue ( display).
• The status LED ()isconstantly lit blue as soon as
an audio signal is received.
• If no audio signal is received, the transmitter automatically
switches to standby mode after about 5minutes. The
status LED ()islit red.
• Alternatively,you can later use the on
the remote control. Note herethat the transmitter must be in
standby mode. The status LED ()islit red.
• Using this product limits your perception of ambient
noise. Forthis reason, do not operate any vehicles or
machines while using this product.
• Always keep the volume at areasonable
level. Loud volumes, even over short
periods, can cause hearing loss.
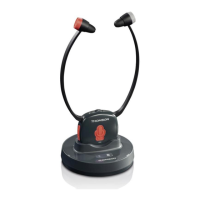
• Switch on the headphones by pressing and holding the
for about 2seconds. The
lights up red, and then changes to green as soon
as thereisasignal connection between the transmitter and
headphones. If no audio signal is detected, the LED stays red.
• Should the LED stay red, you will need to pair the transmit-
ter and receiver.Todoso, switch the transmitter completely
off using the and the
of the headphones. No LED is lit on the transmitter or
headphones. Now press the on the
headphones and keep it pressed until the
ashes green (about 5seconds). Press the
on the transmitter within the next 15 seconds.
An acoustic signal will sound to conrm successful pairing.
• After successful pairing, the playback device (for example,
TV) should now be audible through the earpads.
• Adjust the headband and put the headphones on.
• Set the desired volume using the on
the headphones.
To get the best possible playback (and to avoid unwanted
noise of the playback device), initially reduce the volume of
the headphones ()and set the volume of the playback
device (for example, TV) to about 70–80%. Then adjust the
on the headphones to suit your needs. This
is important for analogue input selection in particular (for
example, headphone output of the TV).
• If the charge level of the headphone batteries is low,the
Power status LED on the headphones will ash red.
Five minutes beforeautomatic switch-off,awarning tone will
also sound: one tone per minute for four minutes and two
tones in the last minute. The headphones then switch off
automatically.
• In the case of interference or poor reception, the head-
phone sound is muted and the LED is lit red.
• These headphones can also be used as standardwired
headphones. Forthis purpose, connect the headphone
output socket of your playback device to the 3.5 mm
stereo jack socket on the headphones ()using an an-
alogue audio cable ( ). Please ob-
serve the technical specications for the audio/headphone
output in the operating instructions of your playback
device; or,ifanything is unclear,consult an expert.
• If you place the headphones onto the charging contacts
(1) during operation, the headphones switch off (Power
status LED turns red) and the transmitter goes into standby
mode (Power status LED (11) is lit red). At the same time,
the wireless connection is interrupted and the headphones
go into charging mode (CHARGE LED is lit green).
• As soon as an audio signal is detected again (and the
headphones areremoved from the charging contacts), the
transmitter automatically switches back on and the Power
status LED (11) is lit blue; the Power status LED on the
headphones is lit green (Fig. 6).
This product has atelescopic antenna (Fig. 3) that enables
DAB+ and FM reception.
Please note:
• Always pull the antenna out completely.
 Loading...