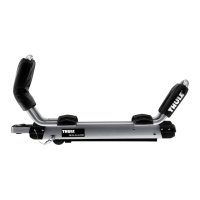
LOWERING CARRIER / MOUNTING THE KAYAK
ABAISSEMENT DU PORTE-KAYAK ET FIXATION DU KAYAK
DESCENSO DEL PORTACARGA / MONTAJE DEL KAYAK
6
• If possible, fold side view mirror against vehicle before loading kayak.
Si possible, repliez le rétroviseur contre le véhicule avant le chargement du kayak.
Si es posible, repliegue el retrovisor contra el vehiculo antes de cargar el kayak.
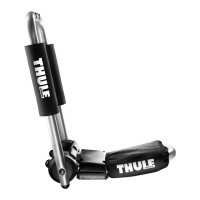
• One arm at a time, squeeze handle and pull down. Arm will rotate
to vertical position.
Un bras à la fois, pressez la poignée et tirez vers le bas. Le bras tourne
en position verticale.
Un brazo después del otro, oprima el asa y tire hacia abajo. El brazo
girará a la posición vertical.
NOTE: Please keep following notes in mind when performing next steps.
REMARQUE: Gardez les remarques suivantes à l'esprit pour effectuer les étapes suivantes.
NOTA: Tenga en consideración las advertencias a continuación cuando realIice
loas pasos. siguientes.
NOTE: Lower arm slowly to ensure it does not contact side of vehicle.
REMARQUE: Abaissez le bras lentement pour vous assurer qu'il ne touche pas
le véhicule.
NOTA: Baje el brazo lentamente para asegurarse de que no toque el lado
del vehículo.
NOTE: In load position, there should be approximately 4" clearance
between arm and vehicle. If not, extend load bars further from
foot before loading kayak.
REMARQUE: Dans la position de chargement, il devrait y avoir un espace d’environ 4 po
entre le bras et le véhicule. Si l’espace est insuffisant, déployez les barres
de toit un plus au delà des pieds avant de charger le kayak.
NOTA: En la posición de carga, debe haber una separación de aproximadamente
4 pulgadas entre el brazo y el vehículo. Si no fuera así, extienda las
barras de carga más afuera del pie antes de cargar el kayak.
• Pull out and down on the bottom cradle to lower the arm to the loading
position. Push slightly against top of arm to ensure it latches in
down position.
Tirez le berceau inférieur vers l'extérieur et le bas pour abaisser le bras en
position de chargement. Poussez légèrement contre le haut du bras pour
vous assurer qu'il se verrouille en position abaissée.
Tire hacia afuera y hacia abajo en la cuna inferior para bajar el brazo a la
posición de carga. Tire ligeramente de la parte superior del brazo para
asegurarse de que se quede enganchado al estar bajado.
Push to latch
Poussez pour
verrouiller
Empuje para
enganchar