EasyManua.ls Logo

Thule Spare me 963PRO User Manual

Thule Spare me 963PRO
12 pages
To Next Page IconTo Next Page
Page #1 background imageLoading...
Page #1 background image
5015944_01 1 of 9
SPARE ME
963PRO
part
pièce
parte
description
description
descripcion
part number
numéro de pièce
numero de parte
qty.
qté
cant.
A bike unit frame / cadre de porte-vélo / marco de la unidad para bicicletas 1
B mounting plate / plaque de montage / placa de montaje 753-3532 1
C washer M8 / rondelle M8 / arandela M8 951-0816-54 1
D hex key M5 / clé hexagonale M5 / llave hexagonal M5 853-0930 1
E locking knob / bouton de verrouillage / perilla de cierre 753-1908-03 1
F washer M6 / rondelle M6 / arandela M6 951-0616-54 2
G socket screw M6 / vis CHC M6 / tornillo de cabeza hueca M6 918-0612-31 2
H rubber spacers / entretoises en caoutchouc / espaciadores de goma 853-5874 4
I
carriage bolt (included with 9033 Tram hitch snow sport carrier)
vis de carrosserie (incluses avec le porte-charges pour sports d’hiver Tram 9033)
perno de carruaje (incluido con el soporte para equipos de nieve con accesorio de remolque 9033)
752-1471-001 2
J strap assembly / sangle / ensamblaje de correa 753-2030-03 1
K stay-put cradle / berceau fixe / soporte “stay-put” 853-7887 4
L anti-sway cage / cage stabilisatrice / jaula antibalanceo 852-2903-001 2
M ripple strap / sangle crantée / correa ondulada 852-3006-001 6
N short mounting bracket / support de montage court / abrazadera de instalación corta 752-1425-001 1
O long mounting bracket / support de montage long / abrazadera de instalación larga 752-1425-002 1
P short stando extension / rallonge avec écartement courte / extensión de apoyo corta 852-3482-001 1
Q long stando extension / rallonge avec écartement longue / extensión de apoyo larga 852-3305-001 1
R lock cylinder / verrou / cerradura cilíndrica 2
S locking keys / clés de verrouillage / llaves de cierre 2
T change key / clé de rechange / llave de cambio 1
U strap assembly with plastic buckle / sangle avec boucle en plastique / conjunto de correas con hebilla plástica 753-1492 1
PARTS INCLUDED • PIÈCES INCLUSESPIEZAS INCLUIDAS
A
B
H F G
M
E
C
STR
JID
U
O N
Q P
L
PRODUCT REGISTRATION / ENREGISTREMENT DE PRODUIT / REGISTRO DE PRODUCTO
Model # XXXXXXXXXXXXXXXXXXXXXX Purchase Date XXXXX/XXXXX/XXXXX Place of PurchaseXXXXXXXXXXXXXXXXXXXXXX
Register online at www.thuleracks.com/register THULE 42 Silvermine Road Seymour, Connecticut 06483 (800) 238-2388
K

Other manuals for Thule Spare me 963PRO

Question and Answer IconNeed help?

Do you have a question about the Thule Spare me 963PRO and is the answer not in the manual?

Thule Spare me 963PRO Specifications

General IconGeneral
Model number963PRO
Maximum number of bikes2
Product TypeBike Carrier
CompatibilitySpare tire mounted
Load capacity60 lbs
Weight5 kg
MaterialSteel
Weight Capacity60 lbs
Mounting TypeSpare tire
ColorBlack
Included Componentsstraps
LockableYes (lock not included)

Summary

Parts Identification

Component List and Diagram

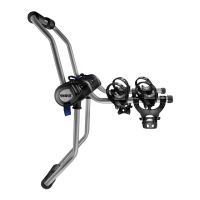
Overview of all included parts with labels, descriptions, and part numbers.

Warnings and Limitations

General Safety and Usage Guidelines

Covers vehicle compatibility, load limits, safety strap use, and general precautions.

Step 1: Install Base Plate

Prepare for Base Plate Installation

Steps to remove the spare tire cover, lug nuts, and spare tire.

Attach Base Plate to Vehicle

Fitting the base plate to the vehicle and notes on bolt patterns.

Step 3: Reinstall Spare Tire

Reinstall Spare Tire and Tighten Nuts

Place spare tire back over the plate and retighten lug nuts.

Check Tire Inflation

Ensure the spare tire is properly inflated.

Step 4: Use Mounting Brackets and Extensions

Bracket and Extension Selection Guide

Guidance on selecting the correct mounting brackets and standoff extensions based on tire width.

Step 4: Use Mounting Brackets and Extensions (Continued)

Mounting Bracket and Standoff Combinations

Details on using different bracket/extension combinations for various tire sizes.

Attaching Longer Mounting Bracket

Instructions for attaching a longer mounting bracket using a hex key.

Step 5: Adjust Square Tube

Adjust Square Tube for Offset Tires

How to move the square tube for left or right offset spare tires.

Remove Plastic Trim

Instruction to remove a plastic trim piece before adjusting the tube.

Step 6: Install Lock Cylinder into Lock Knob

Remove Lock Knob Plug

Using a screwdriver to remove the plug from the lock knob.

Insert Lock Cylinder

Using the change key to insert the lock cylinder into the lock knob.

Step 7: Install Bike Unit

Slide Bike Unit onto Mounting Plate

Sliding the bike unit onto the mounting plate tube.

Tighten Mounting Knob

Securing the bike unit by threading the knob with a washer.

Step 8: Special Instructions

Spacer Application for Tire Contact

Attaching spacers to ensure proper contact between the carrier and the tire.

Correct vs. Incorrect Fitment

Visual guide to correct and incorrect positioning of the carrier on the tire.

Step 9: Adjust Arms and Tighten Knobs

Loosen and Lift Arms

Loosening the knobs and lifting the carrier arms.

Firmly Tighten Knobs

Securing the arms by firmly tightening the knobs.

Step 10: Attach Safety Strap

Safety Strap for Oversized Tires

How to attach the blue safety strap for oversized tires (above P235).

Step 11: Load Bikes

Bike Loading Order

Guidelines for loading bikes, starting with the heaviest.

Loading Precautions

Tips on loading order, starting with inner cradles and alternating directions.

Step 12: Bike Fit Adjustments

Adjust Bike Cradles

Rotating or shifting cradles for different bike geometries.

Secure Bike Frame with Straps

Ensuring straps are securely tightened around the bike frame.

Secure Bikes to Carrier

Using the provided webbing strap to secure bikes to the carrier.

Step 13: Anti-Sway Stabilization

Install Anti-Sway Cages

Aligning and attaching anti-sway cages to the cradle bottoms.

Step 14: Use Bike Locking Cable

Insert Lock Cylinder into Cable

Using the change key to insert the lock cylinder into the top locking cable.

Wrap and Lock Cable

Wrapping the cable over the bike tube and locking it.

Step 15: Use Strap Assembly

Secure Bikes with Load Strap

Using the blue load strap with plastic buckle to secure bikes to the rack frame.

Thule Rack Guidelines

General Rack and Accessory Use

Assists in using the rack system safely and encourages proper usage.

Fitment and Vehicle Compatibility

Emphasizes using the correct Fit Guide for vehicle compatibility.

Load Capacity and Security Checks

Guidelines on load limits, security checks during trips, and proper attachment.

Cargo and Driving Precautions

Advice on cargo projection, width, height, and driving behavior.

Thule Limited Lifetime Warranty

Warranty Coverage and Transfer

Details on what the warranty covers, its duration, and transferability.

Exclusions from Warranty

Lists conditions and damages not covered by the warranty.

Purchaser's Responsibility and Remedies

Outlines purchaser's duties and exclusive remedies for defects.

Spare Me 963PRO Fit Information

Vehicle Fitment Guide

Lists vehicle makes and models with applicable year ranges for the Spare Me 963PRO.

Specific Fit Tips

Provides critical fit notes, including exceptions for tire hangers and backup cameras.

Related product manuals