EasyManua.ls Logo

Tiger T10 - User Manual

Tiger T10
24 pages
Print Icon
To Next Page IconTo Next Page
Loading...
USERS MANUAL
Question and Answer IconNeed help?

Do you have a question about the Tiger T10 and is the answer not in the manual?

Summary

01. Safety Guidelines and Restrictions

Water Precautions

Product is not waterproof; avoid water contact to prevent malfunction or fire.

Folding Parts Safety

Keep body parts away from folding/spinning components to prevent severe injury.

Prohibited Acrobatics

Stunts like jumping/dropping are prohibited to prevent product damage and accidents.

Single Rider Policy

Product is designed for one adult only; children/two people are prohibited.

Unauthorized Modifications

Do not open or tamper with electric parts like battery, controller, or motor.

Legal Compliance

Obey traffic laws, including prohibitions on unlicensed/drunk driving and cargo loading.

Beginner Riding Advice

Beginners should use low speed and practice in a safe area before riding.

Front Brake Usage

Avoid sudden braking with the front brake to prevent overturning.

Downhill Riding

Slow down downhill and use brakes properly to manage heat on the disk.

Steep Slope Operation

Avoid steep slopes exceeding product specifications to prevent damage.

Safe Lifting Procedure

Lift product by body and handle simultaneously to prevent damage and injury.

Safety Equipment

Wear a full-face helmet and protective gear; avoid unsuitable footwear.

02. Precaution Before Driving

Night Driving and Safety Gear

Avoid night driving; wear safety gear and drive safely.

Mode Selection and Braking Readiness

Choose the appropriate mode and be ready to brake suddenly.

Safe Turning Techniques

Slow down when turning to avoid overturning or slipping.

Backward Movement

For backward movement, dismount after stopping.

Prohibited Riding Surfaces

Avoid slippery, crowded, steep, or uneven roads with accident risks.

Pedestrian Crossing Safety

Dismount for pedestrian safety when crossing pedestrian crossings.

Awareness of Surroundings

Do not drive near vehicles, animals, or pedestrians.

Obstacle Navigation

Slow down when passing speed bumps and obstacles.

Braking Method

Brake using the handle, not your foot, for effective deceleration.

Motor;Brake Heat Warning

Be cautious of potential burns from motor and brake heat after driving.

One-Handed Steering Prohibition

Do not ride while holding the handle with only one hand.

Kickstand Usage

Ensure the kickstand is up before riding.

03. Name of Each Part

Control and Display Components

Identifies the display, handle stem, and RGB lights.

Powertrain and Braking Components

Details the motor, wheels, and front disc brake.

Chassis and Support Features

Covers the footboard, suspension, folding lock, and kickstand.

Lighting Elements

Identifies front and rear LED lights.

04. How to Use the Product

Product Unfolding Procedure

Step-by-step guide to unfold the scooter stem and lock it securely.

T-Bar Assembly

Instructions for loosening screws and attaching the T-bar to the handle stem.

Display and Brake Lever Assembly

Guide to positioning and tightening the display and brake levers.

Product Folding Procedure

Steps to safely fold the scooter stem for storage or transport.

Starting the Scooter

How to turn on the scooter and prepare for riding.

Riding Stance

Proper posture and foot placement for stable riding.

Acceleration and Deceleration

Using the throttle for acceleration and brakes for stopping.

Pre-Ride Safety Check

Check folding parts, handle, and main fixing points for security.

Throttle Malfunction Caution

Warning about potential sudden acceleration and how to stop it.

Stopping the Scooter Safely

Use brakes gently and be aware of ABS function for smooth stopping.

05. Display Introduction

Display Interface Overview

Explanation of the scooter's display screen elements and controls.

Scooter Power and Light Controls

How to turn the scooter on/off and control the lights.

Speed Gear and Mode Selection

How to switch speed gears and change operational modes.

Display Information Functions

Understanding TIME, TRIP, ODO, and VOL readings on the display.

06. RGB Lights Introduction

RGB Light Installation

RGB lights are located in the stem pole and on the side of the body deck.

App Setup for RGB Lights

Scan QR code, download App, and connect via Bluetooth to control lights.

Light Color and Effect Customization

Setting colors, gradients, and dynamic effects via the mobile app.

07. How to Use the Charger Correctly

Basic Charging Method

Steps for connecting the charger and understanding charging indicators.

Charging Safety Precautions

Warnings against misuse, improper environments, and unauthorized chargers.

08. Safety Precautions for Lithium-ion Battery

Battery Care and Environmental Factors

Protect battery from exposure, temperature, and follow charging guidelines.

Battery Performance and Lifespan

Understand how temperature and usage affect battery performance and lifespan.

Safe Charging Practices

Use genuine charger, charge in ventilated areas, and monitor temperature.

Battery Storage Guidelines

Store battery in a dry place, avoid extreme temperatures, and maintain charge level.

Troubleshooting Battery Issues

Handle damaged batteries, overheating, smoke, or ignition immediately.

09. Safety Guidelines Before Driving

Pre-Ride Throttle and Handle Check

Verify throttle return and handle fastening for safe operation.

Brake System Inspection

Check brake force, pad wear, cable condition, and fixing bolts.

Tire Pressure and Condition

Check tire pressure (45-50 psi) and for wear or punctures.

Folding Part Tightness Check

Ensure bolts and nuts on folding and fixing parts are tight.

Immediate Stop Driving Conditions

Stop immediately for motor heating, brake errors, abnormal noise, smoke, or water.

10. Maintenance

Consumable Parts Replacement Timing

Periodically inspect and replace components like tires, brake pads, and cables.

External Damage Inspection

Check for deformation, cracks, or discoloration due to environmental exposure.

Heavy Driving Impact Checks

Inspect for fatigue breakdown after heavy use, jumps, or collisions.

Motor and Brake Heat Warning

Be aware of potential burns from hot motor and brake components.

Brake Adjustment Guide

How to adjust brakes when pads wear out and braking power decreases.

11. Product Specifications

Model and Motor Specifications

Details on item numbers, product names, and motor power ratings.

Battery and Speed Capabilities

Information on battery voltage/capacity and maximum speed limits.

Lighting, Braking, and Tyre Details

Specs for lights, brake systems, and tyre sizes.

Suspension, Steering, and Charging Times

Details on suspension, steering range, and charging duration.

Weight, Dimensions, and Frame Material

Specifications for net weight, package size, product dimensions, and frame material.

Overview

This document is a user manual for the TIGER electric scooter, providing detailed information on its functions, technical specifications, usage, and maintenance.

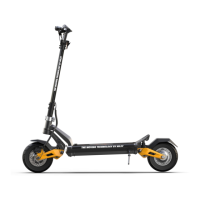
The TIGER electric scooter is designed for personal transportation, offering various models including T10, T10PRO, T9, and T9PRO. It features a robust design with an ultra-strong aluminum alloy 6061 body frame. The scooter is equipped with front and rear disc brakes, with some models featuring front and rear hydraulic brakes for enhanced stopping power. It also includes front and rear hydraulic suspension for a smoother ride.

Technical Specifications:

  • Models: T10, T10PRO, T9, T9PRO
  • Motor Power:
    • T10: 60V 1200W
    • T10PRO: 60V 2*1200W
    • T9: 52V 1000W
    • T9PRO: 52V 2*1000W
  • Lithium Battery:
    • T10: 60V 20.8A
    • T10PRO: 60V 20.8A
    • T9: 52V 15.6A
    • T9PRO: 52V 20.8A
  • Battery Capacity:
    • T10: 60V 24A
    • T10PRO: 60V 24A
    • T9: 52V 20.8A
    • T9PRO: 52V 20.8A
  • Max Speed:
    • Limited: 25km/h for all models
    • Unlimited:
      • T10: 55-60km/h
      • T10PRO: 65-70km/h
      • T9: 45-50km/h
      • T9PRO: 50-55km/h
  • Tire Size:
    • T10/T10PRO: 10*2.5inch (inflatable), 10*2.7inch (vacuum), 10*3.0inch (inflatable)
    • T9/T9PRO: 9*3.0 (vacuum)
  • Charging Time:
    • T10: 10-12h
    • T10PRO: About 5h (two chargers)
    • T9: 8-10h
    • T9PRO: About 5.2h (two chargers)
  • Net Weight (N.W.):
    • T10: 26/28kgs
    • T10PRO: 30/33kgs
    • T9: 26/27kgs
    • T9PRO: 29kgs
  • Product Dimensions (L*W*H):
    • T10/T10PRO: 1320*600*1215mm
    • T9/T9PRO: 1250*600*1200mm
  • Steering Positioning: Yes (left/right 45-60°)
  • Lights: Front deck light, Rear deck light, RGB side lights

Usage Features:

The manual outlines a clear process for unfolding and assembling the scooter. To unfold, the user lifts the stem while pushing up a "dunk" (likely a locking mechanism), then pushes the "dunk" down until it sinks into position, and finally locks the stem buckle. Assembling the T-bar involves loosening screws on the handle stem, placing the T-bar in the middle, and tightening the four screws. The display and brake levers are also assembled by adjusting their position and tightening fixing bolts with a 5mm hexagon wrench. Folding the scooter is the reverse process: loosening the stem buckle, pushing up the "dunk," and lifting down the stem.

Starting the scooter requires pressing the POWER button on the display for 3 seconds. The display automatically turns off after a few minutes of inactivity, and the LED lamp also turns off. The scooter is set to "zero start" from the factory, meaning users need to kick off the ground to initiate movement. Acceleration is controlled via the throttle on the display, while deceleration and stopping are managed by the brakes on the handle. The manual emphasizes gentle braking to engage the ABS function effectively.

The display provides essential information:

  • Gear (1,2,3): Speed gears.
  • Speed: Current speed.
  • Time: Ride time for a single ride.
  • Battery: Battery level.
  • TRIP: Mileage for a single ride.
  • ODO: Scooter's total mileage.
  • VOL: Battery voltage.

The display also features a power key, speed control, light switch (long press for 3 seconds), and mode switch (short press to change speed gear, long press for 3 seconds to turn lights on/off). Short pressing the power button cycles through TIME, TRIP, ODO, and VOL modes.

The scooter includes RGB lights in the stem pole and body deck, which can be controlled via a mobile app called "duoCo Strip." Users scan a QR code to download the app, connect to the Bluetooth controller, and then set the light color. The app offers features like colorful gradient, monochrome, double color gradient, colorful flashing, and colorful jump, and can even synchronize with music rhythm.

Charging involves opening the charging port cap, connecting the charger to the scooter and a household outlet. The charging status indicator shows red for charging and green for complete. It's crucial to close the charging port cap when not charging.

Safety Guidelines and Precautions:

The manual stresses several safety points:

  • Water: The product is not waterproof; avoid use in wet conditions or washing with water to prevent malfunction or fire.
  • Moving Parts: Be cautious of folding and spinning parts to avoid injuries.
  • Acrobatics: Jumping and dropping are prohibited as they can cause damage and accidents.
  • Companion Boarding: Designed for one adult only; prohibits children, infants, or two people from boarding.
  • Self-Tuning: Do not open or modify electric parts (battery, controller, motor system).
  • Laws: Comply with local road traffic acts and regulations; unlicensed, drunk driving, and carrying cargo are prohibited.
  • Beginners: Recommended to use at low speed and practice in a wide, safe area.
  • Braking: Avoid sudden front braking. Decelerate safely and use brakes properly, especially downhill.
  • Steep Slopes: Do not drive on excessive hill roads to prevent damage from overheating or low voltage cut.
  • Lifting: Lift the product by holding the body (footrest) with one hand and the handle with the other to prevent damage to the folding part or injury to the back/knees.
  • Safety Equipment: Always wear a full-face helmet and other protective gear (knee, elbow, hand, upper body). Avoid wearing slippers or high heels.
  • Night Driving: Avoid night driving; if necessary, wear helmets and guards.
  • Driving Conditions: Avoid slippery, crowded, steep, or uneven roads. Get off at pedestrian crossings. Do not drive in a way that threatens other transport. Slow down over speed bumps.
  • Burns: Be careful of heat from the motor and brake (especially disc) after driving.
  • One-Hand Driving: Prohibited.
  • Kickstand: Do not ride or drive with the kickstand down.

Throttle Error Troubleshooting:

  • Brake Sensor Error: Check brake levers and cables for sticking or faulty sensors.
  • Controller Fault: Internal controller may be faulty (water damage, burnt); may require replacement.
  • Motor Fault: Check motor cables for integrity; may require motor replacement.
  • Throttle Fault: Check internal spring and magnet sensor; may require opening the back cover of the throttle display.
  • In case of defects, contact the dealer for help; do not attempt self-repair.

Lithium-ion Battery Safety Precautions:

  • Care: Protect from direct exposure to children and pets.
  • Performance: Affected by external temperature (reduced performance in winter). Discharge performance reduces after 300+ charges/discharges. Replace with genuine battery when usage time shortens.
  • Charging: Use only genuine battery and charger. Charge in a well-ventilated, dry place away from flammable materials, at 0-45℃. If moving from cold to warm, charge after 1-2 hours to prevent condensation.
  • Storage: Keep away from snow, rain, and direct sunlight. Store at room temperature (10-20°C). For storage over 3 months, charge to 70-80% (not full charge).
  • Trouble Symptoms: Discontinue use immediately if damaged, leaking, sour odor, or deformation. If overheating, smoking, or ignition occurs, stop charging/use, move outdoors, and use a fire extinguisher. Do not spray water. Avoid long charging times unattended due to high energy density and risk of ignition.
  • Misuse: Short-circuiting, polarity change, or impact can cause malfunction or fire. Stop use and seek inspection if impacted.
  • Water Inflow: Prevent water from entering the battery to avoid fire or electric shock.
  • Caution: Disconnect battery from the main unit; prohibit recharging, reinstalling, or other applications.
  • Disposal: Separate battery from product, ensure terminals are not short-circuited, and dispose of as industrial waste.
  • Warranty: Battery disassembly, modification, and repair are not covered under warranty.

Maintenance Features:

Regular maintenance is crucial for safety and longevity.

  • Pre-Ride Checks:
    • Throttle and Handle: Check that the accelerator throttle lever returns to the home position. Ensure no excessive leaning or manipulation to prevent internal damage. Check fastening and clearance of the QR lever.
    • Brake and Cable: Verify sufficient braking force. Inspect brake pads for wear, cables for looseness or damage. Check for unusual feelings or noises, and ensure bolts/nuts of brake fixing parts are tight.
    • Tire Pressure and Uniaxial Condition: Check front and rear tires for wear, punctures, and proper air pressure (45-50 psi). Shortage of air increases puncture risk. Judge replacement time by observing tire appearance.
    • Tightening Check: Ensure all bolts and nuts, especially on folding and handle parts, are tight.
  • Immediate Stop Driving (Danger!): Stop driving immediately and contact a service center if you experience: unusual motor heating, brake status error, error messages on the instrument cluster, throttle not returning to original position, abnormal noise, product smoke/ignition/sour odor, driving in rain/wet conditions, or any other unreasonable driving condition.
  • Consumable Parts: Periodically inspect and replace components like suspension, tires, tubes, wheels, bearings, headset bearings, discs, brake pads, cables, and folding parts.
  • External Damage: Inspect for deformation, cracks, or signs of exceeding life expectancy due to compression or strong sunlight. Heavy driving (jumps, impacts, long use on poor roads) can cause fatigue breakdown; check and replace parts as per schedule.
  • Brake Adjustment: As brake pads wear, the gap between the pad and disc widens, reducing braking power. Contact the dealer to change brake pads or adjust the brake device.
  • Important Notice: Be aware of the risk of burns from the heat on the motor and brake (especially disc rotor) after running. The bolts of the motor, rim, and motor shaft may loosen due to ABS function.

Tiger T10 Specifications

General IconGeneral
BrandTiger
ModelT10
CategoryBicycle
LanguageEnglish