2
ENGLISH 02N-095000
UNTIL IT RELEASES FROM THE CASE. AFTER THE WATCH IS SET, TO
LOCK THE CROWN GENTLY PUSH AND TURN THE CROWN UNITL IT
IS FIRMLY LOCKED AGAINST THE CASE.
1. Crown position A (completely pushed in or the “unlocked” screw-down crown)
will allow you to manually wind the watch movement if you wish to do so.
2. Crown position B is used to adjust the date and is also used to adjust the
GMT hand.
A. Turning the crown clockwise will adjust the date
B. Turning the crown counter-clockwise will adjust the GMT hand
When setting the GMT hand, you will look at the index track along the edge
of the dial. You will note that this track is 0 to 24 hours. The GMT hand will
only travel the dial once every 24 hours. Select the correct position to display
the current time in the 2nd time zone you wish to track.
3. Crown position C is used to adjust the time. When setting the time, make
note of Noon and Midnight to ensure you are setting the time correctly. If the
date is changing in the middle of the day, you will need to adjust the time 12
hours ahead and reset the date to display the current date.
4. After setting the watch to the desired time, date and 2nd time
zone push the crown in to position A, and if applied, return the
screw-down crown to the locked position.
24-HOUR GMT INDEX
If your watch is equipped with a 24-hour index printed at the outer edge of the
dial, you can track an alternate time zone by aligning the GMT hand with the
current time in the desired time zone as indicated on the 24-hour index.
ROTATING GMT BEZEL
If your watch is equipped with a rotating bezel with a 24-hour index, you can
track an alternate time zone by rotating the bezel to align the GMT hand with
the current time in the desired time zone. NOTE: If your watch is equipped with
both a 24-hour index on the dial and a rotating GMT bezel, you can track three
time zones.
READING THE GMT ANALOG DISPLAY
GMT HAND + 24 HOUR INDEX ON THE ROTATING BEZEL: After setting the
time to the desired time zones you can review time zone 1 by using the hour
and minute hands on the main dial. The rotating bezel is normally worn in the
standard position with the 24-hour marking aligned with the 12 position. You
can review time zone 2 by reviewing the GMT hand against the 24-hour index
on the bezel. For most places, but not all, the minutes within the hour are the
same across the time zones. You can also review the minute hand on the main
dial for a more accurate view of the minutes within the hour.
GMT HAND + 24 HOUR INDEX ON THE DIAL: After setting the time to the
desired time zones you can review time zone 1 by using the hour and minute
hands on the main dial. The 24-hour index on the dial will have the 24-hour
aligned with the 12 position. You can review time zone 2 by reviewing the
GMT hand against the 24-hour index on the dial. For most places, but not
all, the minutes within the hour are the same across the time zones. You can
also review the minute hand on the main dial for a more accurate view of the
minutes within the hour.
GMT HAND + 24 HOUR INDEX ON THE DIAL + 24-HOUR INDEX ON THE
ROTATING BEZEL: If your watch is equipped with a rotating bezel with a
24-hour index as well as a 24-hour index on a rotating bezel you can track three
time zones by rotating the bezel to align the GMT hand with the current time in
the desired third time zone. Zone 1 will be viewed with the main dial hour and
minute hands. Zone 2 will be the GMT hand viewed with the 24-hour index on
the dial. Zone 3 will be the GMT hand viewed with the 24-hour index on the
rotating bezel. For most places, but not all, the minutes within the hour are the
same across the time zones. You can also review the minute hand on the main
dial for a more accurate view of the minutes within the hour for zones 2 and 3.
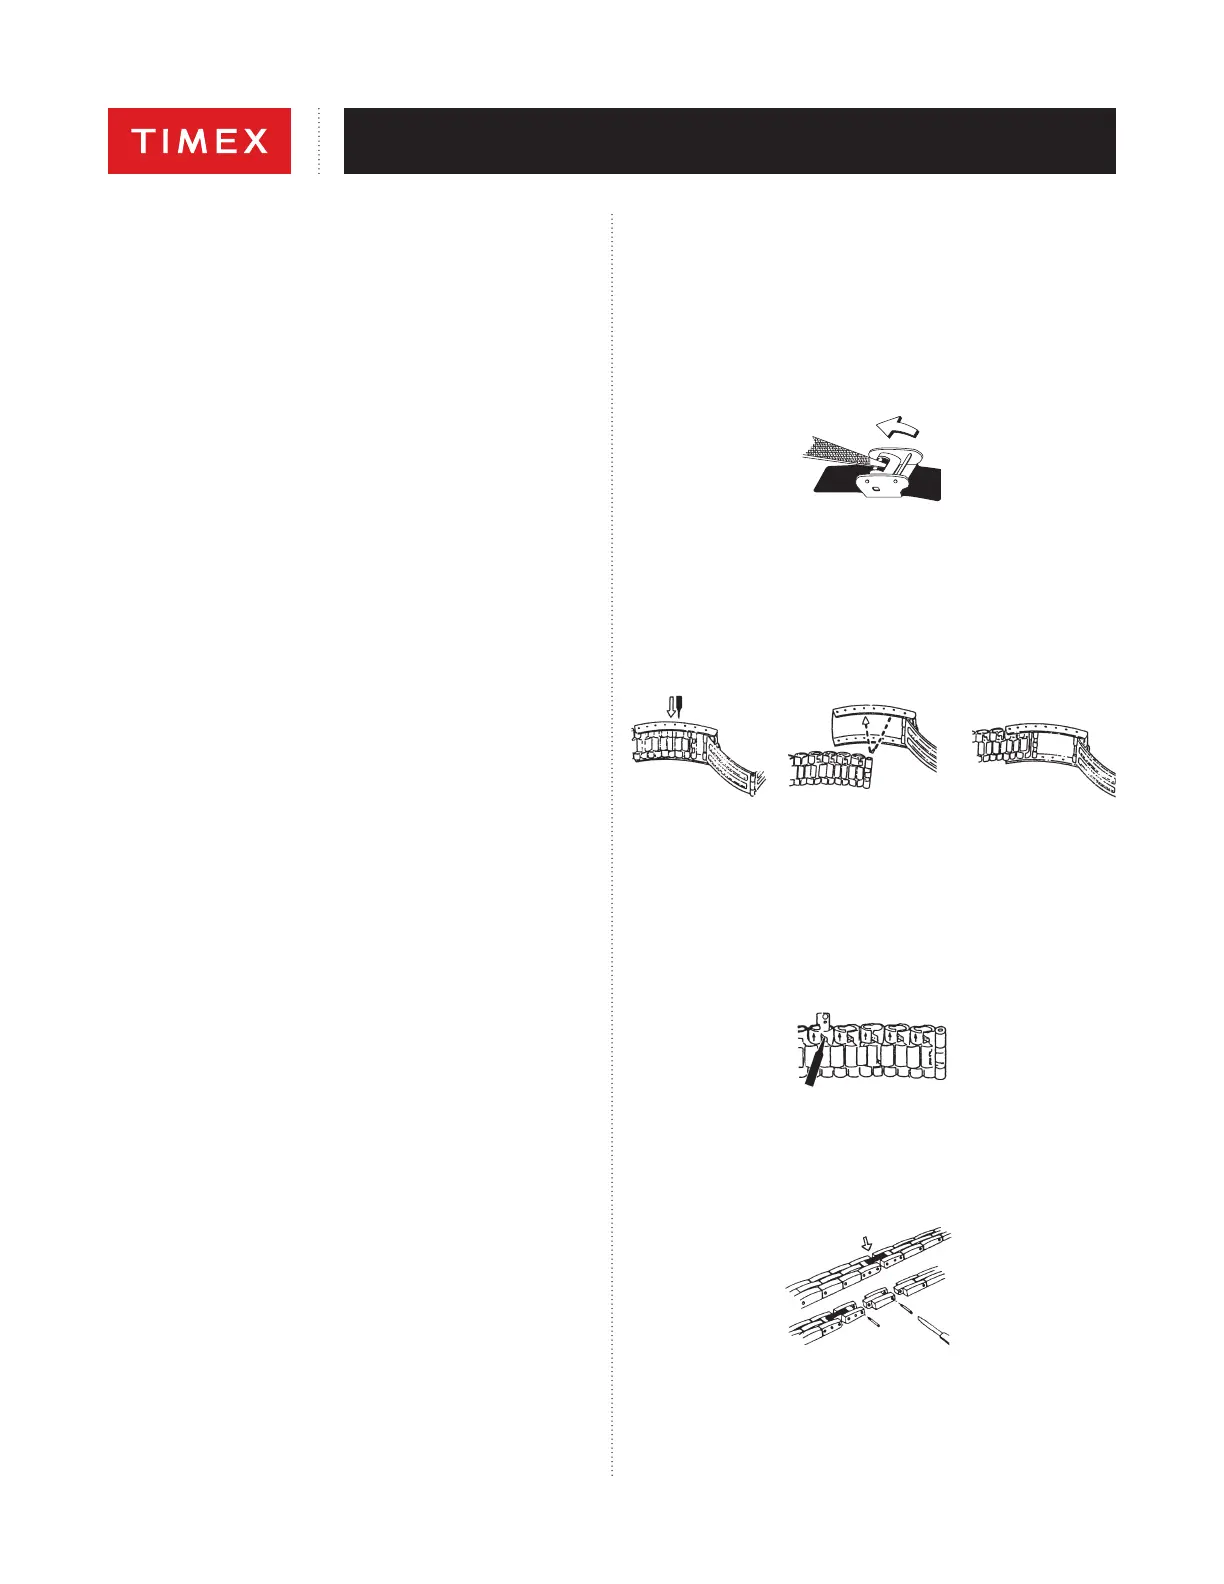
HOW TO ADJUST BRACELET
(Variations of the following bracelet sections apply to all watch models).
SLIDING CLASP BRACELET
1 Open locking plate.
2. Move clasp to desired bracelet length.
3. Exert pressure while holding locking plate and slide clasp back and forth until
it engages in grooves on underside of bracelet.
4. Press locking plate down until it snaps closed. Clasp can be damaged if
excessive force is used.
FOLDOVER CLASP BRACELET
1. Find spring bar that connects bracelet to clasp.
2. Using a pointed tool, push in spring bar and gently twist bracelet to
disengage.
3. Determine wrist size, then insert spring bar in correct bottom hole.
4. Push down on spring bar, align with top hole and release to lock in place.
Fig. 2Fig. 1
Fig. 3
BRACELET LINK REMOVAL
REMOVING LINKS:
1. Place bracelet upright and insert pointed tool in opening of link.
2. Push pin forcefully in direction of arrow until link is detached (pins are
designed to be difficult to remove).
3. Repeat until desired number of links are removed.
RE-ASSEMBLY:
1. Rejoin bracelet parts.
2. Push pin back into link in opposite direction of arrow.
3. Press pin down securely into bracelet until it is flush.
 Loading...