EasyManua.ls Logo

Tool Shed TSPHB5 - User Manual

Tool Shed TSPHB5
9 pages
Print Icon
To Next Page IconTo Next Page
Loading...
POST HOLE BORER 51CC
WITH AUGER
www.thetoolshed.co.nz
TSPHB5
Question and Answer IconNeed help?

Do you have a question about the Tool Shed TSPHB5 and is the answer not in the manual?

Summary

Specifications

Product Identification

Fuel Tank

Identifies the fuel tank component of the post hole borer.

Throttle Switch

Locates and describes the throttle control switch.

Pull Start Cord

Identifies the mechanism for starting the engine.

Engine

Identifies the main engine unit of the post hole borer.

Handle

Identifies the handle components for operating the machine.

200 mm Auger

Identifies the supplied 200mm diameter auger bit.

Fuel Mixing Bottle

Identifies the bottle used for mixing fuel and oil.

Spark Plug Spanner

Identifies the tool for spark plug maintenance.

Allen Keys

Identifies the set of Allen keys provided.

Double Open-End Spanner

Identifies the spanner for various adjustments.

Phillips Head Screwdriver

Identifies the screwdriver for assembly and maintenance.

Safety Guidelines

Work Area Safety

Ensures a safe operating environment by considering lighting, clutter, and bystanders.

Personal Safety

Advises on wearing appropriate PPE, clothing, and maintaining balance.

Power Tool & Machinery Use & Care

Covers general safe practices for using and maintaining power tools.

Fuel & Engine Safety

Addresses hazards related to engine exhaust, carbon monoxide, and fuel.

Gasoline & Vapours

Highlights the flammability and explosive nature of gasoline and its vapors.

When Adding or Removing Gasoline

Provides safety instructions for handling gasoline, including refueling procedures.

When Starting the Engine

Details precautions to take before and during engine startup.

Service

Recommends professional servicing with genuine parts for safety.

Post Hole Borer Specific Safety

Provides safety precautions specific to operating the post hole borer.

Assembly

Fitting Auger Bits

Instructions on how to securely attach the auger bit to the gearbox.

Fuelling

Explains the process of fueling the two-stroke engine with the correct mix.

Fuel Mixing

Guides on correctly mixing petrol and two-stroke oil in the specified ratio.

Operation

Filling the Fuel Tank

Details how to safely transfer fuel mix into the machine's fuel tank.

Starting the Engine

Step-by-step guide on starting the post hole borer engine.

Stop;Run Switch

Explains the function and positioning of the stop/run control.

Pull the Recoil Starter

Instructions on using the recoil starter cord to start the engine.

Operating the Post Hole Borer

Guidance on how to operate the machine effectively and safely during use.

During Use

Advises on safe practices and considerations while the borer is in operation.

Stopping the Engine

Instructions on how to safely shut down the post hole borer engine.

Maintenance

Spark Plug

Details maintenance procedures for the spark plug, including cleaning and gap adjustment.

Air Filter

Provides instructions for inspecting, cleaning, and re-oiling the air filter.

Storage

Lubricating the Gearbox

Instructions for lubricating the gearbox with lithium grease after extended use.

Parts Diagram

Worm Wheel Case Diagram

Illustrates the internal components of the worm wheel case.

Main Parts Diagram

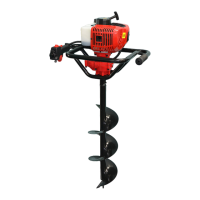
Comprehensive diagram showing all major parts of the post hole borer.

Overview

The ToolShed Post Hole Borer 51CC with Auger (TSPHB5) is a petrol-powered tool designed for boring holes in soil. It is primarily used for tasks such as installing fence posts, planting trees, or other applications requiring deep, narrow holes.

Function Description:

The post hole borer operates using a 51.7 cc/rev 2-stroke single-cylinder petrol engine. It is equipped with a 200mm auger (supplied) that rotates to dig into the ground. The engine's power is transmitted through a gearbox with a 34:1 gear ratio, providing the necessary torque for boring. The device is designed for two-handed operation to ensure safe and stable use, especially when encountering hard debris that can cause reactive torque. Fuel is mixed externally in a dedicated mixing bottle before being added to the fuel tank, ensuring the correct 25:1 petrol-to-oil mixture for the 2-stroke engine. Starting the engine involves setting the choke, ensuring the STOP/RUN switch is in the RUN position, and pulling the recoil starter cord. Once running, the auger's rotation is controlled by a throttle lever and a speed adjuster.

Important Technical Specifications:

  • Model: ToolShed Petrol Powered Post Hole Borer 51CC with 200mm Auger
  • Product Code: TSPHB5
  • CC Rating: 51.7 cc/rev
  • Drive Shaft Capacity: Up to 200mm Ø Maximum
  • Engine Type: 2-Stroke Single Cylinder Petrol Engine
  • Fuel Tank Capacity: 1.2 Litre
  • Fuel Mixture: 25:1 (Petrol:Oil)
  • Gear Ratio: 34:1
  • Machine Weight: 10 KG
  • Auger Weight: 2 KG
  • Spark Plug Gap: 0.7-0.8mm

Usage Features:

  • Auger Attachment: The auger bit is securely attached to the drive shaft using a locking pin and split pin. Users must ensure the hole in the auger shaft aligns with the hole on the drive shaft for proper installation.
  • Fuel Mixing: Fuel must be mixed externally in the supplied fuel mixing bottle at a 25:1 ratio of unleaded petrol to 2-stroke oil. The fuel tank should not be used for mixing.
  • Starting Procedure: The engine is started by setting the choke lever to the ON position, ensuring the STOP/RUN switch is in the RUN position, and then pulling the recoil starter cord. Once the engine starts and runs smoothly, the choke lever should be returned to the OFF position.
  • Operation Control: The auger's rotation is initiated by pressing the safety switch lever and squeezing the throttle lever. Boring speed can be adjusted using the speed adjuster. To stop the auger, the throttle lever is briefly squeezed and released.
  • Safety Guidelines:
    • Always operate the machine outdoors in a well-ventilated area, pointing the exhaust away from you, to avoid carbon monoxide poisoning.
    • Never operate the machine indoors or in confined spaces.
    • Do not light or smoke cigarettes when adding or removing gasoline.
    • Turn off the engine and allow it to cool for at least two minutes before removing the gasoline cap.
    • Only fill or drain gasoline outdoors in a well-ventilated area.
    • Do not overfill the gasoline tank.
    • Keep gasoline away from sparks, open flames, pilot lights, heat, and other sources of ignition.
    • Do not refill the fuel tank while the engine is running or hot.
    • Clean up fuel or oil spills immediately.
    • Ensure the gasoline cap, air filter, spark plug, fuel lines, and exhaust system are properly in place before starting.
    • Always use the post hole borer in daylight or good artificial light.
    • Start the borer carefully with feet away from the auger bit.
    • Do not leave the borer unattended while the engine is running.
    • Wear suitable clothing, gloves, and safety shoes; do not use barefoot or in open-toed shoes.
    • Use only in soil; avoid excessively rocky ground.
    • Before boring, inspect the area for hidden gas and water pipes or electricity and other cables.
    • Ensure the auger bit is securely attached and not damaged or worn.
    • Do not carry the borer with the engine running if the auger bit rotates at idle.
    • Keep hands and feet away from the rotating auger bit.
    • Always ensure the engine is switched off and the spark plug cap is removed before making adjustments.
    • Maintain a firm, two-handed grip to counteract reactive torque when the auger encounters hard debris.
    • Remove any objects or debris that could be thrown, jammed, or entangled in the auger bit.
    • Adopt a stable stance, keeping the borer in front of your body.
    • Allow the auger bit to reach full speed before commencing boring.
    • If the auger bit hits a stone or hard ground, the rotation may stop, causing a hard torque reaction. The operator must maintain a firm grip to compensate.
    • Remove jammed debris and inspect for damage before resuming work.

Maintenance Features:

  • General Maintenance:
    • Always switch off the tool and disconnect from the power supply before cleaning or performing maintenance.
    • Use compressed air to clean the tool, wearing PPE safety goggles.
    • Keep ventilation openings and switch levers clean; do not insert pointed objects.
    • Do not use chemicals for cleaning.
    • Consult ToolShed for damaged or broken parts.
    • Re-lubricate all moving parts regularly.
    • Wipe the body with a soft damp cloth and mild detergent; avoid alcohol, petrol, or caustic agents on plastic parts.
  • Spark Plug:
    • Remove and inspect the spark plug every 10 hours of running.
    • The deposits on the spark plug end should be a tan colour.
    • Remove deposits with a stiff brush (brass wire brush recommended).
    • Check and adjust the spark plug gap to 0.7-0.8mm if required.
  • Air Filter:
    • Remove, examine, and clean the air filter every 4 hours of running.
    • Remove the air filter housing cover by pressing the two clasps.
    • Clean the air filter using an environmentally friendly water-based degreasing agent.
    • Once dry, apply sufficient ordinary engine oil to coat the filter, squeeze out excess oil, and then replace the filter and cover.
    • Never run the engine without the air filter fitted.
  • Gearbox Lubrication:
    • Replace gearbox grease every 50 hours of use with suitable #3 Lithium grease.
    • Remove the grease filler bolt (10.1) on the side of the gearbox.
    • Add #3 Lithium grease with a grease gun.
    • Refit the grease filler port bolt.
  • Storage:
    • For storage longer than one month, drain all fuel from the fuel tank and carburettor.
    • Remove the spark plug and pour approximately 1 tablespoon of clean engine oil into the spark plug hole.
    • With the ignition turned OFF, gently pull the recoil starter cord several times.
    • Re-fit the spark plug and continue to pull the recoil starter cord until the piston is on the compression stroke (when resistance is felt), then stop pulling.
    • Store the hole borer in a dry, well-ventilated place under a cover to prevent dust or debris accumulation.

Tool Shed TSPHB5 Specifications

General IconGeneral
BrandTool Shed
ModelTSPHB5
CategoryTools
LanguageEnglish