KS-4250
ENGLISH
5
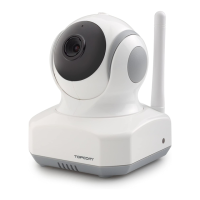
7.2 Product layout
See Figure “A” on the fold-out page.
8 Initial use
8.1 Before setting up
• Make sure your Wi-Fi router is turned on and it can connect to the Internet.
• Download “Easy iCAM” App from the Apple App Store or Android Market (Google Play).
8.2 Connecting the KS-4250 to the AC mains
See figure “B” on the fold-out page.
• Insert the small plug of the AC mains adapter in the mains power connector of the baby unit
and plug the AC mains adapter into a mains connector (100~240 V - 50/60 Hz).
• Slide the Power ON/OFF switch to the ON position. The LED on the camera will glow
orange and then change to red.
Note: When you power the camera on, it takes around 40 to 60 seconds for initial setup.
9 Installing the KS-4250
9.1 Fine tuning
• Place the camera in a convenient location, point the lens of the camera to the observation
area.
• Adjust the angle by rotation the camera.
1 Light sensor
2 Microphone
3 Camera lens
4 Infrared LEDs
5 Antenna
6 Power/Status LED
7 Power adapter plug
8 Reset to factory default button
9 Power ON/OFF switch
CAUTION
• The mains connector must be within easy reach so you can quickly unplug the power
cable in an emergency.
• Use only the supplied AC mains adapter (6 V DC / 800 mA).
CAUTION
Do not place the camera and wires within the baby’s reach!
Fix the camera at least 1 meter away from the baby.