7
USING THE BATTERY
Nomenclature
Display Functions
Basic Key Operation
Battery
BDC70
Charger
CDC68
Battery
(AC100V-240V)
Cover
1
2
3
4
8
6
5
7
9
10
11
13
12
15
14
16
4
17
18
21
19
4
20
22
23
25
24
4
26
27
28
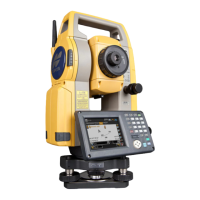
1 Handle
2 Bluetooth antenna
3 External interface hatch (USB port)
4 Instrument height mark
5 Battery cover
6 Operation panel
7 Serial connector /
Combined communications and
power source connector (ES-101/102,
Low Temperature Model: ES-103/105)
8 Circular level
9 Circular level adjusting screws
10 Base plate
11 Levelling foot screw
12 Optical plummet focussing ring
13 Optical plummet eyepiece
14 Optical plummet reticle cover
15 Display unit
16 Objective lens (Includes Laser-
pointer function)
17 Handle securing screw
18 Tubular compass slot
19 Vertical clamp
20 Vertical fine motion screw
21 Trigger key
22 Horizontal fine motion screw
23 Horizontal clamp
24 Tribrach clamp
25 Telescope eyepiece screw
26 Telescope focussing ring
27 Sighting collimator
28 Instrument center mark
pplication software version
Date
Time
Cd
: pole
Operator
ES-103
S/N XXXXXX
Date 2012/01/01
Time 09:39:12
ES-103 REC 9999 REC 9999
S/N XXXXXX
Ver. XXX-XX-XX
XXX-XX-XX
Job. JOB1
● Power ON / OFF
● Lighting up the display and key
● Switching target type
Target type can be switched only on the screen where the target symbol is
displayed.
● Switching the Laser-pointer/Guide light ON/OFF
$
• After turning ON the laser-pointer/guide light, the laser beam is emitted
for 5 minutes, and then automatically switches OFF. But in the Status
screen and when target symbol (ex. ) is not displayed in the Meas
mode, the laser beam is not automatically turned off.
{ON} Power On
{ON} (Press and hold:
About 1 second)
Power Off
[J] Switch the screen/key backlight On / Off
[SHIFT]
Switches between target types
Prism/Sheet/N-prism(reflectorless)
[J] (Press and hold )
To turn the laser-pointer/guide light ON/OFF,
press and hold until a beep sounds.
● Softkey operation
Softkeys are displayed on the bottom line of the screen.
● Inputting letters/figures
{F1} to {F4} Select the function matching the softkeys
{FUNC}
Toggle between Meas mode screen pages (when
more than 4 softkeys are allocated)
{SHIFT}
Switch between numeric and alphabetic characters.
{0} to {9}
During numeric input, input number of the key.During
alphabetic input, input the characters displayed
above the key in the order they are listed.
{.}/{±}
Input a decimal point/plus or minus sign during
numeric input.During alphabetic input, input the
characters displayed above the key in the order they
are listed.
{K}/{L} Right and left cursor/Select other option.
{B.S.} Delete a character on the left.
{ESC} Cancel the input data.
{ENT} Select/accept input word/value.
● Selecting options
● Switching modes
● Others
{O}/{G} Up and down cursor
{L}/{K} Right and left cursor/Select other option
{ENT} Accept the option
[]
From Obs mode (Observation Mode) to Star
key Mode
[CNFG]
From Status mode to Config Mode
(Configuration Mode)
[OBS]
From Status mode to Obs Mode (Observation
Mode)
[USB] From Status mode to USB mode
[DATA] From Status mode to Data Mode
{ESC} Return to the Status mode from each Mode
{ESC} Return to the previous screen
<ES-101/102>
• Press the star key [ ], and the star
key mode is accessed. In the star key
mode, it is possible to change the
setting item that is frequently used
during measurement and start the
measurement program from "Entry
menu".
Battery
Battery Charging
Entry menu
Tilt crn
Contrast
Reticle lev
Entry menu
JOB select
JOB detail
Topography
Coordinate
S-O
: Yes(H,V)
: 10
: 3
G
• To remove the handle, hold both sides
of the handle and lift it straight above.
If you hold the handle by one hand or
incline it, the terminal attached on the
handle may be damaged.
Installing the Battery
Status screen
Measuring screen
Input screen
Obs Mode screen
Operation panel
Charging lamp
Charging: Flashing.
Charging completion: Lighting up.
Charging time: About 4 hours
To outlet
ES series
Quick Manual
21405 99040
G
• If you insert the battery slantwise, the
instrument body or the battery
terminal may be damaged.
• Listen for the click to ensure that the
cover is properly closed.