2
STANDARD PACKAGE COMPONENTS
• LS-B200W Instrument .............................................. 1pc.
• Carrying case............................................................ 1pc.
• Instruction manual .................................................... 1pc.
•Laser Manager Guide ................................................ 1pc.
•Regulatory Information............................................... 1pc.
Dry battery type*
• Battery holder DB-83 ............................................ 1pc.
Dry cell batteries(4 x C) are sold separately.
*In some destinations, a rechargeable battery is already set in the main unit.
Rechargeable battery type (Optional accessories)
• Ni-MH battery pack BT-83Q.................................. 1pc.
• AC/DC converter AD-11 ........................................ 1pc.
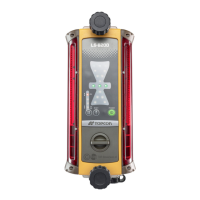
PARTS OF THE INSTRUMENT AND FUNCTIONS
REPLACING THE BATTERY
Dry battery
1
Remove the DB-83 battery holder by turning the battery cover knob.
2 Remove the old batteries and replace with new ones.
Rechargeable battery
1
Remove the BT-83Q by turning the battery cover knob.
2 Attach the charged BT-83Q to the LS-B200W.
3 Attach the battery cover by turning the battery cover knob.
• Batteries generate power using a chemical reaction and as a result have a limited life-
time. Even when in storage and not used for long periods, battery capacity deteriorates
with the passage of time. This may result in the operating time of the battery shortening
despite having been charged correctly. In this event, a new battery is required.
OPERATION
1
Position a rotating laser and turn on the laser.
2 Raise or lower the machine blade or arm to position the cutting
edge or bucket at the desired grade elevation.
3 Mount the LS-B200W onto the mast near the path of the laser
beam and turn on the LS-B200W.
4 Keep the machine blade or arm motionless and raise or lower
the LS-B200W and adjust until ON-GRADE position are blink-
ing. This is the ON GRADE position.
5 Securely clamp the LS-B200W in place. The reference position
has been set.
6 While operating, use the LED display to continually check grade, moving
the blade or cutting / filling according to the direction of the LS-B200W dis-
play.
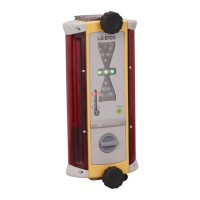
INDICATOR
Shape: Cylindrical
Dimension: 45 to 51mm in diameter
Please refer to the instruction manual for the machine or
contact the machine manufacturer for instructions on
installing the mast onto the machine (by welding, etc.).
45 to 51mm
Tilt indicator
Battery holder/Battery pack
(DB-83/BT-83Q)
Battery cover knob
Power switch
Power ON: Short press
Power OFF: Long press
Detective precision
(Mode) switch
Clamp knob
Detector
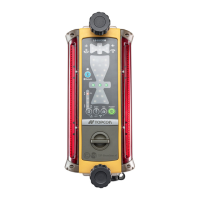
Detector
Clamp
Connector for external communication
Please refer to the page 2 of
the instruction manual for the
indicator display patterns.
Remove the battery when connecting.
Pipes that can be installed onto the LS-B200W are as described below.
Bluetooth wireless
communication
switch
Bluetooth wireless
communication LED
Zero-set switch
Tilt switch
Indicator
ON-GRADE
Rotating laser battery warning display
A blink shows that the rotating laser power is low.
(This function is not usable to the rotating laser which does
not have the function to output alarm signal.)
Goes out:
Battery is sufficient. (When Mode 1 is selected, the lamp will
light up.)
Blinks slowly:
The power is low, but sensor is still usable.
Blinks quickly:
Dead battery. Replace the dry battery with new one or recharge
the battery (BT-83Q Optional accessories).
Mode1
Mode2
Mode3
Mode4
Precision mode
LS-B200W Battery remaining display
Battery remaining display LED
Rotating laser battery remaining warning LED
It is possible to change the detective precision of the
instrument. Please select Mode 1 to 4 according to the
objective of the operation.
(
”Laser beam positions and display patterns”)
Pressing the detective precision (Mode) switch will change
the mode and the corresponding LED lamp will light up.
(During battery remaining display shown below, the lamp
will blink.)
Battery remaining for the LS-B200W will be displayed at 3 lev-
els.
Height alert warning of rotating laser
A blink signifies that the height alert function of rotating laser is
operating.
(This function is not usable to the rotating laser which does not
have the height alert and the function to output alarm signal.)
Blinks
Power-save function (Effective only when using the internal battery)
Blinks
This instrument will enter the power-save mode when no
switches are operated or no laser beam is received for about
five minutes. During the power-save mode, two LEDs (one yel-
low and one red) will blink. (When the laser beam is received
again, the power-save mode will be automatically turned off. Or
when the power switch is pressed again, the power-save mode
will be also turned off.)
To disable the power-save function, press the power switch for
at least five seconds to turn the power on. When the function is
disabled, the LED shown in the figure will blink twice.
Auto-cut off function (Effective only when using the internal battery)
Detective precision (Mode) switch
Blinks
This instrument will automatically power off when no switches
are operated or no laser beam is received for about 60 minutes
after entering the power-save mode. (To use the instrument
again, press the power switch once again.)
To disable the auto-cut off function, press the power switch for
at least five seconds to turn the power on. When the function is
disabled, the LED shown in the figure will blink twice.
 Loading...