Do you have a question about the Topens TC186 and is the answer not in the manual?
Register an account using phone/email, password, and verification code.
Confirm phone and camera are connected to a valid WiFi network before configuration.
Power on camera and reset using SET button to initiate pairing mode.
Log in to the app and use the '+' button to search for and add the WiFi camera.
Configure Wi-Fi by entering credentials and connecting to the camera's network to send parameters.
Return to the app after connecting to the camera's network; a success message will appear.
Confirm binding and wait for the camera status to change from 'online' to 'Connected' before operating.
Register an account and ensure phone is connected to a valid WiFi network.
Power on camera and reset using SET button to enter pairing mode.
Log in, add camera via '+', and follow prompts to connect to the camera's WiFi.
Connect to camera's WiFi, return to app, enter password, and confirm binding. Wait for 'connected' status.
Click camera feed in app to access control interface when status shows "Connected".
Use main control interface push button to activate connected gate opener or industrial equipment.
Access control interface by clicking camera feed once it's connected.
Use timer setting icon to select self-hold mode, keeping relay status until next button press.
Set a 7x24 hour timer for automatic device power on/off.
Share camera by adding user's account via app's circle settings.
Enable or disable sharing for specific accounts in camera settings.
Remove shared devices or revoke sharing permissions from camera settings.
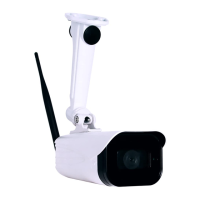
The TOPENS TC186 is a WiFi surveillance camera with a built-in relay switch, designed to provide remote monitoring and control capabilities for various applications, including gate/garage door openers and automatic industrial equipment. This device integrates video surveillance with smart control, allowing users to manage and monitor their systems from a smartphone.
The primary function of the TC186 camera is to offer real-time video surveillance, enabling users to view live footage of their property. Beyond simple monitoring, its key feature is the integrated relay switch, which allows for remote activation and control of connected devices. This relay switch can operate in two modes: "Toggle" or "Self-hold." In "Toggle" mode, a brief activation signal is sent, similar to a momentary push button. In "Self-hold" mode, the relay maintains its activated or deactivated state until manually changed, providing continuous control over power supply or device status.
The camera supports both WiFi and Ethernet cable connections, offering flexibility in network setup. It is equipped with a CMOS sensor and a 6mm lens, providing clear video capture. For low-light conditions, the camera features an ICR infrared filter for night vision, extending visibility up to 15 meters.
The TC186 camera is designed for ease of use, primarily through its dedicated "LinkCraft" mobile application, available for both Android and iOS devices.
Users can access live video feeds from the camera at any time through the "LinkCraft" app. The app displays the camera's status, indicating whether it is "online" or "connected," ensuring users are aware of its operational state. Once connected, users can enter the monitor display and control interface to view the live stream.
The integrated relay switch allows for remote activation of connected devices. For gate/garage door openers, users can press a virtual push button within the app to activate the opener. When connected to automatic industrial equipment, the camera can directly control the power supply. In this scenario, the "Self-hold" mode is particularly useful, allowing the user to maintain a continuous ON or OFF state for the equipment.
A significant feature for controlling industrial equipment is the timer setting. Users can program the camera to automatically power on or off connected devices based on a 7-day, 24-hour schedule. This allows for automated operation, enhancing efficiency and convenience for industrial applications. The timer settings can be easily configured within the app, with options to enable/disable the timer directly and save changes.
The camera supports an optional Micro SD card (up to 128GB) for local video recording. This feature allows users to store monitoring videos directly on the camera, providing a record of activity even if network connectivity is temporarily lost. The installation of the Micro SD card is straightforward, requiring the user to loosen four screws on the bottom cover to access the card slot.
The TC186 camera can be shared with other users, allowing multiple individuals to monitor and control the device. To share, the recipient must also install the "LinkCraft" app and register an account. The primary user can then add friends' accounts within the app's "My Circles" settings and enable sharing for specific users. This is particularly useful for families or small businesses where multiple people need access to the camera's functions.
The "LinkCraft" app includes several other useful features:
The camera's setup process involves connecting it to a WiFi network. The app guides users through the configuration, which includes powering on the camera, observing the indicator light (flashing RED and GREEN alternately), and pressing the SET button to enter a quick flashing mode for configuration. The app automatically detects the camera, allowing users to rename it, input WiFi credentials, and bind the device. For iOS users, the process involves jumping to WiFi settings to connect to the camera's temporary WLAN network before returning to the app to complete the binding.
The TC186 offers versatile wiring options for its relay switch:
Before installation, the app provides a Wi-Fi signal strength check to ensure optimal performance. If the signal is weak, the app suggests solutions such as moving the router closer, minimizing interference, using a Wi-Fi range extender, or connecting the camera via an Ethernet cable for programming. This proactive approach helps users ensure a stable connection for reliable operation.
The manual provides clear instructions for initial setup and common issues, such as the camera quitting configuration if not completed within 5 minutes. The indicator light status (slow vs. quick flashing) helps users identify the camera's current mode during setup.
While not explicitly detailed as a user-controlled feature, smart devices typically receive firmware updates to improve performance, add new features, and address security vulnerabilities, ensuring the camera remains up-to-date and functional over time.
The "LinkCraft" app includes user account registration and management, allowing users to secure their access with mobile phone numbers or email addresses and custom passwords. Verification codes are used during registration to enhance security.
In summary, the TOPENS TC186 is a comprehensive surveillance and control solution that combines video monitoring with smart relay switching, offering remote access, automation, and sharing capabilities for a wide range of applications.
| Night Vision | Yes |
|---|---|
| Motion Detection | Yes |
| Two-Way Audio | Yes |
| Product Type | Security Camera |
| Resolution | 1080p |
| Storage | MicroSD card (up to 128GB) |
| Wireless | Wi-Fi |
| Connectivity | Wi-Fi |