EasyManua.ls Logo

Toro 21385 - User Manual

Toro 21385
28 pages
Print Icon
To Next Page IconTo Next Page
Loading...
FormNo.3435-147RevA
SuperRecycler
®
LawnMower
ModelNo.21385—SerialNo.400000000andUp
Operator'sManual
Introduction
Thisrotary-blade,walk-behindlawnmowerisintended
tobeusedbyresidentialhomeowners.Itisdesigned
primarilyforcuttinggrassonwell-maintainedlawnson
residentialproperties.Usingthisproductforpurposes
otherthanitsintendedusecouldprovedangerousto
youandbystanders.
Readthisinformationcarefullytolearnhowtooperate
andmaintainyourproductproperlyandtoavoid
injuryandproductdamage.Youareresponsiblefor
operatingtheproductproperlyandsafely.
Visitwww.Toro.comformoreinformation,including
safetytips,trainingmaterials,accessoryinformation,
helpndingadealer,ortoregisteryourproduct.
Wheneveryouneedservice,genuineToroparts,or
additionalinformation,contactanAuthorizedService
DealerorToroCustomerServiceandhavethemodel
andserialnumbersofyourproductready.Figure1
identiesthelocationofthemodelandserialnumbers
ontheproduct.Writethenumbersinthespace
provided.
Important:Withyourmobiledevice,youcan
scantheQRcodeontheserialnumberdecal(if
equipped)toaccesswarranty,parts,andother
productinformation.
g282705
Figure1
1.Modelandserialnumberlocation
ModelNo.
SerialNo.
Thismanualidentiespotentialhazardsandhas
safetymessagesidentiedbythesafety-alertsymbol
(Figure2),whichsignalsahazardthatmaycause
seriousinjuryordeathifyoudonotfollowthe
recommendedprecautions.
g000502
Figure2
Safety-alertsymbol
Thismanualuses2wordstohighlightinformation.
Importantcallsattentiontospecialmechanical
informationandNoteemphasizesgeneralinformation
worthyofspecialattention.
ItisaviolationofCaliforniaPublicResourceCode
Section4442or4443touseoroperatetheengineon
anyforest-covered,brush-covered,orgrass-covered
landunlesstheengineisequippedwithaspark
arrester,asdenedinSection4442,maintainedin
effectiveworkingorderortheengineisconstructed,
equipped,andmaintainedforthepreventionofre.
GrossorNetTorque:Thegrossornettorque
ofthisenginewaslaboratoryratedbytheengine
manufacturerinaccordancewiththeSocietyof
AutomotiveEngineers(SAE)J1940orJ2723.As
conguredtomeetsafety,emission,andoperating
requirements,theactualenginetorqueonthisclass
ofmowerwillbesignicantlylower.Pleasereferto
theenginemanufacturer’sinformationincludedwith
themachine.
Important:Ifyouareusingthismachineabove
1500m(5,000ft)foracontinuousperiod,ensure
thattheHighAltitudeKithasbeeninstalled
sothattheenginemeetsCARB/EPAemission
regulations.TheHighAltitudeKitincreases
engineperformancewhilepreventingspark-plug
fouling,hardstarting,andincreasedemissions.
Onceyouhaveinstalledthekit,attachthe
high-altitudelabelnexttotheserialdecalonthe
machine.ContactanyAuthorizedToroService
DealertoobtaintheproperHighAltitudeKitand
high-altitudelabelforyourmachine.Tolocate
adealerconvenienttoyou,accessourwebsite
atwww.Toro.comorcontactourToroCustomer
CareDepartmentatthenumber(s)listedinyour
EmissionControlWarrantyStatement.
Removethekitfromtheengineandrestorethe
enginetoitsoriginalfactorycongurationwhen
runningtheengineunder1500m(5,000ft).Do
notoperateanenginethathasbeenconverted
forhigh-altitudeuseatloweraltitudes;otherwise,
youcouldoverheatanddamagetheengine.
©2019—TheToro®Company
8111LyndaleAvenueSouth
Bloomington,MN55420
Registeratwww.T oro.com.
OriginalInstructions(EN)
PrintedinMexico
AllRightsReserved
*3435-147*A
Question and Answer IconNeed help?

Do you have a question about the Toro 21385 and is the answer not in the manual?

Summary

Mower Introduction and Key Information

Safety Alert Symbol and Important Notes

Explains safety symbols and important terms.

Engine Specifications and Altitude Kit

Covers torque ratings and high altitude operation needs.

Manual Structure Overview

Safety and General Safety Rules

Overview of safety sections and general rules.

Setup Procedures

Lists initial setup steps.

Operation, Maintenance, and Storage

Outlines operation, maintenance, and storage sections.

General Safety Guidelines

Mower Safety Rules

Fundamental safety rules for mower use.

Safety Decals and Warnings

Importance and location of safety decals.

Initial Setup Steps

Handle Setup

Instructions for unfolding the mower handle.

Starter Rope Installation

Installing Recoil Starter Rope

How to properly route the starter rope.

Engine and Bag Assembly

Adding Engine Oil and Assembling Grass Bag

Procedures for oiling the engine and assembling the grass bag.

Product Overview and Pre-Operation

Product Component Identification

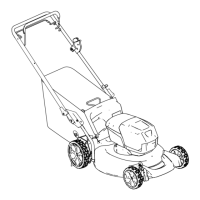
Identifies key parts of the mower.

Before Operation Safety Checks

Essential safety checks before starting.

Fueling Procedures

Filling the Fuel Tank

Safe and correct method for fueling the mower.

Engine and Handle Adjustments

Checking Engine Oil Level

Procedure for checking the engine oil level.

Adjusting Handle Height

Steps to adjust the handle for user comfort.

Cutting Height Adjustment

Adjusting the Cutting Height

Guide to setting the desired cutting height.

During Operation Safety

General Operating Safety Rules

Key safety rules during mowing.

Slope Mowing Safety Precautions

Specific safety advice for mowing on slopes.

Engine Operation Procedures

Starting and Shutting Off the Engine

Procedures for starting and stopping the engine.

Using the Self-Propel Drive

How to engage and use the self-propel feature.

Clipping Management

Recycling Grass Clippings

Instructions for setting up the mower for mulching.

Grass Bagging

Installing and Using the Grass Bag

Steps for attaching and using the grass collection bag.

Grass Bag Removal

Removing the Grass Bag

Procedure for detaching the grass bag.

Side-Discharge Operation

Discharging Clippings and Installing Chute

How to discharge clippings and install the chute.

Side-Discharge Chute Removal

Removing the Side-Discharge Chute

Steps to detach the side-discharge chute.

Mowing Operation Tips

General Mowing Tips

Advice for optimal mowing performance.

Cutting Grass and Leaves

Techniques for cutting grass and leaves effectively.

Post-Operation and Cleaning

After Operation Safety and Cleaning

Safety rules and cleaning procedures after use.

Hauling Safety

Safety considerations when transporting the mower.

Handle Folding

Folding the Handle for Storage

Steps to fold the handle for storage.

Maintenance Overview

Maintenance Schedule and Safety

Maintenance schedule, safety, and preparation steps.

Engine Maintenance

Servicing the Air Filter

How to clean or replace the air filter.

Changing the Engine Oil

Procedure for draining and refilling engine oil.

Component Maintenance

Lubricating Wheel Gears and Replacing Blade

Instructions for lubricating gears and replacing the blade.

Drive System Adjustment

Adjusting the Self-Propel Drive

How to adjust the self-propel drive cable tension.

Storage Procedures

Preparing and Removing from Storage

Steps for storing and retrieving the mower.

California Proposition 65 Warning

Proposition 65 Warning Explanation

Explanation of California's Proposition 65 warning.

Overview

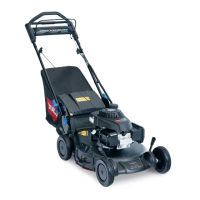
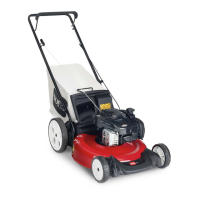
This document is an operator's manual for the Toro Super Recycler® Lawn Mower, Model No. 21385. It provides comprehensive instructions for the safe and effective use, maintenance, and storage of the device.

Function Description

The Toro Super Recycler® Lawn Mower is a rotary-blade, walk-behind lawn mower designed for residential homeowners. Its primary function is to cut grass on well-maintained lawns. The "Super Recycler" designation implies an advanced mulching capability, allowing the machine to finely cut grass and leaf clippings and return them to the lawn as natural fertilizer. This recycling feature helps maintain lawn health and reduces the need for bagging and disposing of clippings. The mower is equipped with a self-propel drive system, which assists the operator by moving the machine forward automatically, reducing physical effort during mowing. It also offers various discharge options, including recycling, bagging, and side-discharging, to accommodate different lawn conditions and operator preferences.

Usage Features

The manual details several key usage features that enhance the operator's experience and control:

  • Handle Unfolding and Adjustment: The handle can be easily unfolded and adjusted to one of three positions, allowing operators of different heights to find a comfortable and ergonomic operating posture. This adjustability is crucial for reducing fatigue during extended use.
  • Recoil-Starter Rope Guide: A dedicated rope guide ensures the recoil-starter rope is properly positioned for safe and easy engine starting.
  • Engine Oil Management: Instructions are provided for adding oil to the engine and checking the oil level, emphasizing the importance of maintaining correct oil levels to prevent engine damage.
  • Grass Bag Assembly: The manual includes steps for assembling the grass bag, which is used to collect grass and leaf clippings when mulching is not desired.
  • Cutting Height Adjustment: The mower offers multiple cutting height settings, ranging from 32 mm (1-1½ inches) to 108 mm (4-1½ inches). Operators can adjust the cutting height by setting all wheels to the same desired level, allowing for customization based on grass type, season, and desired lawn appearance.
  • Engine Starting and Shut-Off: Clear instructions are given for starting the engine by holding the blade-control bar and pulling the recoil-start handle. The engine is designed to shut off automatically within 3 seconds of releasing the blade-control bar, a critical safety feature.
  • Self-Propel Drive Operation: The self-propel drive is activated by simply walking with hands on the upper handle, allowing the machine to keep pace with the operator. The manual also addresses how to disengage the wheel drive if the machine does not roll backward freely.
  • Clippings Management (Recycling, Bagging, Side-Discharging):
    • Recycling: The mower is factory-ready for recycling clippings. It requires ensuring the rear plug is locked in place by raising the rear deflector, pushing the plug in until it snaps, and rotating a lever.
    • Bagging: For bagging, the rear plug is removed, and the grass bag is hung from pins on the handle brackets.
    • Side-Discharging: When side-discharging, the rear plug is locked in place, and the side-discharge chute is installed by unlocking and lifting the side-discharge deflector, then closing the deflector onto the chute.
  • General Mowing Tips: The manual provides advice on inspecting the mowing area, avoiding solid objects, handling vibrations after striking an object, and replacing blades for optimal performance. It also offers guidance on cutting grass (e.g., cutting only a third of the blade at a time, adjusting height for tall grass, avoiding wet conditions) and cutting leaves (e.g., multiple passes, adjusting height).
  • Hauling Safety: Brief instructions are included for safe loading, unloading, and securing the machine during transport.

Maintenance Features

The manual outlines a comprehensive maintenance schedule and procedures to ensure the longevity and safe operation of the mower:

  • Maintenance Service Intervals: A table provides recommended service intervals for various tasks, including after the first 5 hours, before each use or daily, every 25 hours, and yearly or before storage.
  • General Maintenance Safety: Emphasizes disconnecting the spark-plug wire, wearing protective gear (gloves, eye protection), not tampering with safety devices, and proper fuel handling (avoiding leaks, running engine dry or using a hand pump for fuel removal before tipping).
  • Preparing for Maintenance: Instructions include shutting off the engine, waiting for parts to stop, and disconnecting the spark-plug wire. It also provides an important note on tipping the machine (always with the dipstick down) to prevent oil leakage.
  • Cleaning under the Machine: A detailed procedure for cleaning the underside of the machine using a garden hose attached to a washout port is provided, recommending this after each mowing session.
  • Folding the Handle: Instructions for folding the handle for storage, including a warning about damaging cables, are included.
  • Servicing the Air Filter: Yearly maintenance involves pressing down on latch tabs to open the air-filter cover, removing and inspecting the paper air filter and foam pre-filter, cleaning the air-filter body, and reinstalling the filters. Specific instructions are given for cleaning dirty filters (tapping or blowing with compressed air) and replacing damaged ones.
  • Changing the Engine Oil: This procedure is recommended after the first 5 hours and yearly. It involves warming the engine, moving the machine to a level surface, removing the dipstick, tipping the machine to drain used oil, carefully pouring new oil, checking the level, and securely installing the dipstick.
  • Lubricating the Wheel Gears: Every 25 hours, the rear wheel gears should be lubricated by wiping grease fittings and applying 2 or 3 pumps of No. 2 lithium grease.
  • Replacing the Blade: Yearly or more frequently if needed, the blade should be inspected for damage, sharpened, or replaced. The procedure involves holding the blade steady with a block of wood, removing mounting hardware, installing the new blade with curved ends pointing toward the housing, and tightening the blade bolt with a torque wrench to 88 N·m (65 ft-lb).
  • Adjusting the Self-Propel Drive: For self-propel models, this adjustment is necessary when installing a new cable or if the drive is out of adjustment. It involves loosening an adjustment nut, adjusting cable tension (pushing toward the engine for more traction, pulling away for less), and then tightening the nut.

Storage Features

The manual provides detailed instructions for preparing the mower for storage and removing it from storage:

  • Storage Safety: Reiteration of shutting off the machine, waiting for parts to stop, and allowing it to cool before storage.
  • Preparing the Machine for Storage: This includes adding fuel stabilizer to the fuel, properly disposing of unused fuel, running the machine until it runs out of fuel (to dry the engine), disconnecting the spark-plug wire, adding engine oil through the spark-plug hole, and loosely installing the spark plug. All nuts, bolts, and screws should be tightened.
  • Removing the Machine from Storage: Steps include checking and tightening fasteners, removing the spark plug and spinning the engine to blow out excess oil, reinstalling and tightening the spark plug, performing any necessary maintenance, checking the engine-oil level, filling the fuel tank with fresh fuel, and connecting the spark-plug wire.

The manual also includes important safety warnings, such as California Proposition 65 warnings regarding chemicals known to cause cancer and reproductive harm, and a California Spark Arrester Warning for operation in areas with dry vegetation. It emphasizes the importance of reading and understanding all instructions and warnings to prevent personal injury or property damage.

Toro 21385 Specifications

General IconGeneral
Model21385
BrandToro
Engine BrandToro
Engine Displacement163 cc
Cutting Height AdjustmentSingle lever
Drive SystemSelf-propelled
Speed RangeVariable
Mulching CapabilityYes
Side DischargeYes
Rear BaggingYes
Starter TypeRecoil
Wheel Size - Front8 inches
Deck MaterialSteel
TypeWalk Behind
Engine Type4-Cycle
Cutting Width22 inches
Cutting Height Range1 inch - 4 inches
Fuel Capacity0.25 gal (0.95 L)

Related product manuals