Note:MovingtheZ-ttinghigherdecreasesthe
gapbetweenthecontrolbarandthehandle;moving
itlowerincreasesthegap.
3.Hookthespringtotheadjusterlinkandslidethe
springcoverovertheadjusterlink.
4.Checktheadjustment;refertoCheckingtheControl
Cable.
Note:Afterextendeduse,thedrivebeltmaywear
andloseitsproperbelttension.Ifthedrivebelt
slips(continuouslysqueals)underaheavyload,
disconnectthespringfromtheadjustorlinkand
movetheupperendofthespringtotheholethat
isfurtherfromthepivotpointinthecontrolbar
(Figure22).Thenconnectthespringtotheadjustor
linkandadjustthecontrolcable.
Figure22
1.Removetheupperendof
springfromthishole
3.Pivotpoint
2.Inserttheupperendof
springintothishole
4.Upperendofspring
Note:Thebeltmayslip(squeal)inwetconditions;
todryoutthedrivesystem,starttherotorandrun
itwithoutaloadfor30seconds.
InspectingtheRotorBlades
ServiceInterval:Yearly—Inspecttherotorbladesand
haveanAuthorizedServiceDealer
replacetherotorbladesandscraperif
necessary.
Beforeeachsession,inspecttherotorbladesforwear.
Whenarotorbladeedgehasworndowntothewear
indicatorhole,haveanAuthorizedServiceDealer
replacetherotorbladesandthescraper(Figure23).
Figure23
1.Wearindicatorhole
ServicingtheSparkPlug
ServiceInterval:Yearly—Servicethesparkplugand
replaceitifnecessary.
UseaNGKBPMR4Asparkplugorequivalent.
1.Stoptheengineandwaitforallmovingpartstostop.
2.Rotatethedischargechutesothatitfacesforward.
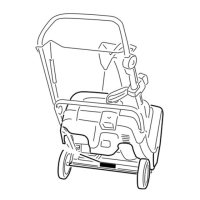
3.Removethedischargechute,thedischargechute
handle,andthechutesealbyremovingthe3large
screwsandonesmallscrew(Figure24).
Figure24
1.Dischargechutehandle4.Dischargechute
2.Largescrew(3)5.Smallscrew
3.Chuteseal
4.Removethe4screwsthatsecuretheshroud
(Figure24).
5.Removethefueltankcap.
12