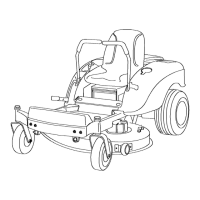
Figure 47
1. Hairpin cotter and clevis
pin
2. Support rod
5. R emo v e the hair pin cotter and w asher from
the adjusting rod ( Figure 48 ) on eac h side of
the mo w er .
6. R emo v e the hair pin cotter and w asher at
the mo w er lev eling brac k ets ( Figure 48 ) on
eac h side of the mo w er . Note whic h hole
the lev eling brac k et is mounted in for future
installation. Slide the brac k ets off of the
mounting pin.
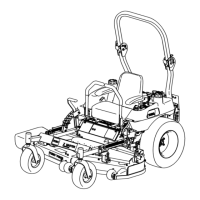
Figure 48
1. Leveling bracket 3. Adjusting rod
2. Hairpin cotter and washer
7. Slide the mo w er rearw ard to remo v e the
mo w er belt from the engine pulley .
8. Slide the mo w er out from under neath the
mac hine .
Note: R etain all par ts for future installation.
Mower Belt Maintenance
Inspecting the Belts
Inspect all belts ev er y 100 hours .
Chec k the belts for crac ks , fra yed edg es , bur n
marks , or any other damag e . R e place damag ed
belts .
Replacing the Mower Belt
Squealing when the belt is rotating, blades slipping
when cutting g rass , fra yed belt edg es , bur n marks ,
and crac ks are signs of a w or n mo w er belt. R e place
the mo w er belt if any of these conditions are
evident.
1. P ark the mac hine on a lev el surface and
diseng ag e the blade control switc h.
2. Mo v e the motion control lev ers to the brak e
position, stop the engine , remo v e the k ey , and
w ait for all mo ving par ts to stop before lea ving
the operating position.
3. Set the height-of-cut at A [1-1/2 inc h (38 mm)].
4. R emo v e the belt co v ers o v er the outside
spindles and loosen the belt guide ( Figure 49 ).
Figure 49
1. Mower belt 5. Engine pulley
2. Idler arm 6. Belt cover
3. Outside pulley 7. Belt guide
4. Spring
8. Idler pulley
5. Pull the idler pulley in the direction sho wn in
Figure 49 and roll the belt off of the pulleys .
34