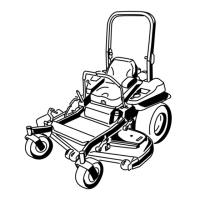
Figure99
1.Clutchpulley5.Squareholeintheidler
armfortheratchet
2.Mowerbelt6.Idlergreasezerk
3.Springloadedidlerpulley
7.Beltguide
4.Ratchet
7.Removeandretainthehardwareonbothsidesofthe
deckasshowninFigure100.
Figure100
1.Rightstabilizer
2.Deckstrut(rightsideshown)
3.Removethereardeckliftattachmentshoulderboltandnut.
4.Removethefrontdeckliftattachmentshoulderboltandnut.
8.Raisethedeckstrutsandsecurethemintheup
position.Slidethedeckouttotherightsideofthe
machine.
ReplacingtheGrassDeector
WARNING
Anuncovereddischargeopeningcouldallowthe
lawnmowertothrowobjectsintheoperator'sor
bystander'sdirectionandresultinseriousinjury.
Also,contactwiththebladecouldoccur.
Neveroperatethelawnmowerunlessyouinstalla
coverplate,amulchplate,grassdeectororbagger.
1.Removethelocknut,bolt,springandspacerholdingthe
deectortothepivotbrackets(Figure101).Remove
thedamagedorworngrassdeector.
Figure101
1.Bolt
5.Springinstalled
2.Spacer6.GrassDeector
3.Locknut
7.Jhookendofspring
4.Spring
2.Placethespacerandspringontothegrassdeector.
PlaceoneJendofthespringbehindthedeckedge.
Note:MakesureoneJendofthespringisinstalled
behindthedeckedgebeforeinstallingtheboltas
showninFigure101.
3.Installtheboltandnut.PlaceoneJhookendofthe
springaroundthegrassdeector(Figure101).
Important:Thegrassdeectormustbeable
torotate.Liftthedeectoruptothefullopen
positionandensurethatitrotatesintothefull
downposition.
61
 Loading...