1.Holdthebladeendusingaragorthickly-paddedglove.
2.Removethebladebolt,curvedwasher,andbladefrom
thespindleshaft(Figure77).
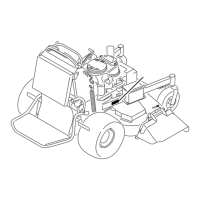
Figure77
1.SailAreaofBlade3.Curvedwasher
2.Blade4.BladeBolt
SharpeningtheBlades
1.Usealetosharpenthecuttingedgeatbothendsof
theblade(Figure78).Maintaintheoriginalangle.The
bladeretainsitsbalanceifthesameamountofmaterial
isremovedfrombothcuttingedges.
Figure78
1.Sharpenatoriginalangle
2.Checkthebalanceofthebladebyputtingitonablade
balancer(Figure79).Ifthebladestaysinahorizontal
position,thebladeisbalancedandcanbeused.Ifthe
bladeisnotbalanced,lesomemetalofftheendof
thesailareaonly(Figure77).Repeatthisprocedure
untilthebladeisbalanced.
Figure79
1.Blade2.Balancer
InstallingtheBlades
1.Installthebladeontothespindleshaft(Figure80).
Important:Thecurvedpartoftheblademustbe
pointingupwardtowardtheinsideofthemowerto
ensurepropercutting.
2.Installthespringdiskandbladebolt.Thespringdisk
conemustbeinstalledtowardthebolthead(Figure80).
Torquethebladeboltto85-110ft-lb(115-150N-m).
Figure80
1.SailAreaofBlade
4.BladeBolt
2.Blade
5.ConeTowardsBoltHead
3.SpringDisk
LevelingtheMowerDeck
PreparingtheMachine
1.Positionmoweronaatsurface.
2.DisengagethePTO,movethemotioncontrolleversto
theneutrallockedpositionandsettheparkingbrake.
3.Stoptheengine,removethekey,andwaitforallmoving
partstostopbeforeleavingtheoperatingposition.
4.Checkthetirepressureofbothdrivetires.Ifneeded,
adjustto13psi(90kPa)
5.Lowerthemowertothe76mm(3inch)height-of-cut
position.
Note:Theactualcuttingheightwillnotbe
adjusteduntilthedeckhasbeenleveled.Referto
MatchingtheHeightofCut(page53).
6.Checkthedistancebetweentheswivels,measureatthe
centeroftheswivels(center-to-centerlength)oneach
threadedrod.Ensurethelengthis49.5cm(19-1/2
inches)for36inchmowerdecksand43.7cm(17-3/16
inches)for40inchmowerdecks(
Figure81).
50

 Loading...