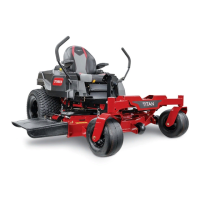
BeltMaintenance
InspectingtheBelts
ServiceInterval:Every25hours—Checkthebelts
forwearorcracks.
Replacethebeltifitisworn.Thesignsofawornbelt
includesquealingwhilethebeltisrotating;theblades
slippingwhilecuttinggrass;andfrayededges,burn
marks,andcracksonthebelt.
ReplacingtheMowerBelt
Thesignsofawornbeltincludesquealingwhilethe
beltisrotating,bladesslippingwhilecuttinggrass,
andfrayededges,burnmarks,andcracksonthebelt.
Replacethemowerbeltifanyoftheseconditionsare
evident.
1.Parkthemachineonalevelsurface,disengage
theblade-controlswitch(PTO),andengagethe
parkingbrake.
2.Shutofftheengine,removethekey,andwait
forallmovingpartstostopbeforeleavingthe
operatingposition.
3.Lowerthemowertothe76mm(3inches)
height-of-cutposition.
4.Foreachofthebeltcovers,loosenthe2bolts,
butdonotremovethem.
5.Slidethecoveruntilitisclearoftheboltsandlift
itupandouttoremoveit.
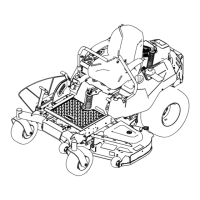
6.Removetheoorpantoaccesstheidlerpulley.
7.Usingaspringremovaltool,(T oroPartNo.
92-5771),removetheidlerspringfromthe
deckposttoremovetensionontheidlerpulley
(Figure52).
g028279
Figure52
1.Spring-removaltool(T oro
PartNo.92-5771)
4.Idlerarm
2.Idlerspring5.Mowerbelt
3.Deckpost
8.Lowerthemowertothelowestheightofcutand
placetheheight-of-cutpininthelockpositionfor
thelowestheight-of-cut.
9.Removethebeltfromthemower-deckpulleys
andremovetheexistingbelt.
10.Installthenewbeltaroundthemowerpulleys
andtheclutchpulleyundertheengine(Figure
52).
WARNING
Thespringisundertensionwhen
installedandcancausepersonalinjury.
Becarefulwhenremovingthebelt.
11.Usingaspring-removaltool,(T oroPartNo.
92-5771),installtheidlerspringoverthedeck
postandplacingtensionontheidlerpulleyand
mowerbelt(Figure52).
12.Ensurethatthebeltisproperlyseatedinall
pulleys.
13.T oinstallthebeltcovers,insertthetabsonthe
eachcoverintothecorrespondingslotsonthe
deckbracket,ensuringthattheyseat.
14.Rotatethecovertothedeckandslidethe
notchesundertheloosenedboltsuntiltheyare
seated.
15.Tightentheboltstosecurethecovertothedeck.
42

 Loading...