POSSIBLE BREAKDOWNS, CAUSES AND SOLUTIONS
PROBLEMS CAUSES SOLUTIONS
Air entry in suction tube Check pipe fittings and suction tube joints
Clean the pre-filter cover and check the condition of
the joint
Motor turning direction
incorrect.(III)
Invert two phases of the feeding line
Check that the network voltage corresponds to that on
the motor specification board
Blocked pre-filter Clean the pre-filter
Air entry in suction tube Check pipe fittings and suction tube joints
Motor turning direction
incorrect.(III)
Invert two phases of the feeding line
Prevent as much as possible, elements that produce
load loss
Check that the network voltage corresponds to that on
the motor specification board
Incorrect fixation of the pump Fix pump correctly
Check that the network voltage corresponds to that on
the motor specification board
THE MOTOR MAKES A
NOISE BUT DOESN’T START
Blocked motor Dismantle the motor and contact the technical service.
Increase in terminal box
temperature because of
voltage arch effect
Check terminal box connections
Heat protector blows Correctly connect cables with terminal box terminals
Fasten the cable to the terminal correctly
Modify size of connection cable to terminal box
terminals
Terminal boxes badly
connected
MÖGLICHE STÖRUNGEN, URSACHEN UND BESEITIGUNG
DIE PUMPE FÜLLT
SICH NICHT AUF
Lufteintritt durch die Saugleitung
Gewinde und Dichtungen der Saugleitung
überprüfen
Deckel des Vorfilters reinigen, Zustand der
Dichtungen überprüfen
Drehsinn des Motors nicht korrekt
(III)
Zwei Versorgungsphasen umkehren
Netzspannung muss dem Typenschild
entsprechen
DIE PUMPE
LIEFERT WENIG
FÖRDERLEISTUN
G
Lufteintritt durch die Saugleitung
Gewinde und Dichtungen der Saugleitung
überprüfen
Drehsinn des Motors ist nicht
korrekt (III)
Zwei Versorgungsphasen umkehren
Druckverlust beim Ansaugen
Teile, die zu Druckverlust führen, vermeiden
Netzspannung muss dem Typenschild
entsprechen
Pumpe ist nicht richtig befestigt
DIE PUMPE
SPRINGT NICHT
AN
Netzspannung muss dem Typenschild
entsprechen
DER MOTOR
MACHT LÄRM,
SPRINGT ABER
NICHT AN
Motor ausbauen und zum technischen
Kundendienst bringen.
Temperaturerhöhung im
Klemmenkasten durch Lichtbogen
Anschlüsse im Klemmenkasten überprüfen
Wärmeschutzschalter springt raus
Kabel korrekt an den Klemmenkasten
anschliessen
Anschlüsse im Klemmenkasten
fehlerhaft
Kabel richtig befestigen.
Grösse der Kabelverbindung an den
Anschluss im Klemmenkasten anpassen
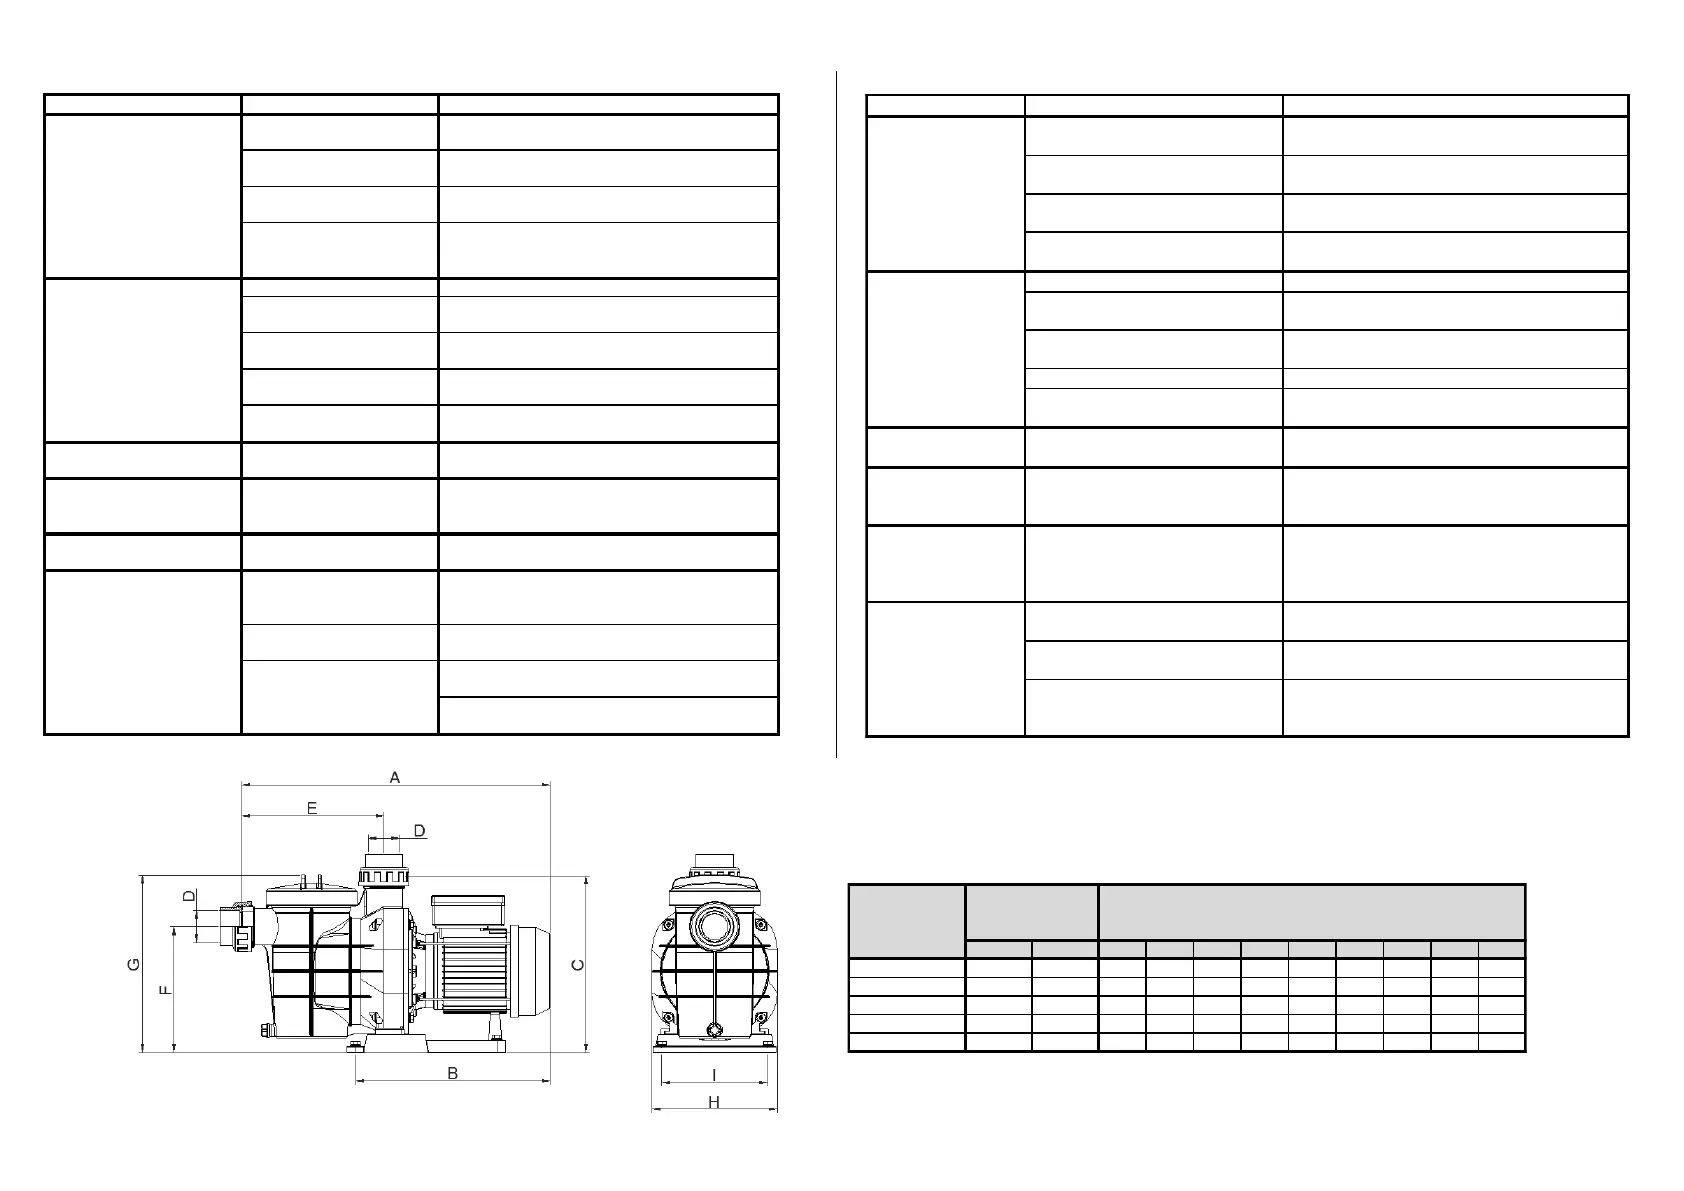
kW CV/HP A B C D E F G H I
SA033
0,25 1/3 475 296 280 Ø50 225 200 285 199 168
SA050
0,37 1/2 475 296 280 Ø50 225 200 285 199 168
SA075
0,55 3/4 490 311 280 Ø50 225 200 285 199 168
SA100
0,75 1 490 311 280 Ø50 225 200 285 199 168
SA125
1,10 1,5 490 311 280 Ø50 225 200 285 199 168
 Loading...