This document is the Owner's Manual for the TOSHIBA RBC-AXU31-E Wireless Remote Controller Kit for Split Type Air Conditioners. It provides essential information for safe and effective operation, maintenance, and troubleshooting of the device.
Function Description
The RBC-AXU31-E is a wireless remote controller designed to operate TOSHIBA split-type air conditioners. It allows users to control various functions of the air conditioner, including starting/stopping operation, selecting operating modes (Cooling, Heating, Fan, Dry, Auto Changeover), adjusting temperature, setting fan speed, controlling louver direction, and utilizing timer functions. The remote controller transmits infrared signals to a signal receiving unit attached to the indoor air conditioner unit. Up to 8 indoor units can be operated as a group by a single remote controller. For U series units, the maximum number of connectable units is 16.
Important Technical Specifications
- Battery Type: 2 x R03 or LR03 (AAA) batteries.
- Battery Life: Approximately one year under normal use.
- Signal Reception Distance: Approximately 8 meters vertically against the signal receiving unit. This distance may vary based on battery capacity and other factors.
- Operating Temperature Range: The temperature setting can be adjusted from 17 °C to 30 °C for cooling/heating modes. No temperature setting is indicated for Fan only mode.
- Fan Speed Settings: AUTO, LOW, LOW+, MED, MED+, HIGH. Five patterns are displayed, with LOW+ being equivalent to LOW, and MED+ to MED.
- Timer Functions: ON timer, OFF timer, Combined timer (OFF -> ON, ON -> OFF), and Everyday combined timer.
- Special Modes: Hi POWER (high power operation) for rapid cooling/heating, QUIET mode for quiet operation, PRESET mode to recall preferred operation settings, and COMFORT SLEEP mode for automatic temperature and fan speed adjustment during OFF timer operation.
Usage Features
Precautions for Safety:
- Installation: Installation should be performed by a qualified professional. The remote controller should not be installed in direct sunlight, near heat sources, or where signals cannot reach the indoor unit. Fluorescent lamps with rapid start or inverter systems, or equipment emitting infrared rays, may interfere with signal reception.
- Operation: Prevent liquids from spilling on the remote controller. In case of abnormal operation (e.g., burning smells), immediately turn off the main power supply and contact the dealer.
- Reinstallation/Repair: Do not attempt to repair the unit yourself; contact the dealer for service.
Changing Batteries:
- To load batteries, remove the battery cover and insert two new R03 or LR03 (AAA) batteries, observing the correct polarity (+/-).
- To remove batteries, remove the cover and lightly slap the batteries out onto your palm.
- Replace batteries if there is no receiving beep from the indoor unit or if the air conditioner cannot be operated. Remove batteries if the remote controller will not be used for more than one month to prevent leakage.
Adjusting Clock:
- After inserting batteries, the clock panel will flash AM 0:00.
- Press the CLOCK button (using a pencil tip) to make the display flash.
- Use the TIMER ▲ or ▼ buttons to set the current time. Each push changes the time by one minute; continuous pushing changes it by ten minutes.
- Press the SET button to confirm the time and start the clock.
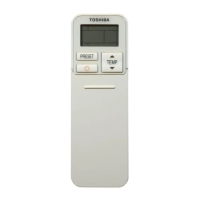
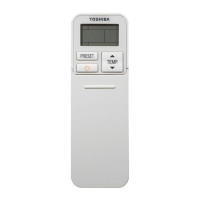
Part Names and Functions (Remote Controller Display):
- Infrared Signal Emitter: Transmits signals to the indoor unit.
- START/STOP Button: Starts or stops air conditioner operation. A receiving beep confirms the action.
- Mode Select Button (MODE): Cycles through Auto, Cool, Dry, Heat, and Fan Only modes.
- Temperature Buttons (TEMP. ▲/▼): Adjusts the set temperature (17-30°C).
- Fan Speed Button (FAN): Selects fan speed (AUTO, LOW, MED, HIGH). AUTO adjusts speed based on room temperature, or for Dry mode.
- Auto Louver Button (SWING): Initiates or stops louver swinging for automatic airflow direction changes.
- Set Louver Button (FIX): Adjusts the airflow direction to a fixed position. Holding it down produces a continuous receiving tone.
- Off Timer Button (OFF): Sets the OFF timer.
- On Timer Button (ON): Sets the ON timer.
- Reserve Button (SET): Reserves time settings for timers.
- Cancel Button (CLR): Cancels ON and OFF timers.
- High Power Button (Hi POWER): Activates high power operation for rapid cooling/heating.
- PRESET Button: Changes to a previously memorized preferred operation mode. Hold for 3 seconds to memorize a setting.
- COMFORT SLEEP Button: Starts OFF timer operation with automatic temperature and fan speed adjustment (1, 3, 5, or 9 hours).
- QUIET Button: Starts quiet operation by setting fan speed to the lowest. Pushing again restores normal operation.
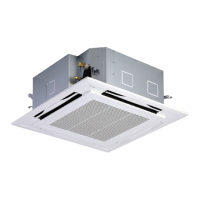
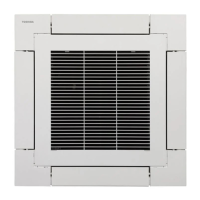
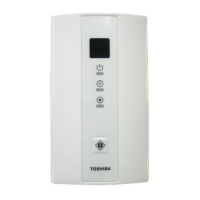
Operating Unit (Signal Receiving Unit):
- Temporary Operation Button: Allows basic operation (start/stop) if the remote controller is unavailable (e.g., dead batteries, lost, or malfunctioning). Pushing for ~1 second starts operation in the last used setting. Pushing again stops it. Do not hold for 3 seconds or more, as this triggers forced cooling or servicing modes.
- Signal Receiving Part: Receives signals from the remote controller.
- Display Lamp: Indicates unit status and errors.
- Lamp (Green): Illuminates when the unit is on.
- Lamp (Green): Illuminates when the timer is reserved.
- Lamp (Orange): Illuminates during heating operation (start, temp. controller active, defrost) and flashes during trouble.
- If "pi, pi" sounds and lamps flash alternately, the desired mode operation is not performed due to disagreement in operation mode.
Automatic Operation (Auto Changeover):
- Select "A" mode using the Mode Select button. The unit will automatically select the operating mode (Cooling/Heating) based on room temperature.
- This mode is not available for SMMS series units other than Super Heat Recovery Multi types, or for Cooling only models.
Adjusting Louver Direction:
- To Set Louver Direction: Push the FIX button during operation. Each push changes the direction.
- For heating, direct louvers downward for hot air to reach the floor.
- For cooling/dry, direct louvers upward to prevent condensation and dripping.
- To Start Swinging: Push the SWING button. Louvers will automatically move up and down.
- To Stop Swinging: Push the SWING button again when the louver is at the desired position.
- Caution: Do not push FIX during swing operation. Stop swinging first. Avoid prolonged downward airflow during cooling/dry to prevent condensation.
Mounting Remote Controller Holder:
- To fix the holder to a wall, first check signal reception by pushing START/STOP at the desired location.
- Use flat head wood screws to secure the holder.
Wireless Remote Controller A-B Selection:
- This feature allows two wireless remote controllers to operate separate air conditioners when installed closely.
- To Set Controller B:
- Start the air conditioner using the remote controller.
- Push and hold the CHECK button with a pencil tip. "00" will appear on the display.
- Push the MODE button while holding CHECK. "B" will appear, "00" will disappear, and the air conditioner will turn OFF. Controller B is now memorized.
- Note: The factory default is "A". To reset to "A", repeat the steps without pushing MODE.
Maintenance Features
Before Asking for Repair Work (Troubleshooting Guide):
The manual provides a comprehensive troubleshooting table for common issues, including:
- Operation does not start: Possible causes include air conditioner not working, power failure, power switch off, ON timer operation, or exhausted remote controller batteries.
- LEDs on signal receiving unit are not in normal state/operation mode is incorrect: Change operation mode.
- Display lamp shows "Disagreement of (cool) and (heat)" or "A (Automatic operation)": Change operation mode.
- Dual swing, cycle swing, individual louver position, or power-saving cannot be set: This remote controller type does not support these functions.
The manual lists various LED flash patterns on the signal receiving unit and their possible causes, such as:
- Communication error between receiving unit and indoor/outdoor unit.
- Address setup error (with wired remote controller).
- Protective device activation (indoor or outdoor unit).
- Temperature sensor error.
- Compressor protection.
- Air conditioner performing a test run.
If problems persist after checking these items, users are instructed to stop operation, turn off power, and contact the dealer. When contacting, provide the air conditioner model name, wireless remote controller kit model name, wireless remote controller model name, signal receiving unit model name, and details of the error (including LED flashing state). Users are warned not to attempt repairs themselves due to danger.
This manual ensures users can effectively manage their TOSHIBA air conditioner with the RBC-AXU31-E remote controller, emphasizing safety, proper usage, and guidance for resolving common operational issues.