Do you have a question about the Tosot TW09HQ3D6DI and is the answer not in the manual?
Manufacturer's responsibilities for injury or loss due to product misuse or external factors.
Safety guidelines for operating and maintaining the appliance.
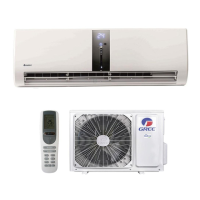
Identifies components of the indoor unit and remote controller.
Illustrates indicators and displays for various models.
Explains the meaning of icons shown on the remote controller's display.
Details the function of the ON/OFF button.
Explains how to use the FAN button to select fan speeds.
Describes the selection of operating modes like Auto, Cool, Dry, Fan, Heat.
Explains how to adjust the temperature using the +/- buttons.
Details the Turbo function for quick cooling or heating.
Explains how to set left & right swing angle.
Explains how to set up/down swing angle.
How to set the clock on the remote controller.
Instructions for setting timer functions.
How to view different temperature readings on the indoor unit display.
Explains the Health and Scavenging functions.
How to use the I FEEL function for temperature sensing.
Controls the display light on the unit.
Details the WiFi connectivity features.
How to activate the Quiet mode for reduced noise.
Explains the different Sleep modes for temperature adjustment.
Customizing sleep temperature curves.
Automatic operation based on room temperature.
High-speed fan operation for quick temperature adjustment.
How to lock and unlock the remote control keyboard.
Instructions for controlling vertical louver movement.
Instructions for controlling horizontal louver movement.
Switching between °C and °F temperature units.
Activating the energy-saving function.
Activating the 8°C heating function.
How the quiet function operates in different modes.
Sleep function behavior in Fan, Dry, and Auto modes.
Basic steps for operating the air conditioner.
Details on less common operational features.
Important notices regarding remote controller usage and battery replacement.
Warning about using insulated objects to press the auto button.
Instructions for cleaning the exterior of the indoor unit.
Steps for cleaning the air filter.
Warnings about filter cleaning frequency and handling.
Pre-season checks for the air conditioner.
Post-season checks for the air conditioner.
Guidance on recycling and disposal of the unit.
Troubleshooting common issues with the air conditioner.
Explains mist emission as a normal phenomenon.
Troubleshooting temperature adjustment issues.
Addresses poor cooling or heating performance.
Troubleshooting sources of odors.
General troubleshooting for abnormal operation.
Explains vapor from the outdoor unit during defrosting.
Explains "water flowing" noise as normal refrigerant sound.
Explains cracking noise due to temperature changes.
Lists error codes and their troubleshooting steps.
Critical warnings for abnormal phenomena requiring immediate attention.
Crucial safety warnings for installation and relocation.
General criteria for selecting an installation site.
Specific location requirements for the indoor unit.
Safety measures for electrical connections.
Essential grounding procedures and guidelines.
Recommending and confirming the installation site.
Steps for mounting the frame on the wall.
Creating the hole for piping through the wall.
Routing the outlet pipe from the unit.
Connecting the refrigerant pipes to the indoor unit.
Connecting and securing the drain hose.
Wiring connections for the indoor unit.
Bundling pipes, wires, and hoses together.
Mounting the indoor unit onto the wall-mounting frame.
Client approval and important notes for testing.
Procedures for conducting the test operation.
Specifies standard lengths for connection pipes.
Minimum allowable length for connection pipes.
Maximum allowable length for connection pipes.
Guidelines for adding refrigerant oil and gas.
Improper pipe expanding causes refrigerant leakage.
Steps for cutting the pipe correctly.
Removing burrs after cutting the pipe.
Applying insulating pipe.
Installing the union nut.
Expanding the pipe end using an expander.
Checking the quality of the expanded pipe port.
| Cooling Capacity | 9000 BTU/h |
|---|---|
| Inverter | Yes |
| Refrigerant | R32 |
| Energy Efficiency Ratio (EER) | 3.21 |
| Seasonal Energy Efficiency Ratio (SEER) | 6.1 |
| Coefficient of Performance (COP) | 3.61 |
| Power Supply | 220-240V, 50Hz |
| Power Consumption (Cooling) | 800 W |
| Indoor Unit Weight | 9 kg |
| Type | Split |
| Heating Capacity | 9500 BTU/h |
| Noise Level (Outdoor) | 50 dB |
| Outdoor Unit Dimensions (WxHxD) | 720 x 495 x 270 mm |
| Air Flow (Indoor) | 350 m3/h |
| Airflow Rate | 350 m3/h |