6
安装步骤-定位
(续)
INSTALLATION PROCEDURE - POSITIONING
(Continued)
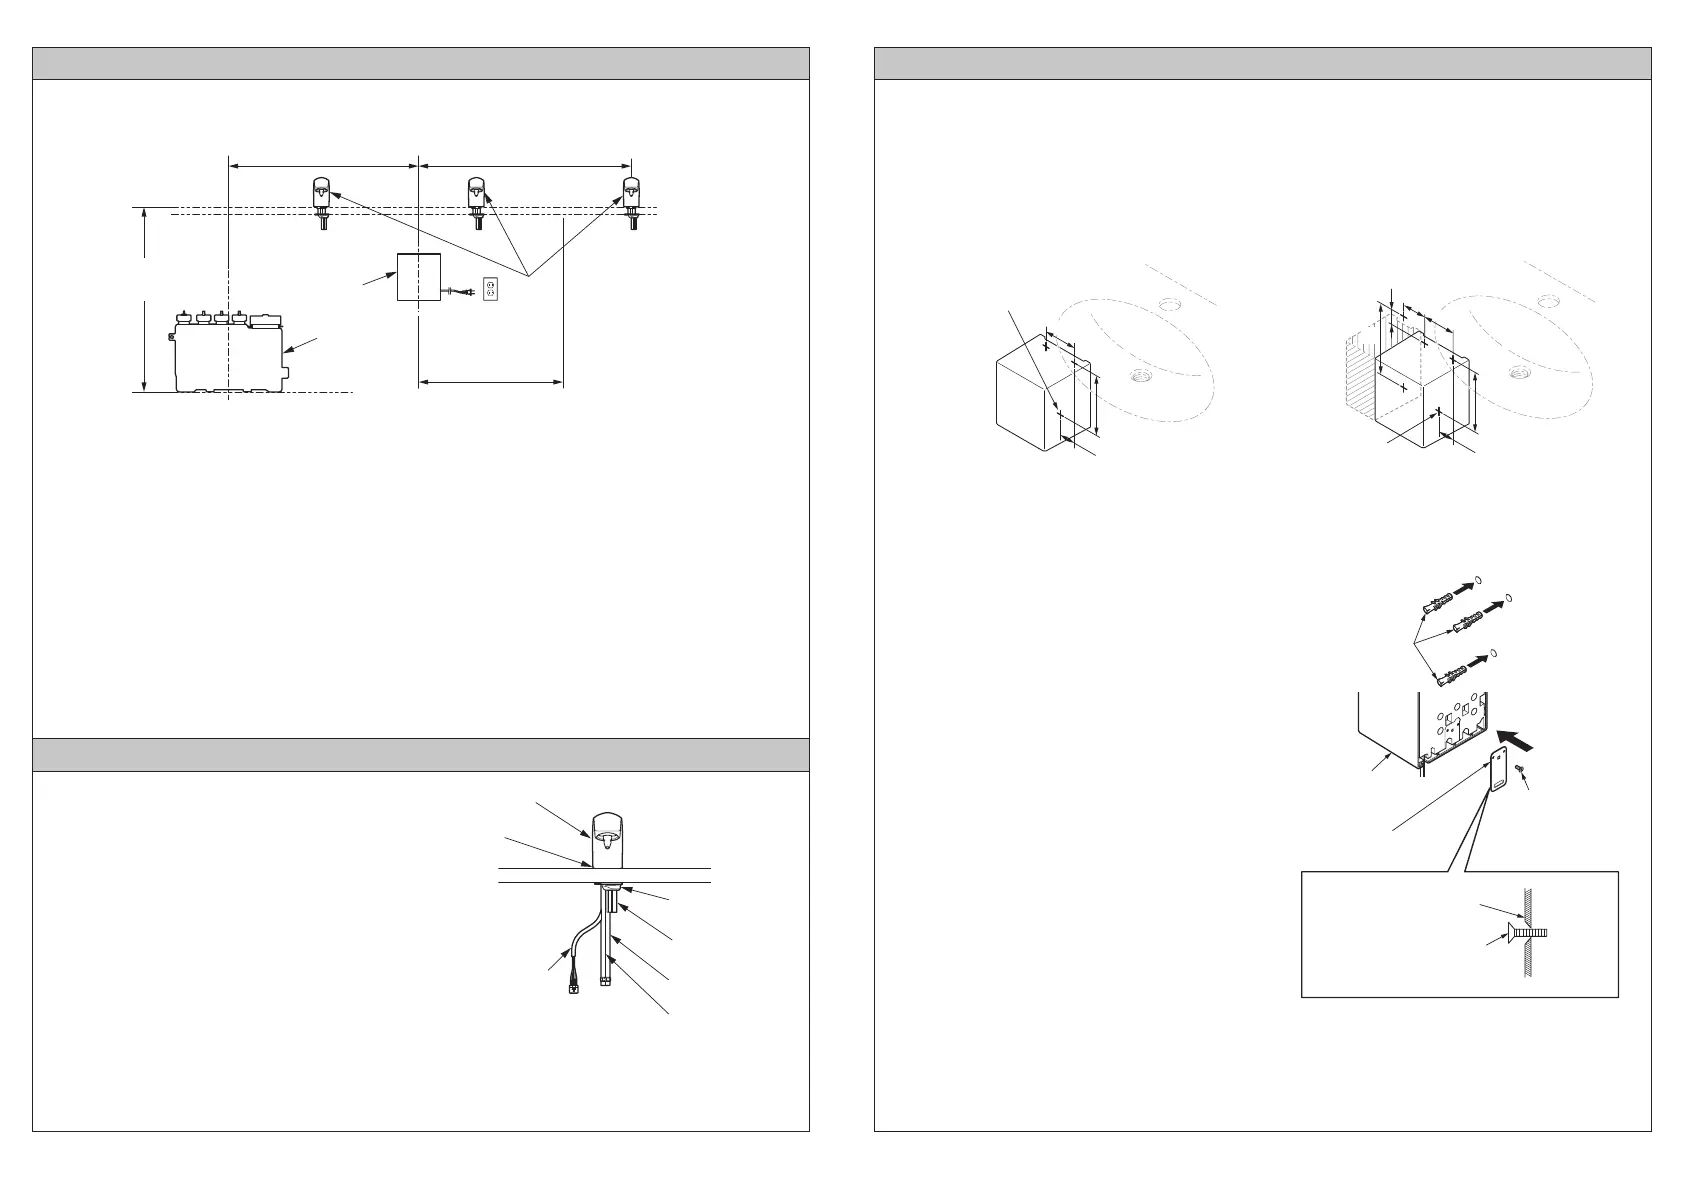
定位皂液箱
Positioning the Tank
*图中的尺寸仅限于将箱体安装在左侧的情况。
如果实际尺寸超过图中的尺寸,感应器连接线
和皂液软管的长度可能不足。
* The dimensions in the figure are limited to when
the tank is installed on the left end.
If actual dimensions exceed those in the figure,
cords and hoses may not reach.
Install the liquid soap water tank within 800 mm from the upper face of the counter. It also should
not exceed the height of the upper end of the controller.
It cannot be installed on the counter or on the lower level.
If it is installed beyond this range, the following troubles may occur. Less water spouts and the
soap does not foam.
The length of the hose connected to the spout is 1.8 m. Install the controller so that the hose can
be connected to the controller.
将皂液箱安装在距离台面上表面800mm的范围之内。它也不应该超过机能部上端的高度。
它不能安装在台面上或更低平面上。
如果超出此范围安装,可能会出现以下故障。喷皂液少和皂液不起泡。
连接到吐皂口本体的皂液软管的长度是1.8m。安装机能部时应使皂液软管可以连接到机能部。
单位: mm
Unit : mm
安装步骤-吐皂口本体 INSTALLATION PROCEDURE - Spout
Dispenser
吐皂口本体
Sensor cord
1.
将吐皂口本体插入台面(或洗面器)的安装孔中。
Insert the dispenser into the installation holes
in the counter (or the sink).
Caution
Make sure that the cords and tubes do not get
crimped.
注意
确保感应器连接线和管路没有发生扭曲。
2.依次安装垫片和六角螺母。
Disassemble screw and washer with the hex
nuts.
Washer
垫片
Hex nut
六角螺母
感应器连接线
Air hose (blue)
空气软管(蓝色)
Liquid soap hose
(clear)
皂液软管(透明)
Packing
密封圈
* For a spout-to-spout distance
of 650 mm
*
吐皂口本体到吐皂口本体距离为650mm
Less than 1400
(Height of functional unit:350)
小于1400
(机能部的高度:350)
Less than 1500
小于1500
Tank
皂液箱
Controller
机能部
Controller installable range
(*1500)
机能部可安装范围
(*1500)
Spouts
吐皂口本体
Less than 800
小于800
7
Marking of the positions of the screw holes for the anchoring plate
Decide the anchoring position of the controller and mark the positions of screw holes on the wall by
referring to the dimensional drawing.
标记固定板螺丝孔的位置
根据尺寸图确定机能部的固定位置,并在墙壁上标记螺丝孔位置。
Reference
anchoring screw
Reference
anchoring screw
Controller (Back side)
Anchoring plate
Countersunk
tapping screw
(Φ 4 x 10)
沉头自攻螺丝
(Φ4 x 10)
固定板
固定板
沉头自攻螺丝(Φ4 x 10)
机能部(背面)
Anchoring plate
Countersunk tapping screw
(Φ 4 x 10)
正面 反面
Top side Bottom side
安装步骤-机能部 INSTALLATION PROCEDURE - Functional Unit
[3L箱型]
[ 3L Tank Type ]
[1L箱型]
[ 1L Tank Type ]
单位: mm
Unit : mm
基准固定螺丝
基准固定螺丝
膨胀管
Installing the controller on a tiled or concrete wall
将机能部安装在瓷砖或混凝土墙体上
* Procure a curl plug that matches the screw
(Φ 5.1 x 32).
*请购买与螺丝相匹配的膨胀管
(Φ5.1 x 32)。
1.在螺丝孔位置钻孔,然后插入膨胀管
(现场购买)。
Drill a rough hole at the screw hole position
and drive in the curl plug (procure in the field).
2.使用一个沉头自攻螺丝将固定板固定到机能
部上。
Anchor the anchoring plate to the controller
with one countersunk tapping screw.
注意
请勿用电动螺丝刀拧紧螺丝。这些螺丝仅可
手动拧紧。
注意请勿装反固定板的正面和反面。
Caution
Do not tighten the screws with an electric
screwdriver. These should be tightened manually.
Pay attention not to confuse the top side and
the bottom side of the anchoring plate.
Anchor
94
149
47
70
149
20
47
137
94
 Loading...