8
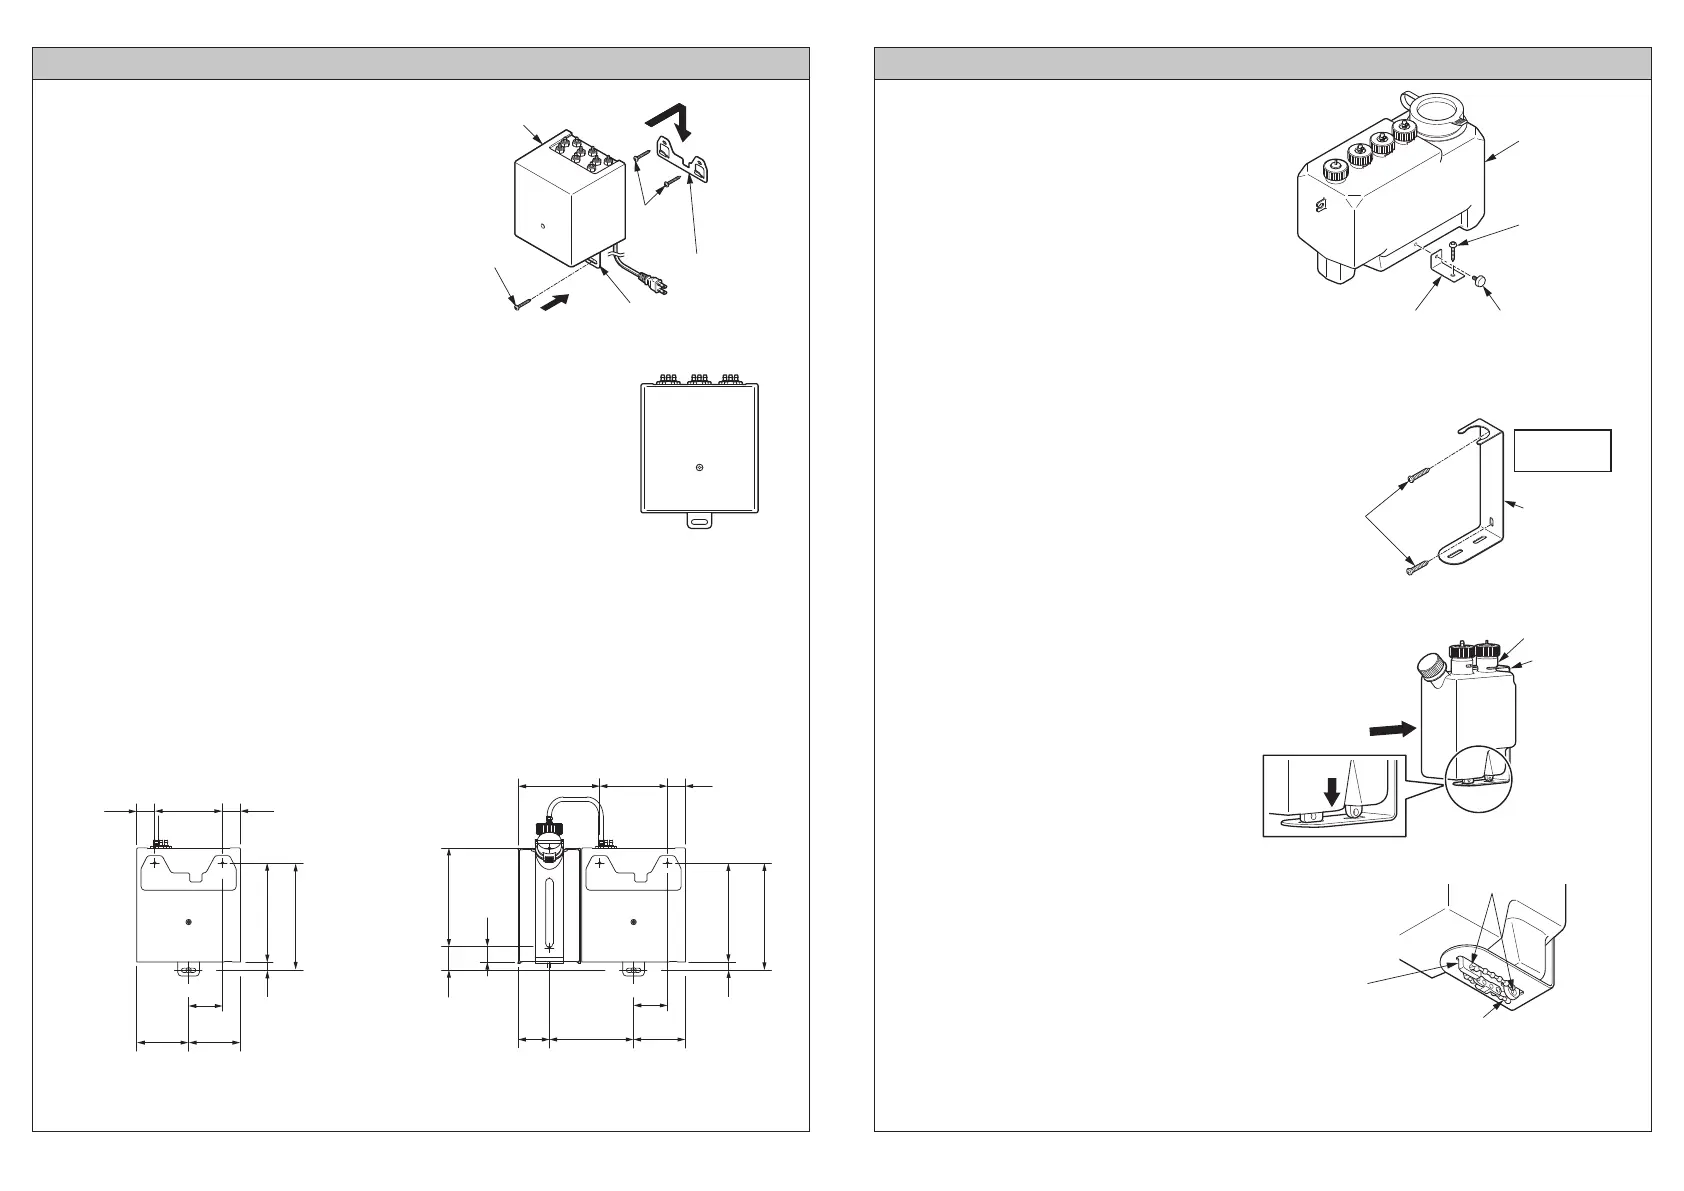
3.用两颗螺丝定位并固定支架。
4.
将机能部挂在安装支架上,并用一颗螺丝固定其
固定板。
Position and anchor the bracket with two screws.
Confirm that the wooden wall has a structure that can sustain the weight (2 kg)
of the controller (Triple type). (In the case of dry wall, in order to hold the
controller, make sure the plywood base is more than 0.5 inch thick.) Anchor
the mounting bracket with two screws and anchor the anchoring plate with one
screw. Reinforce the wall structure sufficiently as needed.
确认木质墙体的结构能够承受机能部(三联型)的重量(2kg)。
(如果墙体干燥,为了支 撑 机能部,请确保胶合板基层厚度大于12mm。)
用两颗螺丝固定安装支架,然后用一颗螺丝固定其固定板。根据需要充
分加固墙体结构。
Hang the controller on the mounting bracket and
anchor the anchoring plate with one screw.
安装步骤-机能部
(续)
INSTALLATION PROCEDURE - Functional Unit
(Continued)
Relation between the screw positions and the side and lower face
[3L箱型]
[ 3L Tank Type ]
单位: mm
机能部
螺丝
安装支架
固定板
螺丝
Unit : mm
[1L箱型]
[ 1L Tank Type ]
螺丝位置与侧面和下表面之间的关系
将机能部安装在木质墙体上
Controller
Mounting bracket
Screws
Screw
Installing the controller on a wooden wall
Anchoring plate
25 2594
149
11
47
72
72
13733
117
149
47
43 72
22
113 94 25
138
11
138
Caution
Install the unit body horizontally.
Pay attention not to pinch of the electric cord or contact it with edges.
注意
请水平安装机能部。
注意请勿夹住感应器连接线或使感应器连接线碰触到边缘。
9
Anchor the tank and the brackets with the
decorative screws that should be tightened by
hand.
Using the bracket to anchor the tank on the floor.
使用支架将皂液箱固定在地板上。
Install the tank on the floor with the screw.
2.将皂液箱收缩部分完全卡入支架。
Pass the constricted part of the tank between
the bracket and insert it the full depth.
Insert the tank in the slit on the bottom
surface of the bracket and pass it through
the two holes.
安装步骤-皂液箱
INSTALLATION PROCEDURE - Tank
1.用随附的圆头螺丝固定支架。
2.用螺丝将皂液箱安装在地板上。
1.使用装饰螺丝(应该用手拧紧)将皂液箱和支
架进行固定。
Anchor the bracket with the attached
round-head screw.
[1L箱型]
[ 1L Tank Type ]
[3L箱型]
[ 3L Tank Type ]
Note
If the floor is made of concrete, embed the curl plugs first.
Bracket
Decorative screw
1.装饰螺丝
Tank
Screw
2.螺丝
Two round-head
screws
(Φ 5.1 x 32)
Bracket
Wall surface
墙面
Insert it the full
depth.
Constricted part
Hole
Slit on the bottom of
the tank anchoring plate
Bundling band
3.
4.系上绑扎带。
3.将皂液箱插入支架底面上的狭缝中,并使
其穿过两个孔。
Attaching the bundling band.
*
绑扎带用于防止皂液箱与物体碰撞时掉落。
如果皂液箱安装在墙体等的后面,则不
需要系上绑扎带。
* The bundling band serves to prevent the
tank from falling off if the tank collides with
something.
If the tank is installed behind a wall, etc., it is
not necessary to attach the bundling band.
皂液箱固定板
底面上的狭缝
4.绑扎带
2.将其完全卡入。
孔
支架
收缩部分
两颗圆头螺丝
(Φ5.1 x 32)
Bracket
支架
皂液箱
支架
提示
如果地板是混凝土材质,则需首先插入膨胀管。
 Loading...