0GU079 Instructions 10/2015
2
3
▪ Disconnect water supply.
▪ Twist upper half of valve clockwise to lock (snap).
Rib (R) lines up with pegs (P). Keep locked.
▪ Turn top of new valve counterclockwise to unlock.
Pull up to extend. Refer to Fit Chart below - “Notch
Settings” for # of pegs (P) shown.
▪ Place valve in tank at one
of the angles shown.
▪ Insert tamper proof
accessory to prevent
accidental extension
of valve.
▪ Remove current valve.
▪ Hand tighten mounting nut
plus additional 3/4 turn.
CAUTION: Do not overtighten!
▪ Branchez l’alimentation en eau. ▪ Retirez la valve de remplissage.
▪ Serrez à la main pour faire un
3/4 tour.
▪ Tournez le dessus de la nouvelle soupape dans le sens contraire des
aiguilles d’une montre pour le déverrouiller. Voir le tableau réglage cran
pour le nombre de chevilles (P) represent.
▪ Verrouillez la soupape en tournant sa partie supérieure dans le sens des aiguilles
d’une montre. Alignez la rainure (R) avec les taquets (P). Garder verrouillé.
▪ Placez la soupape dans le réservoir,
en respectant l’un des angles indiquès.
▪ Simplemente se puede uti-
lizar para evitar mas ajustes.
▪ La clavette peut s’utiliser
simplement pour empêcher
d’autres altérations.
▪ Gire la parte superior de la válvula nueva en dirección contraria
a las manecillas del reloj y jale para extender. Ver el grífico de instalacíon
d’el posición de muesca para el numero de clavijas (P) que se muestran.
▪ Gire la mitad superior de la válvula en dirección de las manecillas para cerrar
(a presion). La varilla (R) se alinea con las espigas (P). Mantener cerrado.
▪ Coloque la válvula en el tanque en
uno de los ángulos que se muestra.
▪ Desenchufa el suministro de agua. ▪ Saca la válvula de corriente.
▪ Apriete con la mano para dar
vuelta a 3/4.
4
▪ Attach tube.
▪ Caution: Push tube as shown to ensure
port is locked in place.
▪ Attach to overflow tube with metal clip. Trim tube if kink occurs.
▪ Fixez au tube de trop-plein à l’aide de l’attache métallique. Coupez le tube s’il s’entortille.
▪ Fije al tubo de desborde con un sujetador de metal. Corte el tubo si se produce aiguna falla.
▪ Fixez le tube.
▪ Fije el tubo.
▪ Attention: Poussez le tube comme indiqué pour
assurer le port est verrouillé en place.
▪ Atención: Empuje el tubo como se muestra para asegurar
que el puerto está bloqueada en su sitio.
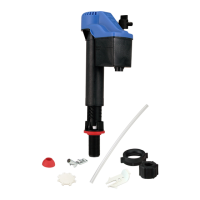
Genuine TOTO
Replacement Fill
Valve
a)
2
e)
a)
a)
b)
b)
c)
b)
c)
a) b) c)
c)
d)
d)
MODEL # FILL VALVE HEIGHT - NOTCH SETTING REFILL RATIO - KEY SETTING
ST743S(R)(B), ST707S, ST804S, ST784S, ST753S, ST423S, ST424S, ST774S, ST794S, ST754S, ST423E, ST424E, ST743E(R)(B), ST794E, ST784E
ST744E, ST243E, ST453U
53
ST454E(R)
4
4
ST753E, ST754E
5
4
ST755S
4
5
ST703, ST706(R), ST723, ST733, ST406
8
close
ST405M
6
close
ST413M, ST412M, ST416M, ST464M
7
1
CST853S, CST854S(L)(G), CST874S(G), CST934SF
10
4
CST853, CST854, CST863, CST864, CST863E, CST864E, CST634CEF(G), CST644CEF(G), CST866, CST884, CST914, CST924F
4
5
CST854E(L), CST853E
9
3
CST604CEF(G)(R), CST614CEF(G), CST624CEF(G), CST626CEF(G)
9
4
CST934EF
10
3
CST964CEF(G)
9
4
CST974CEF(G)
7
6
CST904
3
2
CST654MF, CST604CUF(G) 1G type, CST614CUF(G) 1G type 12 4
4
▪
Turn refill adjuster dial (D) counter clockwise to fully close. Insert adjuster key as shown above. Refer to the “Refill Ratio Key setting” in the
chart above to adjust amount of refill water. Turn adjuster dial (D) clockwise until radius edge contacts stopping post.
▪ Tournez le cadran de réglage de recharge (D) vers la gauche pour fermer complítement. Insérez la clé de réglage, comme indiqué ci-dessus. Reportez-vous à Réglage de la touche de Recharge
Ratio dans le tableau ci-dessus pour ajuster la quantité de l’eau de recharge. Tournez le cadran de réglage (D) dans le sens horaire jusqu’ã ce que les contacts de bord rayon d’arrét.
▪ Gire el cuadrante de ajustador de recarga (D) hacia la izquierda para cerrar completamente. Inserte la llave de ajustador como se muestra arriba. Consulte “el posición de la Llave de Razón de
Recarga” en el grífico anterior para ajustar la cantidad de agua de recarga. Gire el cuadrante de ajustador (D) hacia la derecha hasta que el borde del radio se puso con el posterior detención.
d)
TSU99A.X
▪ Turn off water supply.
▪ Fermez l’alimentation en eau.
▪ Corte el suministro de agua.
▪ Flush.
▪ Actionnez la chasse d’eau.
▪ Descargue.
▪ Place bucket.
▪ Placez le seau.
▪ Coloque la cubeta.
▪ Retire la tuerca de montaje.
Necesita una llave de tuercas.
▪ Retirez l’écrou de montage.
Utilisez une clé, au besoin.
1
▪ Remove mounting nut.
May need wrench.
R
P
locked
verrouillé
cerrada
P
Fit Chart
May be left over
Metal clip
Attache en métal
Sujetador de metal
Mounting nut
Écrou de montage
Tuerca de montaje
Tube
Tuyau
Tubo
Tamper proof accessory
L’accessoire inviolable
El accesorio a prueba de forcejeos
Cone washer
Rondelle conique
Arandela cónica
Coupling nut
Écrou d’accouplement
Tuerca de acoplamiento
Nécessaire / Obligatorio
À laisser de côté, au besoin / Puede sobrar.
Required