Complete Manual & Quick Start Guide
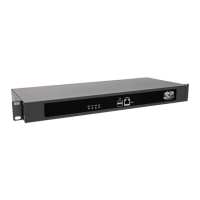
Internal UPS Web Management Adapter Card
Model: SNMPWEBCARD
1111 W. 35th Street, Chicago, IL 60609 USA
Customer Support: (773) 869-1234 • www.tripplite.com
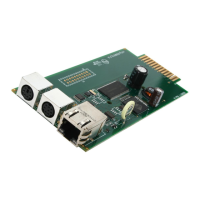
1) Connecting SNMPWEBCARD to UPS
a. Turn the UPS on.
b. Unscrew and remove the accessory slot cover plate on the back of the
UPS.
c. Slide the SNMPWEBCARD into the accessory slot. Using an Ethernet
cable, connect the SNMPWEBCARD to the LAN. The SNMPWEB
CARD by default is configured for DHCP and will automatically
obtain an IP address provided there is a DHCP server.
d. Proceed to Step 6b. (Only follow Steps 2-5 if the SNMPWEBCARD
did NOT automatically receive an IP address when you performed
Step 1 above.)
2) Manually Configuring SNMPWEBCARD
a. Disconnect Ethernet cable and remove the SNMPWEBCARD
from the accessory slot.
b. Set the SNMPWEBCARD's jumpers. For most Tripp Lite UPS models,
set to jumper position 1 (see Fig.1). This is the card's default position.
For models listed below with their corresponding series
numbers, set to jumper position 2 (see Fig. 2).
Note: Series numbers can be found on the back of the UPS.
3) Preparing Computer for Terminal Mode Configuration
a. Open a VT-100-compatible terminal emulation program on your
computer.
b. Configure the terminal emulation program to use the COM port on your
computer that will connect to the SNMPWEBCARD, and to use the
following settings:
Baud Rate: 9600 Stop Bit: 1
Data: 8 bits Flow Control: none
Parity: none
4) Installing SNMPWEBCARD in UPS
a. Unscrew and remove the accessory slot cover plate on the back of the UPS.
b. Slide the SNMPWEBCARD into the accessory slot.
c. Using the cable (73-1025) provided, connect the serial interface
connector to the COM port of the computer. Then connect the mini din
8 (circular) connector to the middle port of the SNMPWEBCARD.
Note: To prevent damage to the connector, make sure that the pins are
properly aligned.
d. Using an Ethernet cable, connect the SNMPWEBCARD to the LAN.
5) Configuring SNMPWEBCARD in Terminal Mode
a. When the configuration main menu appears on your computer screen,
you will be prompted to accept or modify current setting. Type M (modify).
b. A password prompt will appear. Type the default terminal password:
TrippLite.
c. Reset Configuration to default values (Y/N) will appear. Type N (no) and
press ENTER.
d. Network Interface Parameters will appear. You will be prompted with
Should target obtain IP settings from the network? Type N (no) and
configure the card to your networks subnets. If you do not know what IP
address to give the SNMPWEBCARD, contact your system administrator.
e. Save settings. The card will then reboot; depending on the selected
configuration settings, it will take 2-5 minutes for the card to become
initialized.
6) Preparing SNMPWEBCARD for Operation
a. Remove the cable connecting the SNMPWEBCARD to the computer.
b. Test network configuration by pinging the IP address given to the
SNMPWEBCARD.
c. If test is successful, replace the UPS accessory slot plate and secure it
with screws to hold the SNMPWEBCARD firmly in position.
7) Connecting to the SNMPWEBCARD Using a Web Browser
a. Open a web browser on any computer on the LAN.
b. Enter the IP address that was assigned to the SNMPWEBCARD. You
will be prompted to enter a username and password. Enter the default
username: admin. Leave the password field blank.
c. The UPS status screen will appear. Additional configurations may be
specified from this screen: email, SNMP, shutdown parameters and more.
PLEASE READ CAREFULLY BEFORE INSTALLING SNMPWEBCARD
SNMP: The RFC1628.mib and Tripplite.mib
(provided on the accompanying CD) must be
loaded into every management station that will
monitor the UPS via SNMP.
Documentation: The full SNMPWEBCARD
User's Guide is provided on the accompanying
CD. The User's Guide may also be accessed on
line at www.tripplite.com
Support: If you have any questions or prob-
lems, contact a Tripp Lite Network Product
Specialist at (773) 869-1599, between the hours of
8:30 AM and 5:00 PM CST.
200503171 93-2253
13
U5
Link Positions
2
3
Jumper Position 2
U5
Link Positions
Fig. 1
Fig. 2
Tripp Lite
UPS System Model Series Number
SMART1400RM2U AGSM1400Y2U29
SMART1500RM2U AGSM1400Y2U29
SMART1500RMXL2U AGSM1400Y2U29
SMART2200RM2U AGSM2200Y2U29
SMART2200RMXL2U AGSM2200Y2U29
SM2200RM2U-L520 AGSM2200Y2U29
Tripp Lite
UPS System Model Series Number
SM2000RMX3U AGSM2200Y2U29
SMART2600RM2U AGSM3000Y2U29
SMART3000RM2U AGSM3000Y2U29
SMART3000RMXL2U AGSM3000Y2U29
SMART3000RM2U AGSM3000Y2U29
This product designed and engineered in the U.S.A.
WARRANTY
REGISTRATION
Register on-line today for a
chance to win a FREE Tripp Lite
product! www.tripplite.com/warranty
Jumper Position 1
(Default)
Link Color Link Indicator
Off No Network
Flashing Amber 100 Mbs Network Connection
Flashing Green 10 Mbs Network Connection
Status Color Status Indicator
Off Not Initialized
Steady Green Initialized & Operational
Flashing Amber Error-Not Initialized
Link Status
200503171 93-2253 SNMP Webcard QSG.qxd 8/15/2005 10:06 AM Page 1