3
Installation
2 - Dynamic IP Address Assignment
2-1
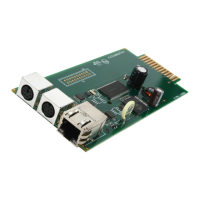
Connect the SRCOOLNET to the SRCOOL12K or SRXCOOL12K: Usingthe
dedicated connector
A
, connect the SRCOOLNET to the communication port on
thesideofthespotcooler(SeeFigure1onPage5).
2-2
Connect SRCOOLNET to Power: ConnecttheACAdapter
B
to the SRCOOLNET
viatheportlabeled“DCPower”
C
andplugtheotherendintoanACpower
source(SeeFigure1onPage5).
Note: The SRCOOLNET must be plugged into a power source protected by a
UPS or Inverter/Charger in order to maintain communications during a power
outage.
2-3
Connect SRCOOLNET to Network: Connect a standard Ethernet patch cable to
theRJ45EthernetportontheSRCOOLNET. Note: This port does not support
PoE (Power over Ethernet) applications. The SRCOOLNET will attempt to obtain
anIPaddressviaDHCP.Thismaytakeaslongasseveralminutes,dependingon
your network environment.
2-4
Discover IP Address: ContactyournetworkadministratortodeterminewhichIP
addresshasbeenassignedtotheSRCOOLNETbytheDHCPserver.Thecardcan
beidentifiedontheDHCPserverbyreferringtoitsMACaddress(seeStep
1-2
).
Youmaywishtorequestalong-termleaseperiodfortheIPaddress,depending
onyourapplication.AfteryouhavediscoveredtheIPaddress,proceedto
4 - Test and Configure. Note: The DHCP address is also displayed during boot-
up when connected to a computer through the configuration cable and a
terminal emulation program.
13-08-187 93-32CA.indb 3 9/27/2013 9:25:19 AM