I
NSTALLATION
¾ Installing the SEE2 DRIVER
Do not plug the SEE2 into the computer system before the driver is completely
installed.
1. Turn on your computer, wait for bootup to complete.
2. Insert the driver CD and follow the instructions.
3. Make sure to restart the computer.
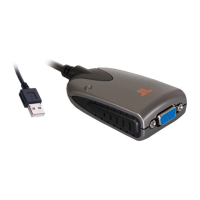
¾ Installing the SEE2 Hardware
After installing the SEE2 software, you are ready to connect the SEE2 to your
computer.
1. Plug the cable from the monitor, into the VGA port on the SEE2
2. Plug the SEE2 into an available USB 2.0 port.
3. Follow the instruction for installing.
¾ At this point if you have additional SEE2 Adaptors to install, you do not
have to restart your computer between installing the devices. Plug them in
and follow the instructions.
4. Restart your computer.
¾
F
UNCTION
D
ESCRIPTION
This section describes the main functions provided by the SEE2 .
USB
TO
G
RAPHICS
/VGA:
Supports either LCD or CRT monitors;
On an LCD or CRT monitor 3 modes are supported; Primary, Extended and Mirror;
access them by right-clicking on the “T” icon in the system tray, by your clock, or from
display properties in control panel.
2