.Qperation
To
Change
Belt
Speeds
Your tiller has two belt-driven
speed ranges - HIGH RANGE and
LOW RANGE - you pick one or
the other by deciding which set
of
pulley grooves you move the for-
ward belt into. By moving the belt
from one speed range into the
other,
in combination with the
FAST and SLOW wheel speeds of-
fered by the Wheel Speed Lever,
you obtain a choice
of
four differ-
ent forward wheel speeds and two
different tine speeds.
Changing the belt from LOW
range into HIGH range (or back
again) is simply a matter
of
mov-
ing the belt from one set
of
grooves on the engine and trans-
mission pulleys to a second set
of
grooves. This change
is
done
quickly without tools. See Photos
4-12 through 4-16 for reference.
By using the two belt speed
ranges with the two Wheel Speed
Lever positions (FAST and SLOW),
here are the wheel speeds / tine
speeds available to you:
At
3000
RPM
engine
speed,
the
wheel
and
tine
speeds
you
can
choose
from
are:
Wheel
Speed
Belt
Lever
Wheel
Tine
Position
Position
Speed
Speed
Low
Range
Slow
.5MPH
146RPM
Low
Range
Fast
1.2MPH
146
RPM
High
Range
Slow
.
7MPH
200
RPM
High
Range
Fast
1.72MPH
200
RPM
When the tiller is moving in
REVERSE, the wheels and tines
are powered by the rubber reverse
disc and not by the belt. So you
have only two reverse speeds
as
determined by the SLOW and
FAST positions
of
the Wheel
Speed Lever.
IMPORTANT:
Proper
belt
ten-
sion is
important
to
good
perfor-
mance.
Check
tension
after
first
2
hours
of
new
operation;
then
every
10
operating
hours.
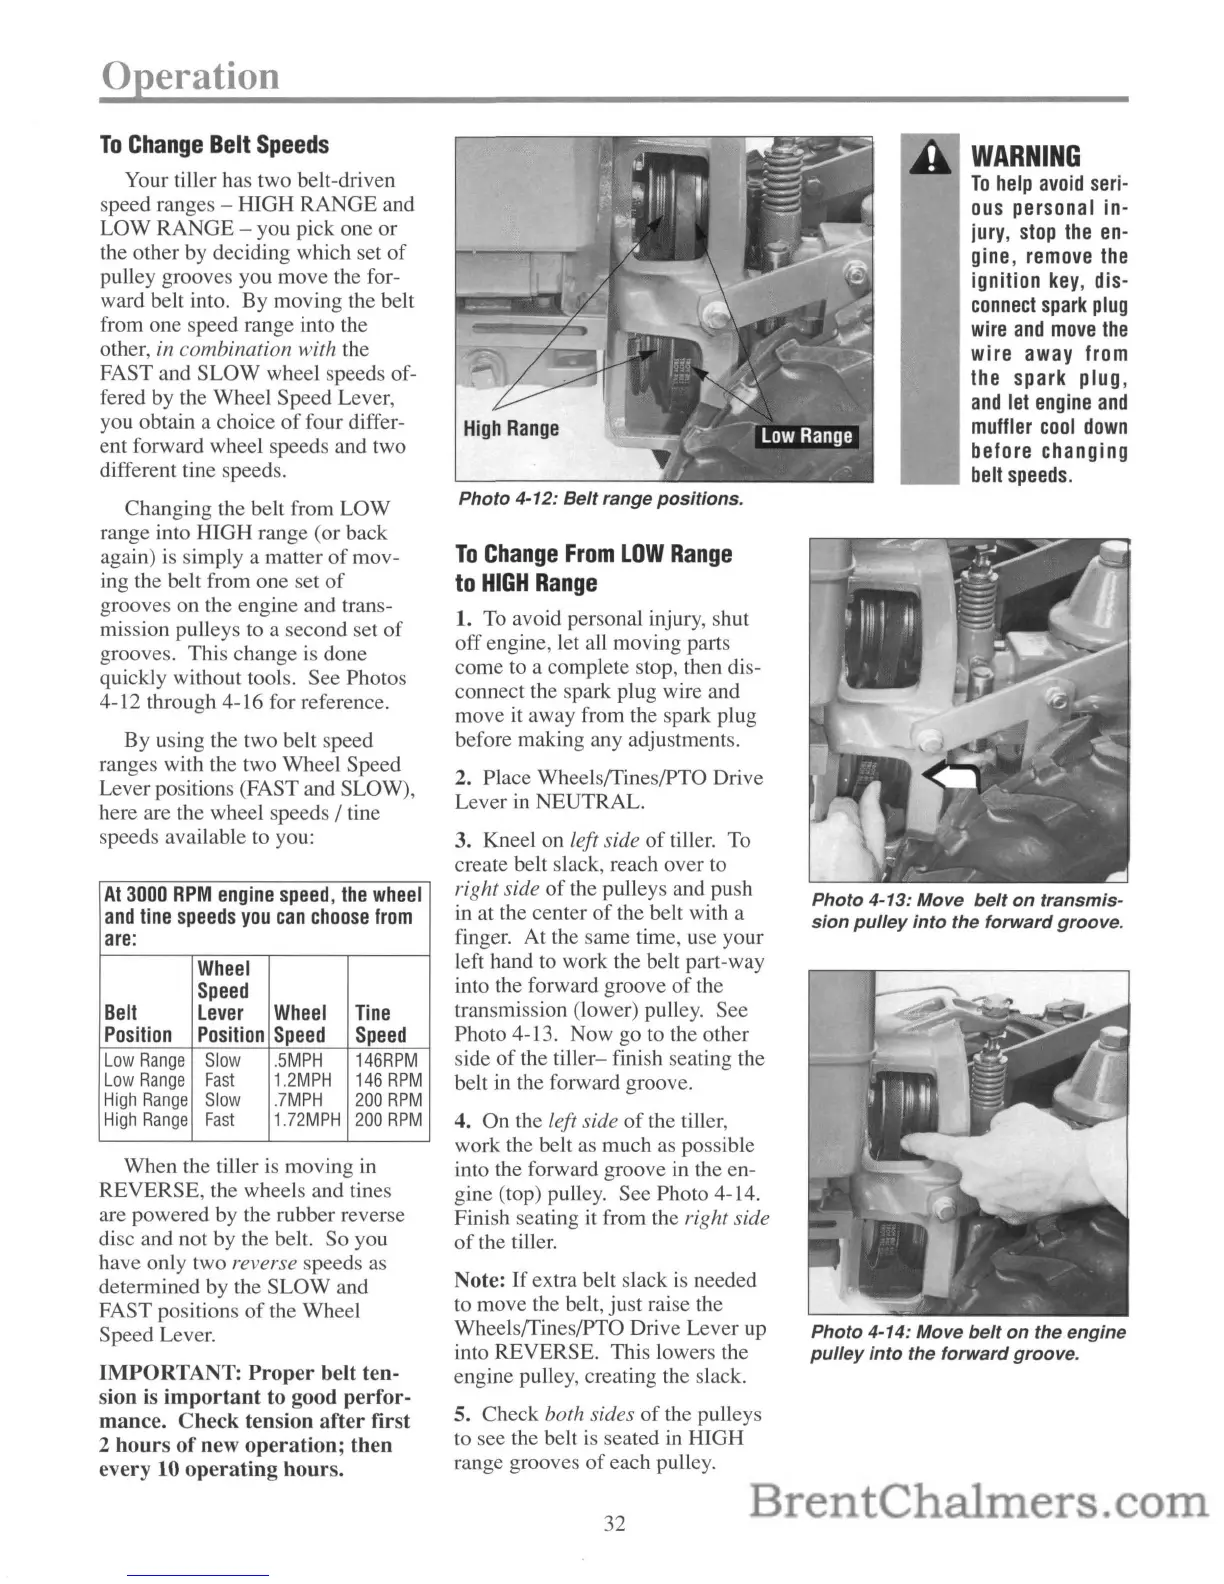
Photo 4-12:
Belt
range
positions.
To
Change
From
LOW
Range
to
HIGH
Range
1.
To
avoid personal injury, shut
off engine, let all moving parts
come to a complete stop, then dis-
connect the spark plug wire and
move it away from the spark plug
before making any adjustments.
2. Place Wheels/Tines/PTO Drive
Lever in NEUTRAL.
3. Kneel on left side
of
tiller. To
create belt slack, reach over to
right side
of
the pulleys and push
in
at the center
of
the belt with a
finger. At the same time, use your
left hand to work the belt part-way
into the forward groove
of
the
transmission (lower) pulley. See
Photo 4-13. Now go to the other
side
of
the tiller- finish seating the
belt in the forward groove.
4. On the left side
of
the tiller,
work the belt as much as possible
into the forward groove in the en-
gine (top) pulley. See Photo 4-14.
Finish seating it from the right side
of
the tiller.
Note:
If
extra belt slack
is
needed
to move the belt, just raise the
Wheels/Tines/PTO Drive Lever up
into REVERSE. This lowers the
engine pulley, creating the slack.
5. Check both sides
of
the pulleys
to see the belt
is
seated
in
HIGH
range grooves
of
each pulley.
32
WARNING
To
help
avoid
seri-
ous
personal in-
jury,
stop
the
en-
gine,
remove
the
ignition
key,
dis-
connect
spark
plug
wire
and
move
the
wire away from
the
spark plug,
and
let
engine
and
muffler
cool
down
before changing
belt
speeds.
Photo
4-13:
Move
belt
on
transmis-
sion
pulley
into
the
forward
groove.
Photo
4-14: Move
belt
on
the
engine
pUlley
into
the
forward
groove.


 To Next Page
 Loading...