~aintenance/Rep_a_ir_s~~~~~~~~~~~~~~~
Photo 5-5: Use grease liberally in
PTa
access hole.
Figure
5-6:
Oil
relief
vent locations.
TRANSMISSION
GEAR
OIL
MAINTENANCE
WARNING
To
help
avoid
personal
injury,
stop
the
engine,
remove
the
electric
start
key,
disconnect
the
spark
plug
wire
and
move
it
away
from
the
spark
plug,
and
let
the
engine
and
muf-
fler
cool
before
inspecting
or
servicing
the
tiller.
A small amount
of
oil seepage
or wetness around a shaft opening
or cover is no cause for alarm.
But
a heavy concentration
of
oil is
more serious. You should tighten
all bolts immediately, and replace
any worn seals or gaskets.
It may be impossible to deter-
mine how much oil has been lost,
so check the oil levels in the
PTa
transmission and the tine attach-
ment before using the tiller again.
Add any necessary gear oil.
Serious damage to the transmission
components can result from opera-
tion when gear oil levels are low.
If
tilling during very hot
weather, the gear oil
may
heat up
and expand inside the transmis-
sions.
To
allow for this oil expan-
sion, both the power unit transmis-
sion and the tine attachment
trans-
missions have oil relief vents (see
Figure
5-6).
A.
Checking
for
Oil
Leaks
At
25-hour operation intervals,
check the tiller for oil leaks. In-
spect for oil accumulations on the
tiller or the floor where it's stored.
can cause the belt
or
disc to slip
on the pulleys.
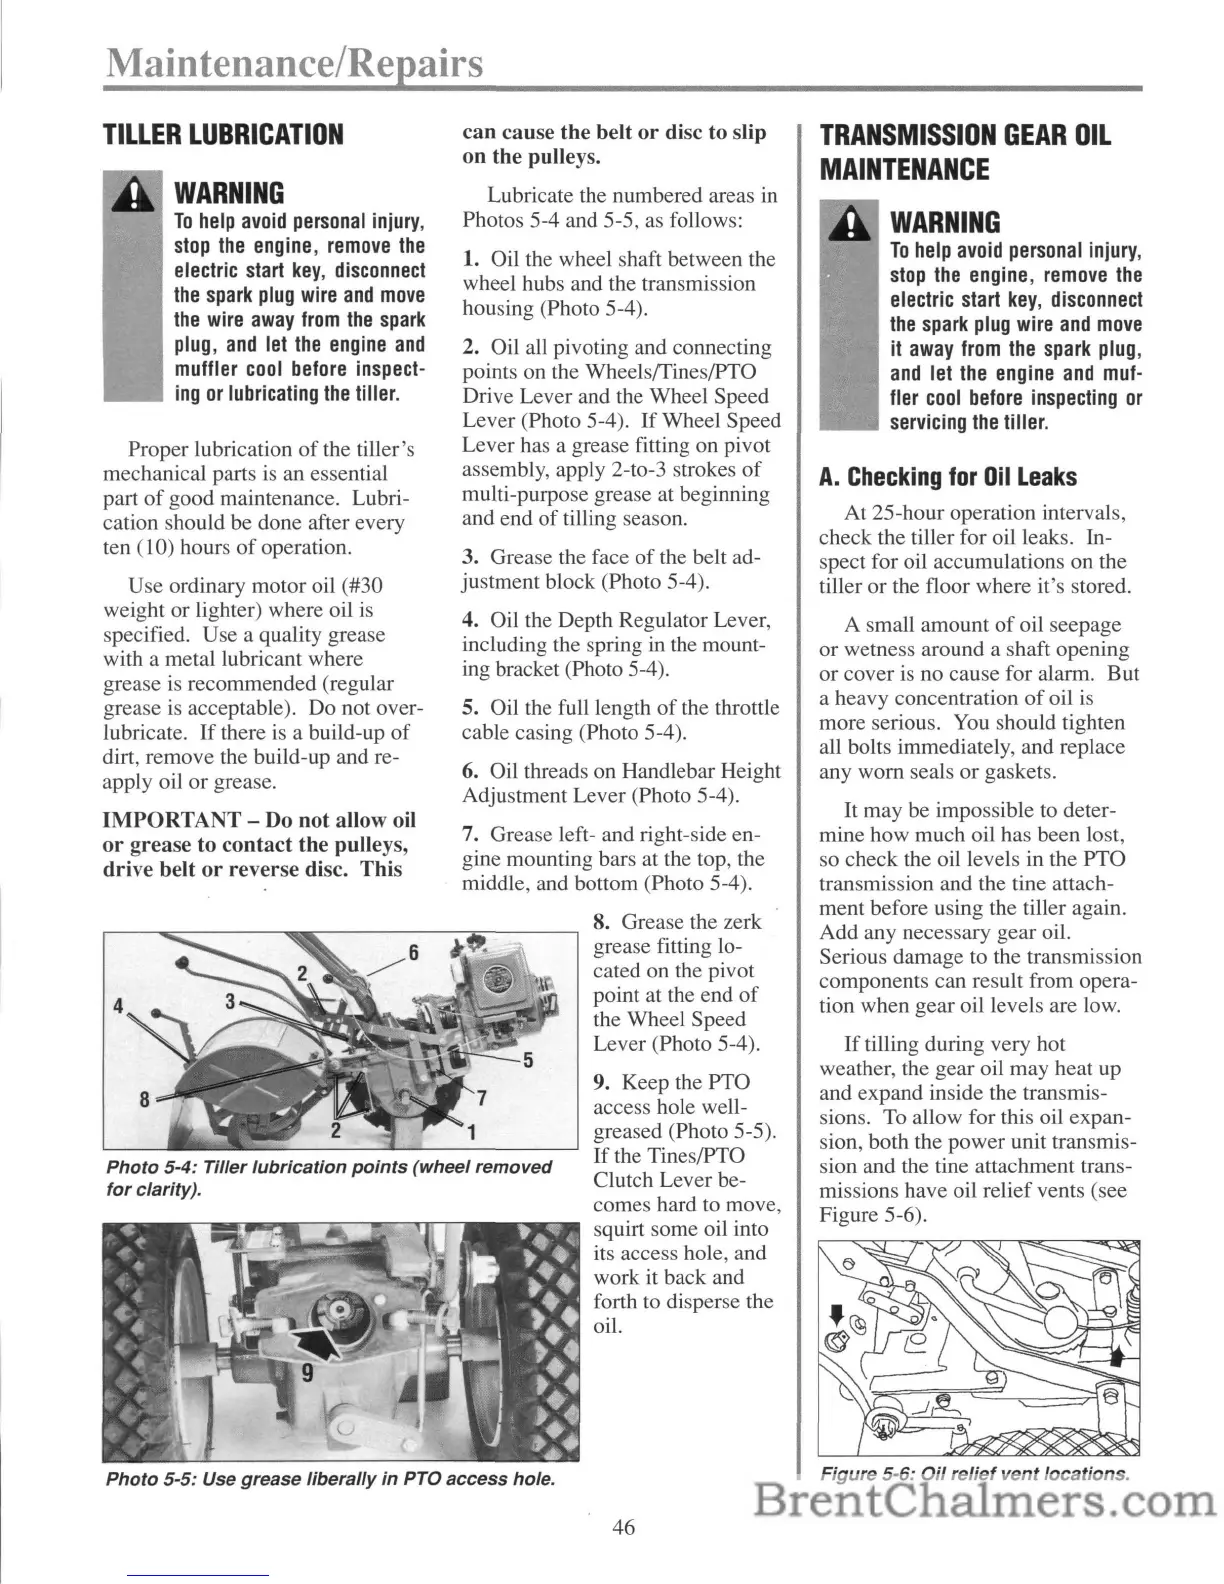
Lubricate the numbered areas in
Photos 5-4 and 5-5, as follows:
1. Oil the wheel shaft between the
wheel hubs and the transmission
housing (Photo 5-4).
2. Oil all pivoting and connecting
points on the Wheelsffines/PTO
Drive Lever and the Wheel Speed
Lever (Photo 5-4).
If
Wheel Speed
Lever has a grease fitting on pivot
assembly, apply 2-to-3 strokes
of
multi-purpose grease at beginning
and end
of
tilling season.
3. Grease the face
of
the belt ad-
justment block (Photo 5-4).
4. Oil the Depth Regulator Lever,
including the spring in the mount-
ing bracket (Photo 5-4).
5. Oil the full length
of
the throttle
cable casing (Photo 5-4).
6. Oil threads on Handlebar Height
Adjustment Lever (Photo 5-4).
7. Grease left- and right-side en-
gine mounting bars at the top, the
middle, and bottom (Photo 5-4).
8. Grease the zerk
grease fitting lo-
cated on the pivot
point at the end
of
the Wheel Speed
Lever (Photo 5-4).
9.
Keep the
PTa
access hole well-
greased (Photo 5-5).
If
the Tines/PTO
Clutch Lever be-
comes hard to move,
squirt some oil into
its access hole, and
work it back and
forth to disperse the
oil.
WARNING
To
help
avoid
personal
injury,
stop
the
engine,
remove
the
electric
start
key,
disconnect
the
spark
plug
wire
and
move
the
wire
away
from
the
spark
plug,
and
let
the
engine
and
muffler
cool
before
inspect-
ing
or
lubricating
the
tiller.
4
Photo 5-4: Tiller
lubrication
points
(wheel removed
for
clarity).
TILLER
LUBRICATION
Proper lubrication
of
the tiller's
mechanical parts is an essential
part
of
good maintenance. Lubri-
cation should be done after every
ten (10) hours
of
operation.
Use ordinary motor oil (#30
weight or lighter) where oil is
specified. Use a quality grease
with a metal lubricant where
grease is recommended (regular
grease is acceptable).
Do
not over-
lubricate.
If
there is a build-up
of
dirt, remove the build-up and re-
apply oil
or
grease.
IMPORTANT
- Do not allow oil
or
grease to contact
the
pulleys,
drive belt
or
reverse disc. This
46


 To Next Page
 Loading...