~aintenance/Rep_a_ir_s~~~~~~~~~~~~~~~
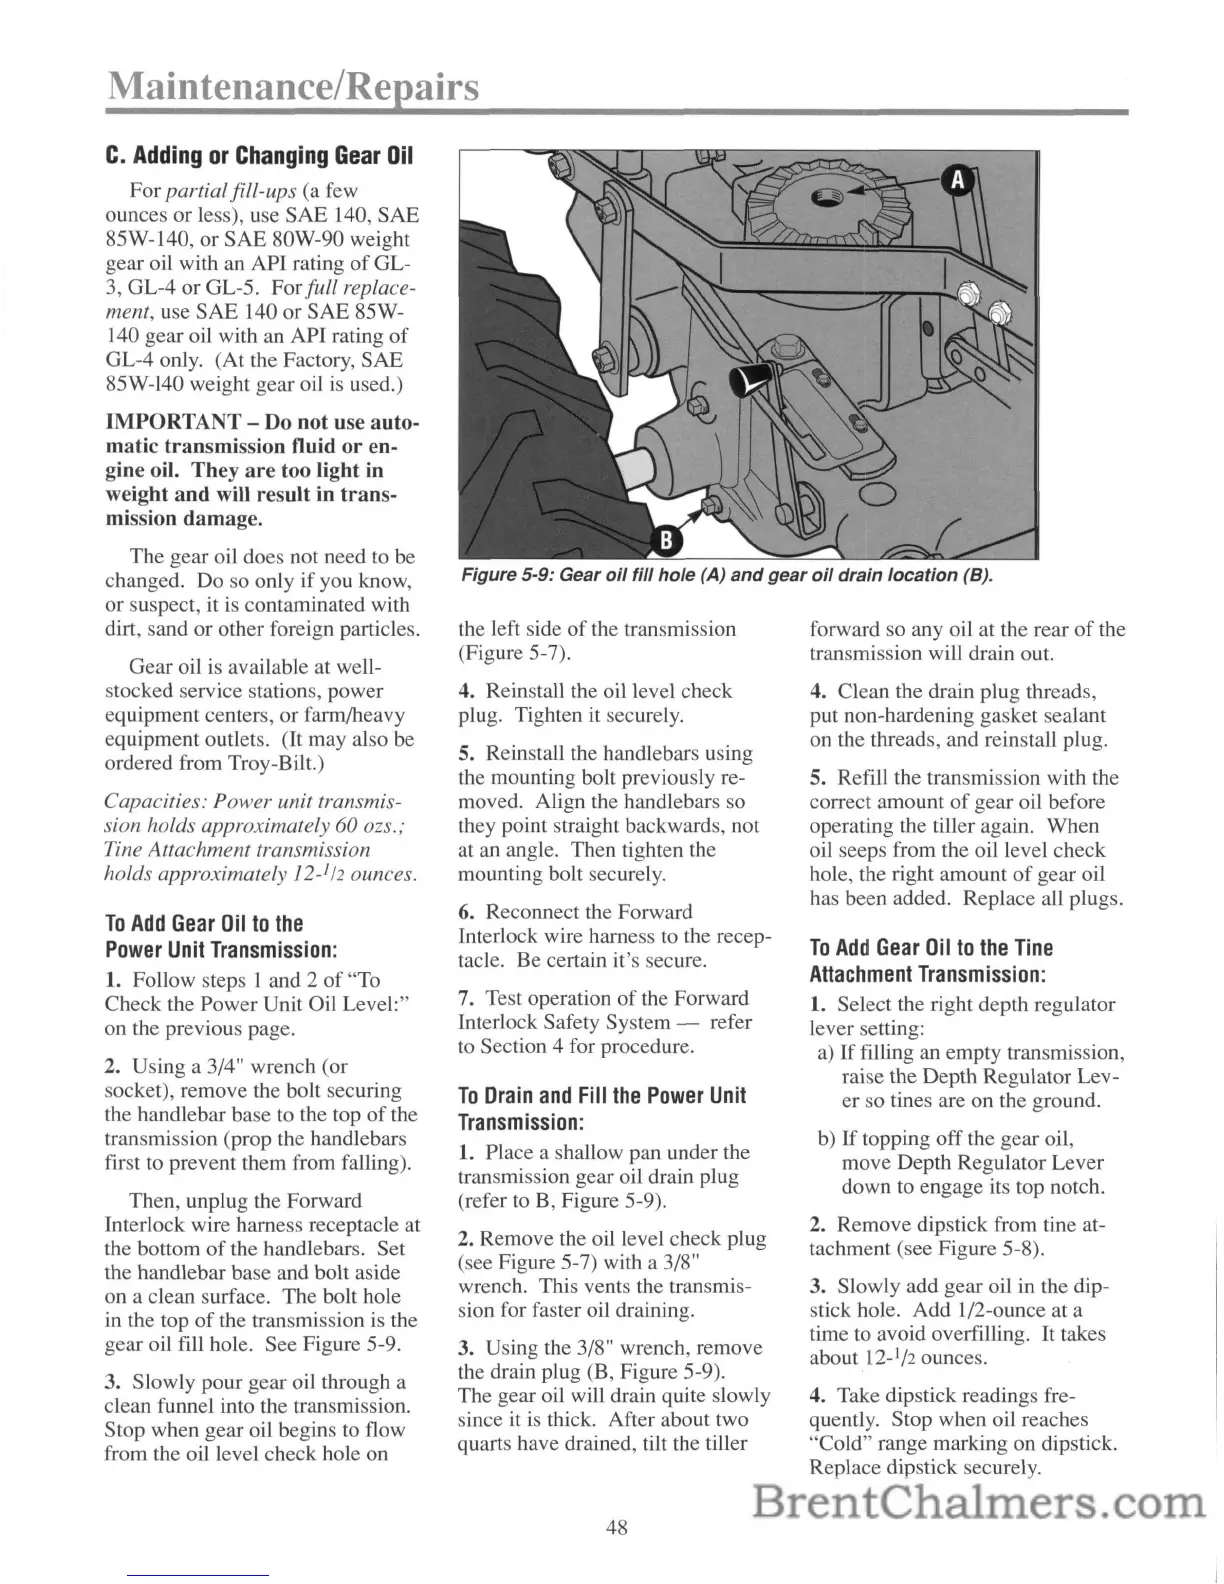
Figure 5-9: Gear
oil
fill
hole
(A)
and
gear
oil
drain
location
(8).
C.
Adding
or
Changing
Gear
Oil
For
partialfill-ups (a few
ounces
or
less), use SAE 140, SAE
85W-140, or SAE 80W-90 weight
gear oil with an API rating
of
GL-
3, GL-4 or GL-5. For
full replace-
ment,
use
SAE
140 or SAE 85W-
140 gear oil with an API rating
of
GL-4 only. (At the Factory, SAE
85W-140 weight gear oil is used.)
IMPORTANT
- Do
not
use
auto-
matic
transmission
fluid
or
en-
gine oil.
They
are
too light in
weight
and
will
result
in
trans-
mission
damage.
The gear oil does not need to be
changed. Do so only if you know,
or suspect, it is contaminated with
dirt, sand or other foreign particles.
Gear oil is available at well-
stocked service stations, power
equipment centers, or farm/heavy
equipment outlets.
(It
may also be
ordered from Troy-Bilt.)
Capacities: Power unit transmis-
sion holds approximately
60 ozs.;
Tine Attachment transmission
holds approximately 12-
1
/2
ounces.
To
Add
Gear
Oil
to
the
Power
Unit
Transmission:
1. Follow steps 1 and 2
of
"To
Check the Power Unit Oil Level:"
on the previous page.
2. Using a 3/4" wrench (or
socket), remove the bolt securing
the handlebar base to the top
of
the
transmission (prop the handlebars
first to prevent them from falling).
Then, unplug the Forward
Interlock wire harness receptacle at
the bottom
of
the handlebars. Set
the handlebar base and bolt aside
on a clean surface. The bolt hole
in
the top
of
the transmission is the
gear oil fill hole. See Figure 5-9.
3. Slowly pour gear oil through a
clean funnel into the transmission.
Stop when gear oil begins to flow
from the oil level check hole on
the left side
of
the transmission
(Figure 5-7).
4. Reinstall the oil level check
plug. Tighten it securely.
5. Reinstall the handlebars using
the mounting bolt previously re-
moved. Align the handlebars so
they point straight backwards, not
at an angle. Then tighten the
mounting bolt securely.
6.
Reconnect the Forward
Interlock wire harness to the recep-
tacle. Be certain it's secure.
7. Test operation
of
the Forward
Interlock Safety System - refer
to Section 4 for procedure.
To
Drain
and
Fill
the
Power
Unit
Transmission:
1. Place a shallow pan under the
transmission gear oil drain plug
(refer to B, Figure 5-9).
2. Remove the oil level check plug
(see Figure 5-7) with a 3/8"
wrench. This vents the transmis-
sion for faster oil draining.
3. Using the 3/8" wrench, remove
the drain plug (B, Figure 5-9).
The gear oil will drain quite slowly
since it is thick. After about two
quarts have drained, tilt the tiller
48
forward so any oil at the rear
of
the
transmission will drain out.
4. Clean the drain plug threads,
put non-hardening gasket sealant
on the threads, and reinstall plug.
5. Refill the transmission with the
correct amount
of
gear oil before
operating the tiller again. When
oil seeps from the oil level check
hole, the right amount
of
gear oil
has been added. Replace all plugs.
To
Add
Gear
Oil
to
the
Tine
Attachment
Transmission:
1. Select the right depth regulator
lever setting:
a)
If
filling an empty transmission,
raise the Depth Regulator Lev-
er
so tines are on the ground.
b)
If
topping off the gear oil,
move Depth Regulator Lever
down to engage its top notch.
2. Remove dipstick from tine at-
tachment (see Figure 5-8).
3. Slowly add gear oil in the dip-
stick hole. Add 1/2-ounce at a
time to avoid overfilling. It takes
about 12-
1
/2
ounces.
4. Take dipstick readings fre-
quently. Stop when oil reaches
"Cold" range marking on dipstick.
Replace dipstick securely.


 To Next Page
 Loading...