EasyManua.ls Logo

Troy-Bilt 12097 - MAINTENANCE;SERVICE CONTINUED; Engine Maintenance; Carburetor Adjustment Procedures

Troy-Bilt 12097
24 pages
Print Icon
To Next Page IconTo Next Page
To Previous Page IconTo Previous Page
Loading...
MAINTENANCE/SERVICE
ENGINE
MAINTENANCE
Engine
Lubrication
The
engine
on
your
equipment
is
a
two-cycle
(“two-
stroke”)
engine.
Lubrication
is
provided
by
mixing
the
proper
type
and
amount
of
two-cycle
oil
with
unleaded
regular
gasoline.
See
Page
9
for
mixing
instructions.
Attempting
to
operate
the
engine
on
gasoline
alone
(without
the
appropriate
amount
of
two-cycle
oil
mixed
in)
will
cause
the
engine
to
overheat
and
seize
up.
Engine
Air
Filter
It
is
extremely
important
that
air
filter
service
be
per¬
formed
by
the
maintenance
schedule
and
according
to
the
steps
that
follow.
Your
equipment
has
two
thin
flocked
filters
and
a
thick
foam
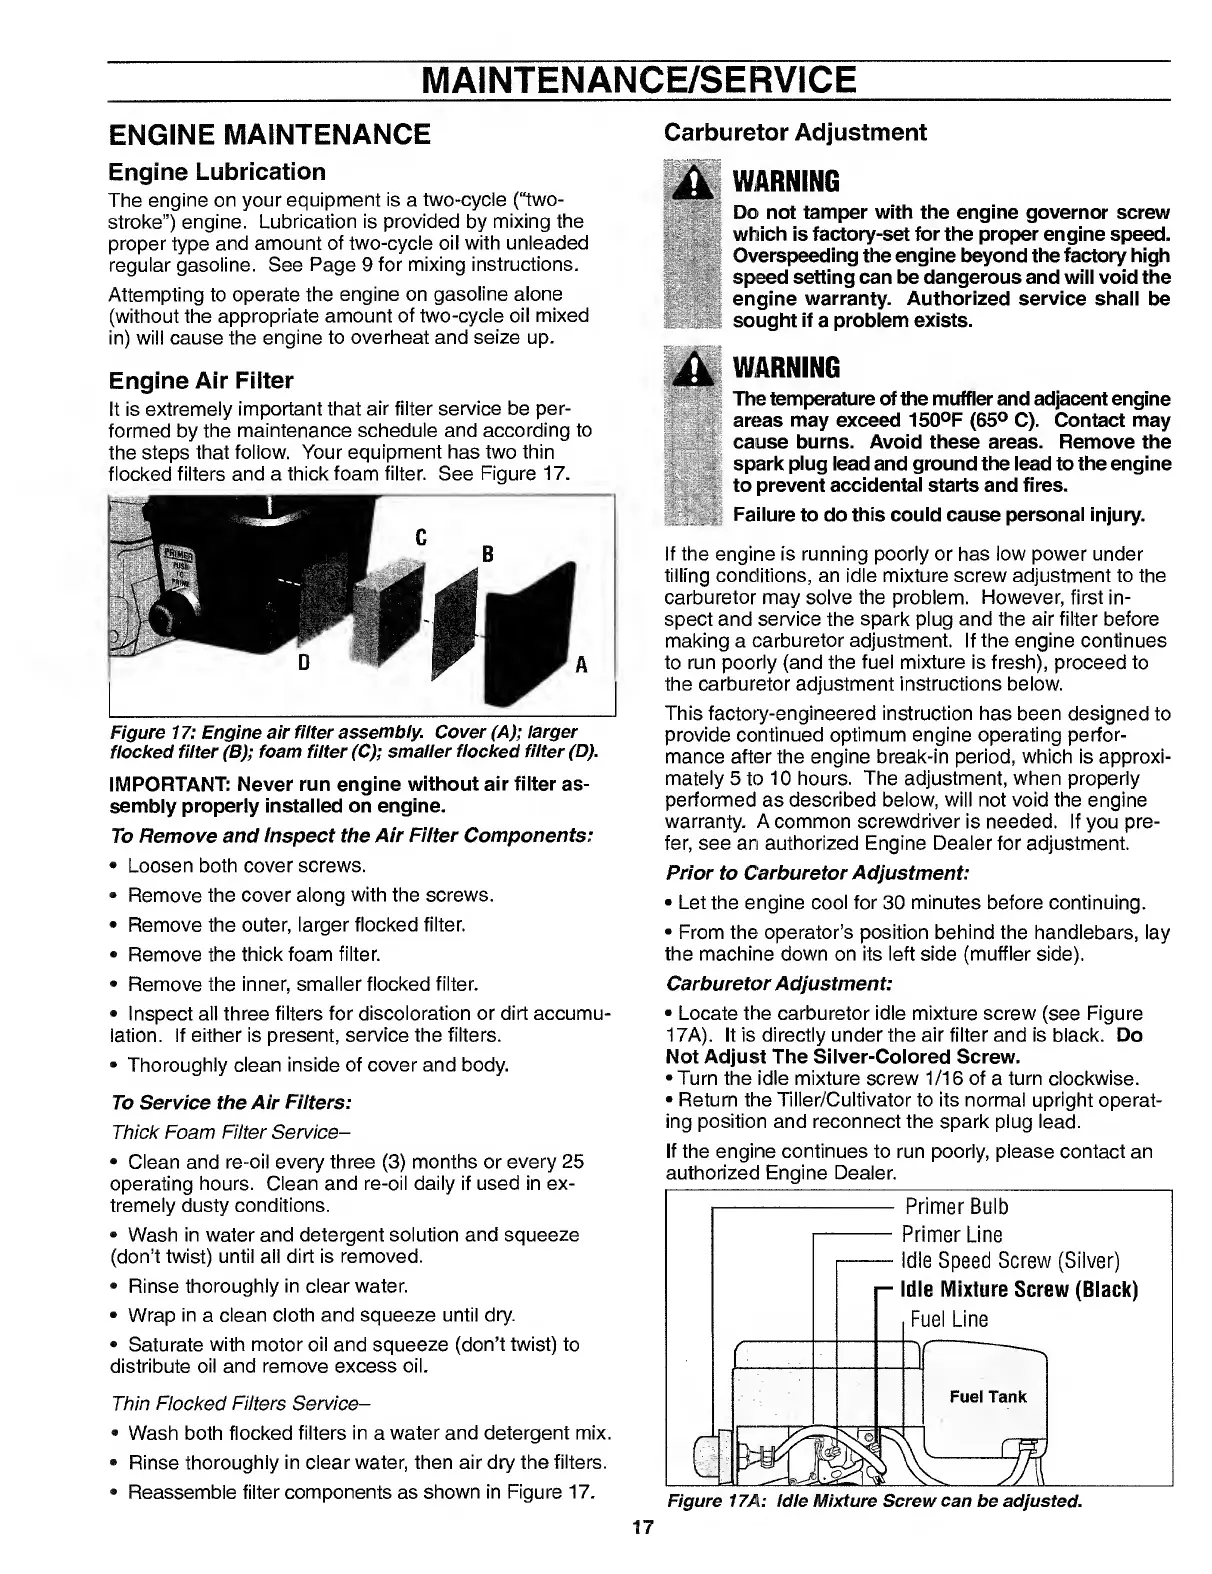
filter.
See
Figure
17.
Figure
17:
Engine
air
filter
assembly.
Cover
(A);
larger
flocked
filter
(B);
foam
filter
(C);
smaller
flocked
filter
(D).
IMPORTANT:
Never
run
engine
without
air
filter
as¬
sembly
properly
installed
on
engine.
To
Remove
and
Inspect
the
Air
Filter
Components:
•
Loosen
both
cover
screws.
•
Remove
the
cover
along
with
the
screws.
•
Remove
the
outer,
larger
flocked
filter.
•
Remove
the
thick
foam
filter.
•
Remove
the
inner,
smaller
flocked
filter.
•
Inspect
all
three
filters
for
discoloration
or
dirt
accumu¬
lation.
If
either
is
present,
service
the
filters.
•
Thoroughly
clean
inside
of
cover
and
body.
To
Service
the
Air
Filters:
Thick
Foam
Filter
Service-
•
Clean
and
re-oil
every
three
(3)
months
or
every
25
operating
hours.
Clean
and
re-oil
daily
if
used
in
ex¬
tremely
dusty
conditions.
•
Wash
in
water
and
detergent
solution
and
squeeze
(don’t
twist)
until
all
dirt
is
removed.
•
Rinse
thoroughly
in
clear
water.
•
Wrap
in
a
clean
cloth
and
squeeze
until
dry.
•
Saturate
with
motor
oil
and
squeeze
(don’t
twist)
to
distribute
oil
and
remove
excess
oil.
Thin
Flocked
Filters
Service-
•
Wash
both
flocked
filters
in
a
water
and
detergent
mix.
•
Rinse
thoroughly
in
clear
water,
then
air
dry
the
filters.
•
Reassemble
filter
components
as
shown
in
Figure
17.
Carburetor
Adjustment
WARNING
Do
not
tamper
with
the
engine
governor
screw
which
is
factory-set
for
the
proper
engine
speed.
Overspeeding
the
engine
beyond
the
factory
high
speed
setting
can
be
dangerous
and
will
void
the
engine
warranty.
Authorized
service
shall
be
sought
if
a
problem
exists.
WARNING
The
temperature
of
the
muffler
and
adjacent
engine
areas
may
exceed
150°F
(65°
C).
Contact
may
cause
burns.
Avoid
these
areas.
Remove
the
spark
plug
lead
and
ground
the
lead
to
the
engine
to
prevent
accidental
starts
and
fires.
Failure
to
do
this
could
cause
personal
injury.
If
the
engine
is
running
poorly
or
has
low
power
under
tilling
conditions,
an
idle
mixture
screw
adjustment
to
the
carburetor
may
solve
the
problem.
However,
first
in¬
spect
and
service
the
spark
plug
and
the
air
filter
before
making
a
carburetor
adjustment.
If
the
engine
continues
to
run
poorly
(and
the
fuel
mixture
is
fresh),
proceed
to
the
carburetor
adjustment
instructions
below.
This
factory-engineered
instruction
has
been
designed
to
provide
continued
optimum
engine
operating
perfor¬
mance
after
the
engine
break-in
period,
which
is
approxi¬
mately
5
to
10
hours.
The
adjustment,
when
properly
performed
as
described
below,
will
not
void
the
engine
warranty.
A
common
screwdriver
is
needed.
If
you
pre¬
fer,
see
an
authorized
Engine
Dealer
for
adjustment.
Prior
to
Carburetor
Adjustment:
•
Let
the
engine
cool
for
30
minutes
before
continuing.
•
From
the
operator’s
position
behind
the
handlebars,
lay
the
machine
down
on
its
left
side
(muffler
side).
Carburetor
A
djustment:
•
Locate
the
carburetor
idle
mixture
screw
(see
Figure
17A).
It
is
directly
under
the
air
filter
and
is
black.
Do
Not
Adjust
The
Silver-Colored
Screw.
•Turn
the
idle
mixture
screw
1/16
of
a
turn
clockwise.
•
Return
the
Tiller/Cultivator
to
its
normal
upright
operat¬
ing
position
and
reconnect
the
spark
plug
lead.
If
the
engine
continues
to
run
poorly,
please
contact
an
authorized
Engine
Dealer.
Figure
17A:
Idle
Mixture
Screw
can
be
adjusted.
17