10
USING THE ELECTRIC START ACCESSORY
This unit can be started with an optional electric start accessory
(items sold separately). Refer to the electric start accessory
operator’s manual for the proper use of this feature.
Please contact your local retailer, call the Customer Support
Department or visit our website for more information.
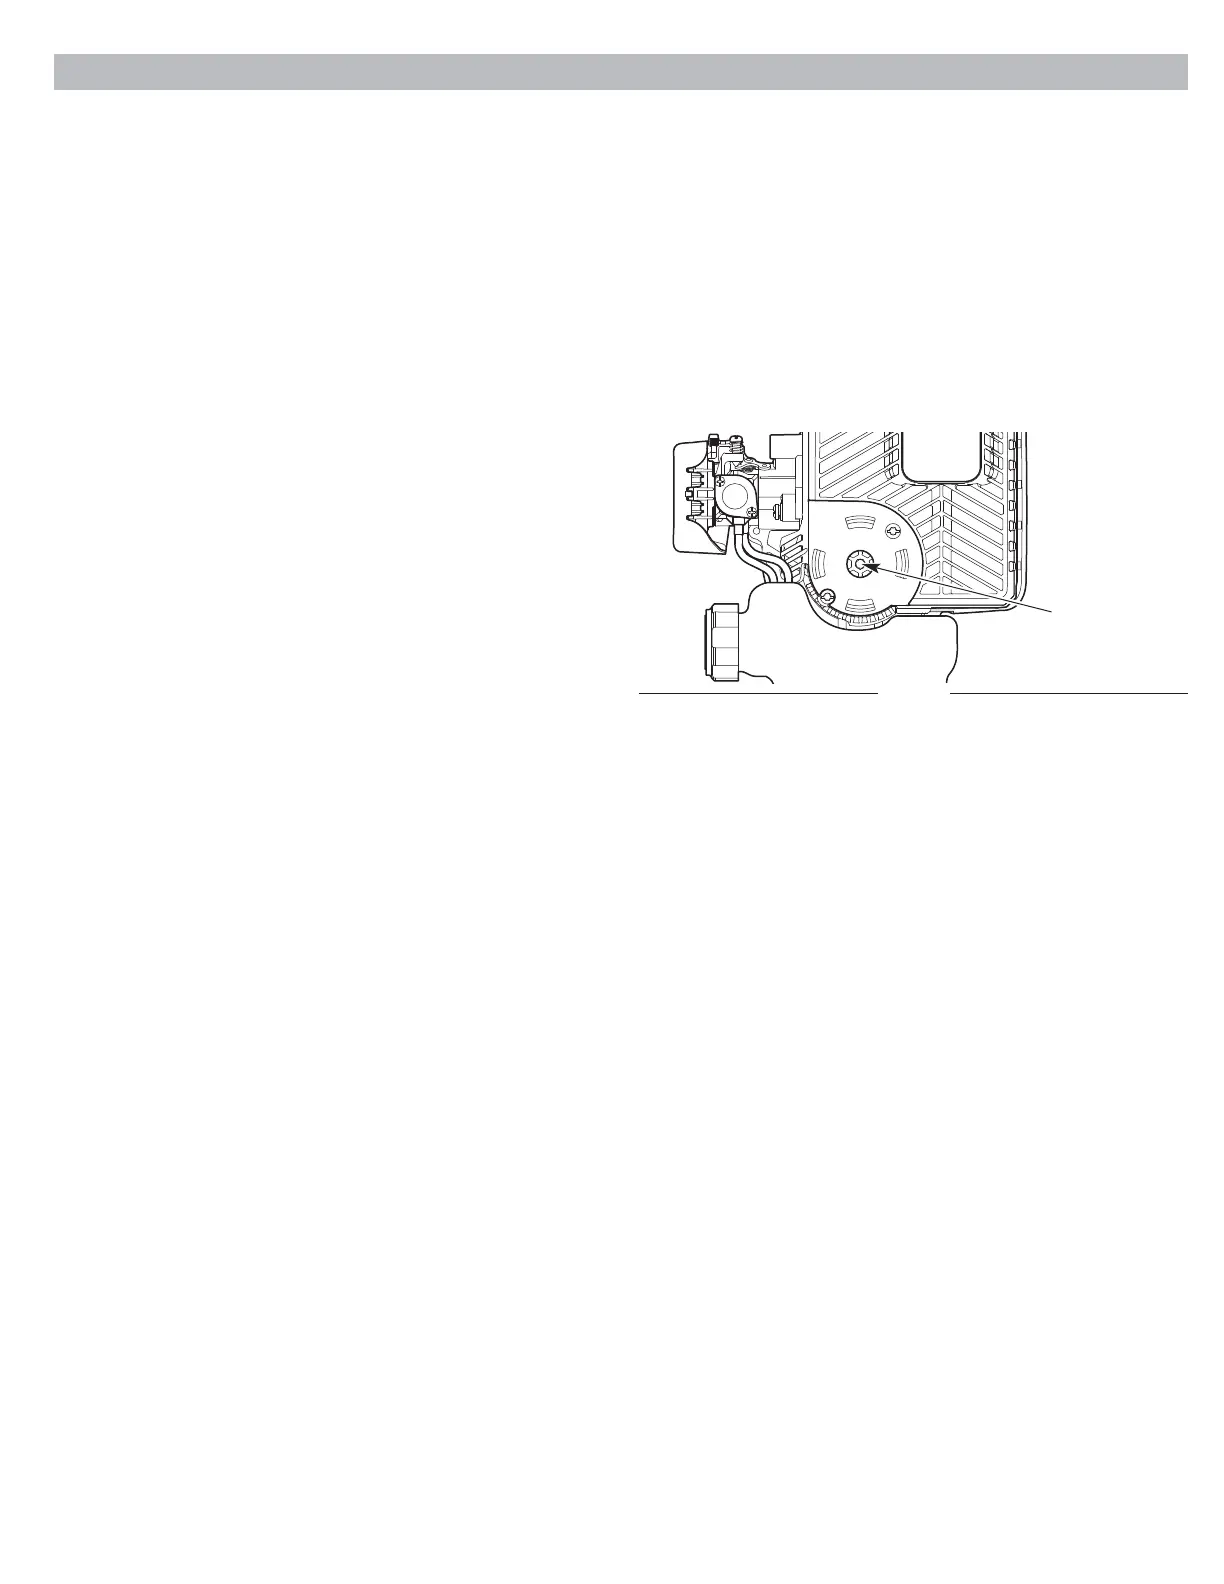
Fig. 10
Electric Start
Port
ELECTRIC START ACCESSORIES
Item No. Description
49M2027P966 . . . . . . . . . . . . . . . . . . . . . . . . . . . . . . .Electric Starter
49MASCBP966 . . . . . . . . . . . . . . . . . . . . . . . . . . . .Engine Starter Bit
49MRBESY966 . . . . . . . . . . . . . . . . . . . . . .Cordless Electric Starter
STOPPING INSTRUCTIONS
1. Release the throttle control and allow the engine to idle.
2. Press and hold the On/Off switch in the Off (O) position until the
engine comes to a complete stop (Fig. 7).
STARTING INSTRUCTIONS
1. Mix gasoline with oil. Refer to Oil and Fuel Mixing Instructions.
2. Fill the fuel tank. Refer to Fueling the Unit.
NOTE: There is no need to turn the unit on. The On/Off switch is in
the On ( I ) position at all times (Fig. 7).
3. Slowly press and release the primer bulb 10 times (Fig. 8). If fuel
cannot be seen in the primer bulb, press and release the primer
bulb until fuel is visible.
4. Move the choke lever to Position 1 (Fig. 8).
5. Crouch in the starting position (Fig. 9).
6. Insert the electric start accessory into the electric start port (Fig. 10).
Refer to the Operation section of the electric start accessory
operator’s manual.
NOTE: PRESS and HOLD the throttle lockout, then SQUEEZE and
HOLD the throttle control for ALL further steps (Fig. 7).
NOTE: To prevent the throttle control from being squeezed
accidentally, this unit has a throttle lockout. The throttle control
cannot be squeezed unless the throttle lockout is also engaged.
7. Press and hold the throttle lockout. Squeeze and hold the
throttle control (Fig. 7). Run the electric start accessory for 2
seconds.
8. Continue to press the throttle lockout and squeeze the throttle
control. Move the choke lever to Position 2 (Fig. 8).
9. Continue to press the throttle lockout and squeeze the throttle
control. Run the electric start accessory in intervals no longer
than 2 seconds each until the unit starts.
10. Remove the electric start accessory from the unit.
11. Continue to press the throttle lockout and squeeze the throttle
control. Allow the engine to warm up for 30 to 60 seconds.
12. Continue to press the throttle lockout and squeeze the throttle
control. Move the choke lever to Position 3 (Fig. 8). Allow the
engine to warm up for an additional 60 seconds. The unit may
be used during this time.
NOTE: The engine is properly warmed up when it accelerates
without hesitation.
IF... the engine hesitates, return the choke lever to Position 2 (Fig. 8)
and continue the warm-up.
IF... the engine does not start, begin the starting procedure with step 3.
IF... the engine fails to start after a few attempts: Move the choke lever
to Position 3. Press and hold the throttle lockout. Squeeze and
hold the throttle control. Run the electric start accessory in
intervals no longer than 2 seconds each until the unit starts.
IF... the engine is already warm, begin the starting procedure with
step 8.






 To Next Page