Home
Troy-Bilt
Tiller
TUFFY 12155
Troy-Bilt TUFFY 12155 User Manual
4
of 1
of 1 rating
36 pages
Give review
Manual
Specs
To Next Page
To Next Page
To Previous Page
To Previous Page
Loading...
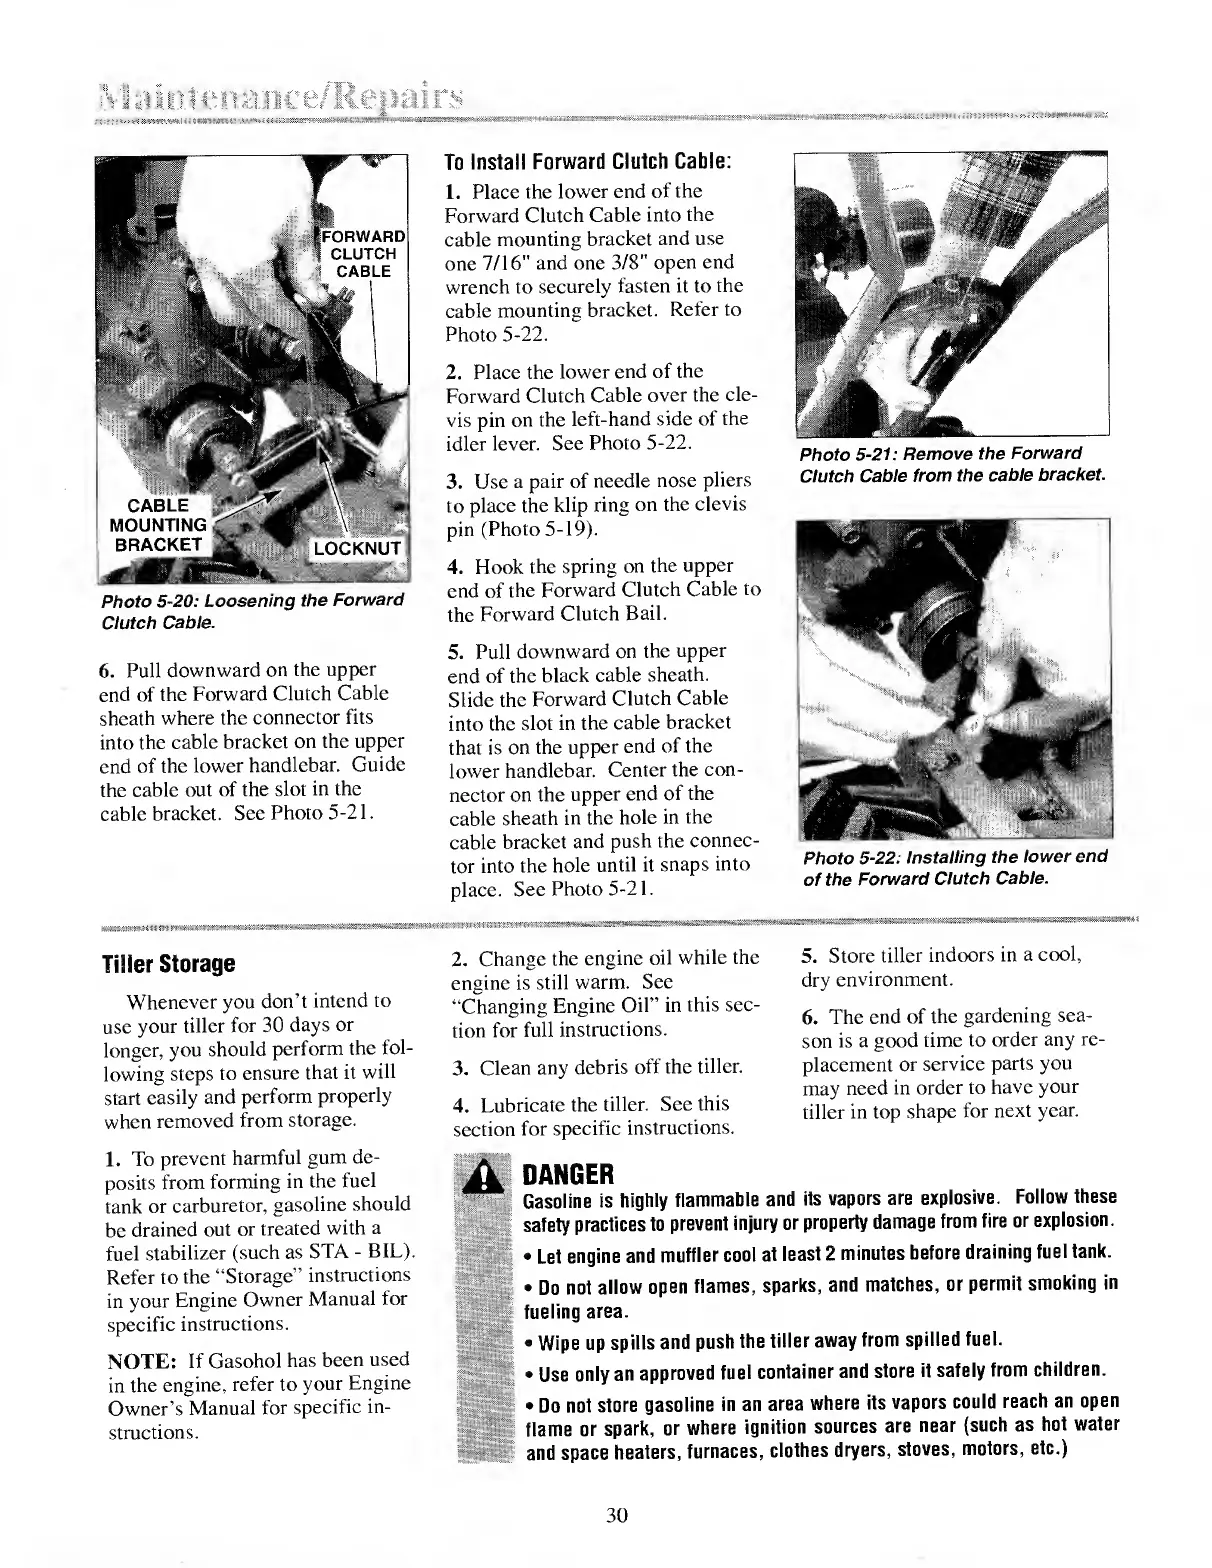
Photo
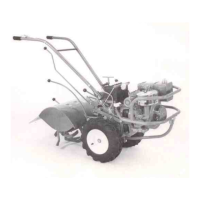
5-20:
Loosening
the
Forward
Clutch
Cable.
6
.
Pull
downward
on
the
upper
end
of
the
Forward
Clutch
Cable
sheath
where
the
connector
fits
into
the
cable
bracket
on
the
upper
end
of
the
lower
handlebar.
Guide
the
cable
out
of
the
slot
in
the
cable
bracket.
See
Photo
5-21.
Tiller
Storage
Whenever
you
don’t
intend
to
use
your
tiller
for
30
days
or
longer,
you
should
perform
the
fol¬
lowing
steps
to
ensure
that
it
will
start
easily
and
perform
properly
when
removed
from
storage.
1.
T
o
prevent
harmful
gum
de¬
posits
from
forming
in
the
fuel
tank
or
carburetor,
gasoline
should
be
drained
out
or
treated
with
a
fuel
stabilizer
(such
as
STA
-
BIL).
Refer
to
the
“Storage”
instructions
in
your
Engine
Owner
Manual
for
specific
instructions.
NOTE:
If
Gasohol
has
been
used
in
the
engine,
refer
to
your
Engine
Owner’s
Manual
for
specific
in¬
structions.
To
Install
Forward
Clutch
Cable:
1.
Place
the
lower
end
of
the
Forward
Clutch
Cable
into
the
cable
mounting
bracket
and
use
one
7/16"
and
one
3/8"
open
end
wrench
to
securely
fasten
it
to
the
cable
mounting
bracket.
Refer
to
Photo
5-22.
2.
Place
the
lower
end
of
the
Forward
Clutch
Cable
over
the
cle¬
vis
pin
on
the
left-hand
side
of
the
idler
lever.
See
Photo
5-22.
3.
Use
a
pair
of
needle
nose
pliers
to
place
the
klip
ring
on
the
clevis
pin
(Photo
5-19).
4.
Hook
the
spring
on
the
upper
end
of
the
Forward
Clutch
Cable
to
the
Forward
Clutch
Bail.
5.
Pull
dowmward
on
the
upper
end
of
the
black
cable
sheath.
Slide
the
Forward
Clutch
Cable
into
the
slot
in
the
cable
bracket
that
is
on
the
upper
end
of
the
lower
handlebar.
Center
the
con¬
nector
on
the
upper
end
of
the
cable
sheath
in
the
hole
in
the
cable
bracket
and
push
the
connec¬
tor
into
the
hole
until
it
snaps
into
place.
See
Photo
5-21.
2.
Change
the
engine
oil
while
the
engine
is
still
warm.
See
“Changing
Engine
Oil”
in
this
sec¬
tion
for
full
instructions.
3.
Clean
any
debris
off
the
tiller.
4.
Lubricate
the
tiller.
See
this
section
for
specific
instructions.
Photo
5-21:
Remove
the
Forward
Clutch
Cable
from
the
cable
bracket.
Photo
5-22:
Installing
the
lower
end
of
the
Forward
Clutch
Cable.
5.
Store
tiller
indoors
in
a
cool,
dry
environment.
6.
The
end
of
the
gardening
sea¬
son
is
a
good
time
to
order
any
re¬
placement
or
service
parts
you
may
need
in
order
to
have
your
tiller
in
top
shape
for
next
year.
A
DANGER
Gasoline
is
highly
flammable
and
its
vapors
are
explosive.
Follow
these
safety
practices
to
prevent
injury
or
property
damage
from
fire
or
explosion.
•
Let
engine
and
muffler
cool
at
least
2
minutes
before
draining
fuel
tank.
•
Do
not
allow
open
flames,
sparks,
and
matches,
or
permit
smoking
in
fueling
area.
•
Wipe
up
spills
and
push
the
tiller
away
from
spilled
fuel.
•
Use
only
an
approved
fuel
container
and
store
it
safely
from
children.
•
Do
not
store
gasoline
in
an
area
where
its
vapors
could
reach
an
open
flame
or
spark,
or
where
ignition
sources
are
near
(such
as
hot
water
and
space
heaters,
furnaces,
clothes
dryers,
stoves,
motors,
etc.)
30
29
31
Table of Contents
Table of Contents
3
Section 1: Safety.5
11
Tiller Features and Controls Identification.12
12
Section 4: Operation.15
12
Break-In Operation.15
15
Pre-Start Checklist.16
15
Tilling Depths.17
15
Guiding the Tiller.17
17
Moving the Tiller Forward.17
17
Moving the Tiller Rearward.17
17
Turning the Tiller Around.18
18
Tilling in the Garden.18
18
Seedbed Preparation.18
18
Cultivating.19
19
Power Composting.19
19
High-Traction Frame Weights.19
19
Preventing Tines from Becoming Tangled.20
20
Tilling on Slopes.20
20
Terrace Gardening.20
20
Loading and Unloading the Tiller.21
21
Required Maintenance Schedule.22
22
Regular Maintenance.23
23
Tiller Lubrication.23
23
Checking and Adding Engine Oil.23
23
Changing Engine Oil.24
24
Checking and Topping off Transmission Gear Oil.24
24
Checking for Oil Leaks.26
26
Engine Cooling System Maintenance.26
26
Engine Ignition System Maintenance.26
26
Spark Plug Maintenance.26
26
Carburetor Adjustments.26
26
Tightening Tiller Hardware.27
27
Removing and Installing Tine Assemblies.27
27
Removing and Installing Individual Tines.27
27
Checking and Adjusting Belt Tension.28
28
Belt Removal and Replacement.28
28
Removing and Installing the Forward Clutch Cable.29
29
Tiller Storage.30
30
4
Based on 1 rating
Ask a question
Give review
Questions and Answers:
Need help?
Do you have a question about the Troy-Bilt TUFFY 12155 and is the answer not in the manual?
Ask a question
Troy-Bilt TUFFY 12155 Specifications
General
Engine Type
4-Cycle OHV
Number of Tines
4
Starting System
Recoil
Forward Speeds
1
Reverse Speeds
0
Wheel Size
8 inches
Related product manuals
Troy-Bilt 630C-Tuffy
32 pages
Troy-Bilt Tuffy 630C
32 pages
Troy-Bilt TUFFY 630CN
32 pages
Troy-Bilt TB154
28 pages
Troy-Bilt TB144
25 pages
Troy-Bilt TB154E
24 pages
Troy-Bilt TBC304
40 pages
Troy-Bilt TB146EC
16 pages
Troy-Bilt 8HP
32 pages
Troy-Bilt Bronco
64 pages
Troy-Bilt 634F-Bronco
32 pages
Troy-Bilt BRONCO 12209
32 pages

 Loading...