INSTALLATION INSTRUCTIONS FOR
SPYRE MECHANICAL DISC BRAKE
SAFETY WARNINGS & INFORMATION
A) Safety Precautions And Considerations
WARNING - This braking system was designed for use on a single rider bicycle. Use of this system on any other vehicle or apparatus will void the
warranty, possibly causing you great personal harm and injury.
WARNING - Disc Brakes, calipers, and rotors get VERY HOT during regular use. DO NOT touch or attempt to service the rotor, caliper, assembly
until you’ve allowed for sufficient cooling to occur.
WARNING - These disc brakes offer a significant increase in performance over traditional cable actuated systems. Follow the break-in
recommendations listed in this manual, allow yourself to learn and become accustomed to the braking characteristics.
WARNING - If your bike is involved in a fall or crash, stop and fully check the brake function, including: lever, caliper, and rotor are securely
attached to the bike, pads are correctly installed and functioning, the cable is operating smoothly and the lever feels firm when actuating the
brake. Always have a qualified mechanic check the brakes if you have any doubts.
WARNING - Pad thickness must be at least 0.8 mm. Confirm this before each ride. Keep pads clean and free of oil or hydraulic fluid. If pads
become contaminated discard and replace.
WARNING - Ensure that cable housing is always secured to the frame and/or fork prior to every ride. Do not ride a bike on which the cable
housing can come into contact with the tires!
CAUTION - Read this manual completely before attempting to install or work on your TRP Brakes. If you are unfamiliar with any element of
assembly or maintenance of this braking system please consult a qualified mechanic for assistance.
B) Emergency Information
CAUTION - Please keep out of reach of children.
Spyre SLCSpyre Spyre MTN
INSTALLATION
TOOLS NEEDED FOR ASSEMBLY AND MAINTENANCE
· 5mm Allen Wrench (Spyre & Spyre Mtn)
· 3mm Allen Wrench (Spyre & Spyre Mtn)
· T25 Torx® wrench
A) MOUNTING THE ROTOR
· Remove wheel from bike.
· Clean the disc and hub-mounting surface with isopropyl alcohol (DO NOT use disc brake cleaner).
· Using a TORX T25 driver, attach the rotor to the hub using supplied bolts and tighten to 6 – 8 Nm (53 – 71 in-lbs).
· Use a star-pattern sequence to tighten the disc screws. DO NOT simply tighten them clock-wise or counter clock-
wise. [Fig. A-1]
NOTE: Be sure the rotation arrows point in the same direction as the rotation of the wheel.
· Replace the wheel per the manufacture specifications.
· Check and re-torque disc screws after a few hours, and after the first ride or two.
WARNING : DO NOT TOUCH THE DISC IMMEDIATELY AFTER USE – IT WILL BE HOT!
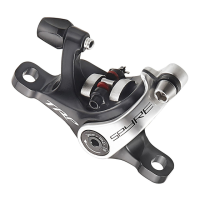
B) MOUNTING THE CALIPER
· For IS or PM adapters, hold the adapter so that the stamped “F” or “R” is facing you – away from the bike, rotor
and wheel. For post mount, proceed directly to next step.
· Align caliper with frame/fork mounting holes. [Fig. B-1]
· Attach the caliper to the fork or frame using two mounting bolts, but do not fully tighten at this time.
[Fig. B-2)
CAUTION - Cleanliness is a very important part of any maintenance of a TRP disc brake. If the pads or rotor
become contaminated with oil, or if the system becomes contaminated with impurities, braking performance
will be greatly impaired.
B-1. Post mount installation
A-1. Rotor torquing sequence
2
4
1
3
5
6
B-2. PM Adapter installation