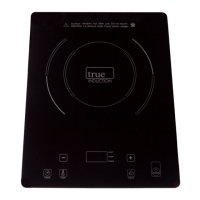
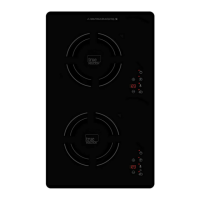
The True Induction Single Burner TI-1B cooktop is an induction cooking appliance designed for efficient and safe food preparation. It utilizes induction technology, which requires specific types of cookware to function, ensuring that heat is generated directly in the pot or pan rather than on the cooktop surface itself. This method of heating offers several advantages, including faster cooking times and improved energy efficiency.
Function Description
The primary function of the True Induction cooktop is to provide a controlled heating source for cooking. It operates by generating an electromagnetic field that induces currents within compatible cookware, causing the cookware itself to heat up. This direct heating mechanism minimizes heat loss to the surrounding environment, making it a highly efficient cooking method.
The cooktop features a user-friendly control panel with various settings to manage the cooking process. Users can adjust the heat intensity using a power invariance technology, which allows for precise control over the cooking temperature. The temperature settings range from 150°F to 450°F, offering flexibility for different cooking needs, from simmering to searing. The unit also includes a timer function, enabling users to set a specific cooking duration, after which the cooktop will automatically shut off. This feature is particularly useful for recipes that require precise timing and helps prevent overcooking or burning.
A key safety feature of the True Induction cooktop is its automatic shut-off mechanism. The unit is designed to turn off after 120 minutes of continuous use, providing an added layer of safety, especially if the user forgets to turn it off manually. This function applies to both heat and temperature settings. Additionally, the cooktop incorporates a child safety lock mode, which prevents unintended activation of the sensor keys, enhancing safety in households with children. This lock can be activated or deactivated by pressing the Lock key for three seconds, both in standby and cooking modes.
The cooktop is designed for flush mounting installation in a countertop, requiring a specific cut-out size of 11 3/8" x 13 3/4". Proper placement is crucial, with a minimum clearance of 2 1/2" from any side of the countertop. For flush mounting, a router tool can be used to round the corners of the cut-out. The unit comes with a pre-installed foam gasket on its overhang, which helps secure it to the countertop. For RV use, butyl tape is recommended instead of the supplied foam tape for better adhesion and ease of removal for servicing.
Usage Features
To begin using the cooktop, the power plug must be inserted into a standard outlet. Upon plugging in, all indicators and the display will light up briefly with a beep sound, after which the unit enters standby mode. Compatible ferromagnetic cookware, containing water, oil, or food, should be placed on the center of the glass-ceramic top.
The cooktop is activated by pressing the Power button on the control panel. The power display will illuminate, accompanied by another indicator sound. The Heat function key should then be pressed once, which defaults to a power level of "5." Users can adjust the heat settings from 1 to 10 using the +/- keys. Similarly, the temperature settings can be adjusted from 150°F to 450°F using the same +/- keys, with exact temperatures available at specific increments (150, 180, 210, 240, 270, 300, 330, 360, 390, 420, and 450°F).
The timer function is initiated by pressing the TIMER button after selecting either HEAT or TEMP mode. The display will show "0," and the operating time can be set in 5-minute intervals, up to a maximum of 150 minutes, or reduced by 1 minute increments. During timer operation, the timer duration can be changed using the arrow keys, and the cooktop's built-in memory will retain the previously entered HEAT or TEMP setting. The display typically shows the HEAT or TEMP settings during countdown, but pressing the TIMER button once will briefly show the remaining timer for 5 seconds. Once the timer expires, the unit sounds and automatically switches to standby mode. To continue cooking, the Power and Heat buttons must be pressed again.
Turning off the unit is straightforward: simply press the Power button when cooking is complete. The cooling fan may continue to operate for a period after the unit is turned off to ensure proper cooling.
Maintenance Features
Proper maintenance is essential for the longevity and safe operation of the True Induction cooktop. Before any cleaning, it is crucial to switch off the device and allow it to cool completely. The unit should be cleaned after each use to remove any food residues.
The glass-ceramic plate and plastic surfaces can be wiped with a slightly damp cloth, preferably a microfiber cloth. Dishwashing soap can be used if necessary. It is important to prevent water from seeping into the device. Abrasive cleaners, such as metal pads, or oil-based liquids should never be used, and the cooktop should never be run under water.
For cleaning the air intake and exhaust vents, a vacuum cleaner attachment can be used to suck up dirt and debris, ensuring optimal air circulation.
The cooktop also includes error codes to help diagnose potential issues. For example, if no cookware is detected or if it's improperly placed, the display will show "---." Internal circuit errors are indicated by "E1," while "E2" signifies IGBT overheating, requiring the unit to cool down before restarting. "E3" and "E4" indicate high and low supplied voltage, respectively, which usually resolve once the voltage returns to normal. "E5" and "E6" point to top plate or IGBT sensor open/short circuits, requiring the unit to be turned off, power shut off at the circuit breaker for 30 seconds, and then restarted. If these errors persist, service is needed. "E7" indicates top plate overheating, prompting the user to turn off the cooktop and allow it to cool.
For proper air circulation, a minimum of 3 inches of clearance from the bottom of the induction cooker to any shelving or storage is required. The underside of the countertop should not be closed off from the cabinetry below to facilitate better airflow. This ensures that the internal components remain cool and function efficiently.