This document is a user manual for the True Induction TI-1G & TI-2G Gas Combo Cooktop. It provides comprehensive information on installation, operation, maintenance, and troubleshooting for these hybrid cooktop models, which combine induction cooking zones with gas burners.
Function Description:
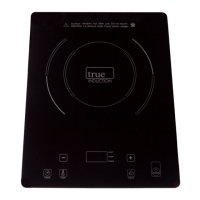
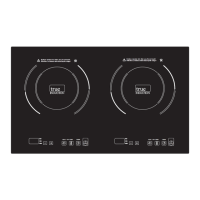
The True Induction TI-1G and TI-2G are combo cooktops designed for domestic use, offering the flexibility of both induction and gas cooking. The induction zones provide efficient, precise, and fast heating, while the gas burners offer traditional flame cooking. This hybrid design caters to various cooking preferences and cookware types. The cooktops are designed to be dropped into a countertop, with specific cut-out dimensions provided for installation.
Important Technical Specifications:
General:
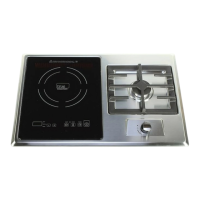
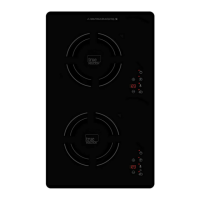
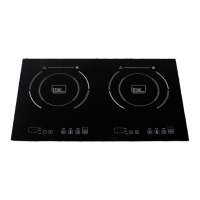
- Models: TI-1G (one induction zone, one gas burner) and TI-2G (two induction zones, two gas burners).
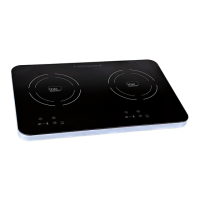
- Power Supply: Electrically grounded installation is required, adhering to local codes, National Electrical Code (ANSI/NFPA70), or Canadian Electrical Code, Part 1. A three-prong grounding plug is provided for shock hazard protection.
- Gas Type: Factory set for LP gas (propane or butane).
- Gas Pressure (LP): Designed for 10” of water column. For proper operation, the pressure supplied must be between 10” and 13” of water column. Inlet pressure must be at least 1" greater than the operating pressure.
- Installation Clearance:
- Minimum 4" clearance from any side of the countertop to the cooktop cut-out.
- Minimum 4" clearance from the back of the countertop to the cooktop cut-out.
- Minimum 1" (approximately 30mm) clearance beneath the unit for a heat baffle.
- Minimum 2 inches from the wall to the back of the cooktop.
- Minimum 26 inches between the cooktop and any wall cupboard or extractor hood positioned immediately above.
- Recommended 1 3/16" clearance between the cooktop and any adjacent fixture surface (e.g., cabinet door).
- Ambient Temperature Tolerance: Adjacent furniture and materials must withstand a minimum of 185°F (85°C) above ambient room temperature (68°F/20°C to 77°F/25°C).
TI-1G Specifics:
- Cut-out Dimensions: 14 1/4" x 23 3/4".
- Components: One induction cooking zone, one gas burner (Semi-Rapid), control panel, power option display, power/time control keys, heat key, power button, gas burner control knob.
TI-2G Specifics:
- Cut-out Dimensions: 19 1/2" x 22".
- Components: Two induction cooking zones, two gas burners (Auxiliary and Semi-Rapid), control panel, power option display, power/time control keys, heat key, power button, left gas burner control knob, right gas burner control knob.
Gas Burner Cookware Compatibility:
- Auxiliary Burner: Pan Diameter 3.2" to 5.5"
- Semi-Rapid Burner: Pan Diameter 5.5" to 7.8"
- Rapid Burner: Pan Diameter 7.8" to 11"
- Triple Ring Burner: Pan Diameter Above 10.2"
Usage Features:
Safety Precautions:
- Hot Surface Warning: Induction surfaces remain hot after use; do not touch immediately.
- Gas Leaks: If gas is smelled, do not light any appliance, touch electrical switches, use a phone in the building. Immediately call the gas supplier from a neighbor's phone or the fire department if the supplier cannot be reached. Gas leaks cannot always be detected by smell; use a UL or CSA approved gas detector.
- Grounding: Cooktop must be properly installed and grounded by a qualified technician. Do not cut or remove the grounding prong.
- Flammable Materials: Keep the cooktop area clear of combustible materials, gasoline, and other flammable vapors/liquids. Do not store flammable materials on or near surface units.
- Space Heater Warning: Never use the appliance as a space heater to avoid carbon monoxide poisoning and overheating.
- Child Safety: Keep out of reach of children.
- Cookware Size: Adjust top burner flame size so it does not extend beyond the edge of the cooking utensil to prevent injury and ensure efficiency.
- Domestic Use: Designed and manufactured solely for domestic (household) food cooking; not suitable for non-domestic applications or commercial environments.
Installation Process:
- Qualified Installation: Installation and service must be performed by a qualified installer, service agency, or gas supplier.
- Electrical Disconnection: Always disconnect the appliance power before installation and maintenance.
- Cut-out: Cooktops are designed to be dropped into countertop openings; specific dimensions are provided for TI-1G and TI-2G models.
- Sealing: A set of tabs and a seal are provided for fitting the unit with thickness from 1/16" to 1 4/7" and sealing with adhesive on one side.
- Gas Connection: Shut off the main gas supply valve before disconnecting old cooktop and keep it off until the new hook-up is complete. Never use an old connector when installing a new cooktop.
- Burner Placement: Position the cooktop in the recess and secure it by means of brackets.
Gas Burner Operation:
- Ignition: Push and turn the knob counterclockwise to the HI position for 1-2 seconds. Hold the knob until the flame is lit by the internal igniter. If difficult to light in HI, try in LOW position.
- Re-lighting: Return the knob to OFF, then repeat the ignition process.
- Shut-off: Turn the knob clockwise to the OFF position.
- Flame Adjustment: Knob controls electric ignition, safety device, and flame level.
- Flame Regulation: The minimum flow rate must be adjusted so the flame does not go out. This involves lighting the burner, turning the knob to minimum level, adjusting a screw in the center of the shaft, and using a screwdriver to turn the screw inside the tap until the correct setting is obtained.
- Gas Flow Adjustment: Gas flow to burners is adjusted by turning the knobs. The knob's indicator line points to symbols on the panel.
- Rapid Boiling: When the knob is rotated to the maximum position, it permits rapid boiling of liquids.
- Simmering/Maintaining: Minimum position allows for simmering or maintaining boiling conditions.
- Low Position: To reduce gas flow to minimum, rotate the knob counter-clockwise to the LOW position.
- Intermediate/OFF Positions: Other intermediate operating adjustments can be achieved by positioning the indicator between the HI and LOW positions, and never between the HI and OFF position.
- Gas Supply Valves: When the range is not being used, set the gas knobs to their OFF positions and also close the gas shut-off valve placed on the main gas supply line.
Maintenance Features:
General Maintenance:
- Cleaning: Disconnect the appliance from the electrical supply before cleaning. It is advisable to clean when the appliance has cooled.
- Surface Cleaning: Avoid leaving alkaline or acidic substances (lemon juice, vinegar, etc.) on the surfaces. Use cleaning products with a chlorine or acidic base.
- Burner & Grids: Burner and grids can be removed and cleaned with appropriate detergent.
- Stainless Steel: Stainless steel can be stained if in contact with highly calcareous water or aggressive detergents (containing phosphorus). These parts should be cleaned with water and then dried well.
Burner Maintenance and Replacement:
- Correct Placement: All burner caps and burner bases should be properly installed. Check that each burner has the right size head and cap.
- Burner Head Size: Always match the burner head size to the cap size.
- Electrode Alignment: Always line up the hole in the burner head to the electrode.
- Flame Distributor & Thermocouple: Check that the burner flame distributor F and the cap C are correctly repositioned. Failure to do so can cause serious problems. Also check the electrode S & Thermocouple are clean to ensure trouble-free sparking.
- Triple Ring Burner Replacement: The triple ring burner must be correctly positioned (see fig.7); the burner rib must be entering in their ligament as shown by the arrow. The burner correctly positioned must not be able to rotate (fig.8). Then position the cap A and the ring B (fig.8).
Gas Leak Test:
- Procedure: Use pipe joint compound or wrap using pipe thread tape with Teflon around all male (external) pipe threads.
- Manual Shut-off Valve: Install a manual gas line shut-off valve in the gas line in an easily accessed location outside of the range. Make sure everyone operating the range knows where and how to shut off the gas supply to the cooktop.
Troubleshooting:
The manual includes a table for common errors and their potential solutions:
- Burner not lighting or flame is not uniform: Check if gas holes are clogged, if movable parts are mounted correctly, or if there are no draughts around the cooking surface.
- Flame does not stay lighted on safety device: Press the knob all the way in, keep the knob pressed long enough to activate the safety device, or check if gas holes are clogged in the area corresponding to the safety device.
- Burner does not remain on when set to "Low": Gas holes are not clogged, there are no draughts near the cooking surface, or the minimum has been adjusted correctly (refer to "Minimum Regulation").
- Cookware is not stable: The bottom of the cookware is perfectly flat, the cookware is centered correctly on the burner or electric hot plate, or the support grids have not been inverted.