EasyManua.ls Logo

Ultimate V3 User Manual

Ultimate V3
3 pages
To Next Page IconTo Next Page
Page #1 background imageLoading...
Page #1 background image
Ultimate V3 Mount
Assembly/use Instructions
Thank you for purchasing the Ultimate V3 Mount. I hope you will enjoy it knowing the bayonet will not affect harmonics
of your barrel. There are two different length brackets available to cover as many firearms as possible. The brackets will
mount on any picatinny rail with at least two slot sections available.
Please carefully read and understand the following assembly/use instructions. Failure to follow these and the V3 mfg
directions can result in damage to your bayonet due to bullet strikes.
NOTE: You must confirm your firearm is unloaded (mag removed, chamber empty, bolt open/removed), prior to starting
the assembly/mounting process.
What comes in the package:
1. Fully assembled bracket (including screws), ready for mounting to your V3 Chronograph bayonet and picatinny
rail section.
2. Instruction sheet.
Assembly:
1. Find and remove the 2- #10-24 screws from the “bracket head”.
2. Remove all original parts used to mount your V3 bayonet.
3. Place the V3 base on the bracket head and replace the screws. Note: feel free to use a small amount of blue
Loctite on the screws. Tighten screws to 20 Inch# Max.
Question and Answer IconNeed help?

Do you have a question about the Ultimate V3 and is the answer not in the manual?

Ultimate V3 Specifications

General IconGeneral
BrandUltimate
ModelV3
CategoryRacks & Stands
LanguageEnglish

Summary

Assembly Instructions

Bracket Screw Removal

Find and remove the 2- #10-24 screws from the "bracket head" for assembly.

Original Parts Removal

Remove all original parts previously used to mount your V3 bayonet.

Base Plate Attachment

Place the V3 base on the bracket head and replace the screws, optionally using blue Loctite.

Mounting Setup Guide

QD Bracket Attachment

Attach the QD bracket to the firearm's picatinny rail, adjusting tension with a 2.5mm allen wrench.

Barrel Spacer Placement

Position barrel spacers on your V3 and hold the unit on the barrel like the original retention strap.

Ball End Interference Check

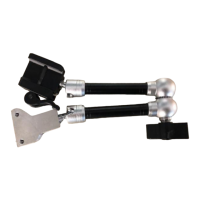
Ensure there is no interference with either "ball end" during setup.

Tension Handle Tightening

Tighten the tension handle until the teeth mesh completely, just enough to hold the assembly.

Field Installation and Use

Bayonet Alignment

Use spacer tube or dowel for proper bayonet alignment to bore, 1/8"-1/4" below bore diameter.

Final Tensioning

Tighten tension handle with medium to heavy hand pressure; do not use tools.

Assembly Removal

Release tension on QD bracket to remove the assembly and then remove spacers from the bayonet.

In-Field Mounting

Mount assembly to firearm, ensuring QD lever is tight and re-tension if necessary.

Spacer Removal Before Firing

Remove square spacer tube or dowel before loading/firing to prevent injury or equipment damage.

Troubleshooting and Support

Loss of Tension

Assembly losing tension may cause movement away from bullet path, affecting readings.

Performance Check

Regularly check tension and alignment for optimal performance.